We are fans of computer hard disks, but almost conversely, we are also fans of viewing documents online in association with email … what we like to think of as “in midair”.
Today I was with a student being sent PDF statements from a telco, and wondering about the least complicated way, in Hotmail (email with a Windows Outlook feel), to view those documents.
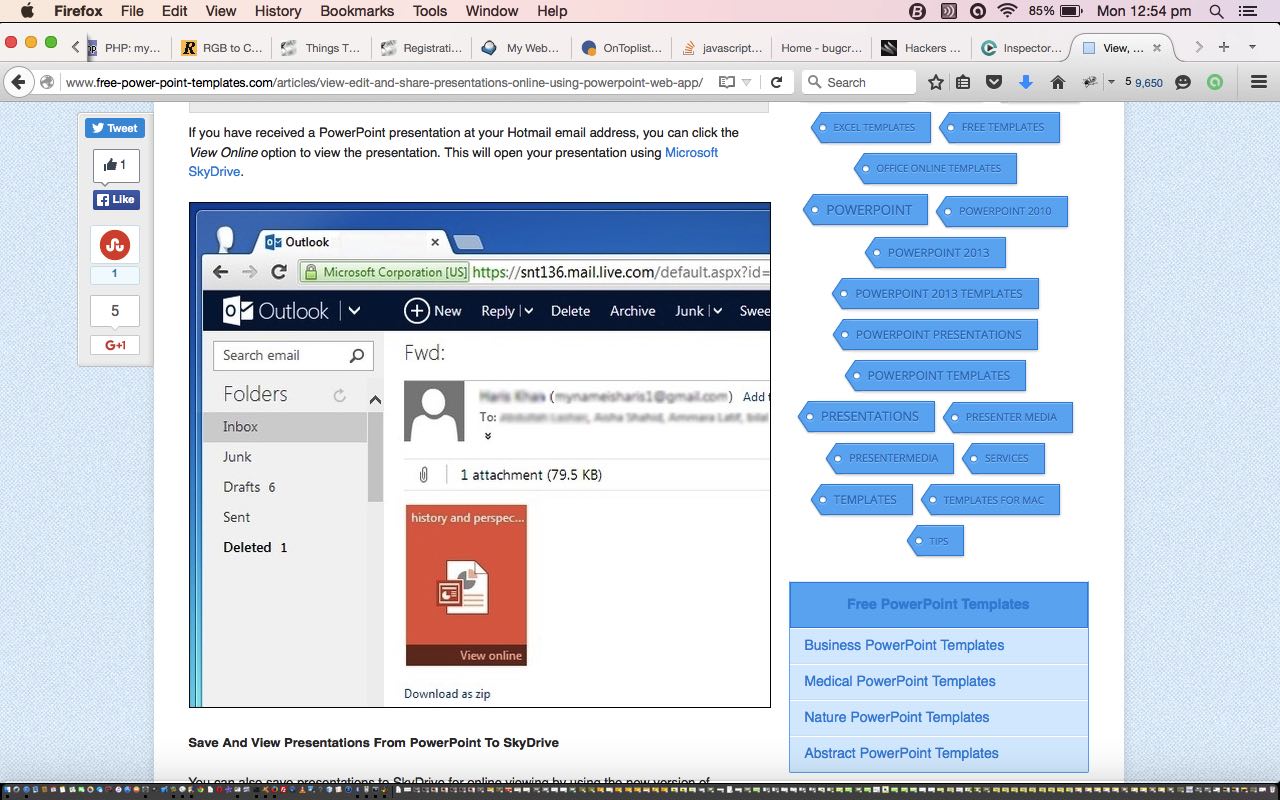
We had been trying the Hotmail “Download as zip” option because “we are fans of computer hard disks”, but it panned out to be possible, albeit far more complicated, to explain than a solution using “in midair” ideas (for which Microsoft has the useful term “collaborate for free”) facilitating the use of a “View online” menu action.
And, believe it or not, the way we got to “View online” was via double (left) clicking the Hotmail (email) attachment. Can’t remember when a double (left) click has led me to a menu in Windows. It’s probably happened, but have to say it surprised a little, because you get it in your head with a double (left) click (on a non-folder) to add in that extra time for something that requires loading something.
As the phrase “View online” would make you think, what is happening is that an online (ie. internet) method is being used to display the data you send to it “in midair”. Compare this to the ‘”Download as zip” saving to hard disk as a zip file, and then opening this zip file, and then Extracting the relevant PDF statement file from the zip file and using Windows Explorer to refind this extracted file to right-click it and “Open as” with the appropriate PDF reader you have installed’ method, and you can see the benefits of an “in midair” approach to getting things done in many email driven scenarios.
Both methods support a printing out of the aforesaid mentioned statement, so you have lost nothing going down this modern path, except if you worry about the data being “sniffed”, perhaps, in the public online world.
This same methodology can apply to other documents that are Hotmail (email) attachments, especially those with a home Windows Office application from …
- Excel – spreadsheet
- Word – documents
- PowerPoint – slideshows and presentations – as shown with today’s tutorial picture derived from the Free PowerPoint Templates website (… thanks)
If this email driven way of doing things interests you, then you may want to read Emailing Microsoft Excel Spreadsheet Primer Tutorial as a tutorial with similar themes.
Previous relevant Emailing Microsoft Excel Spreadsheet Primer Tutorial is shown below.
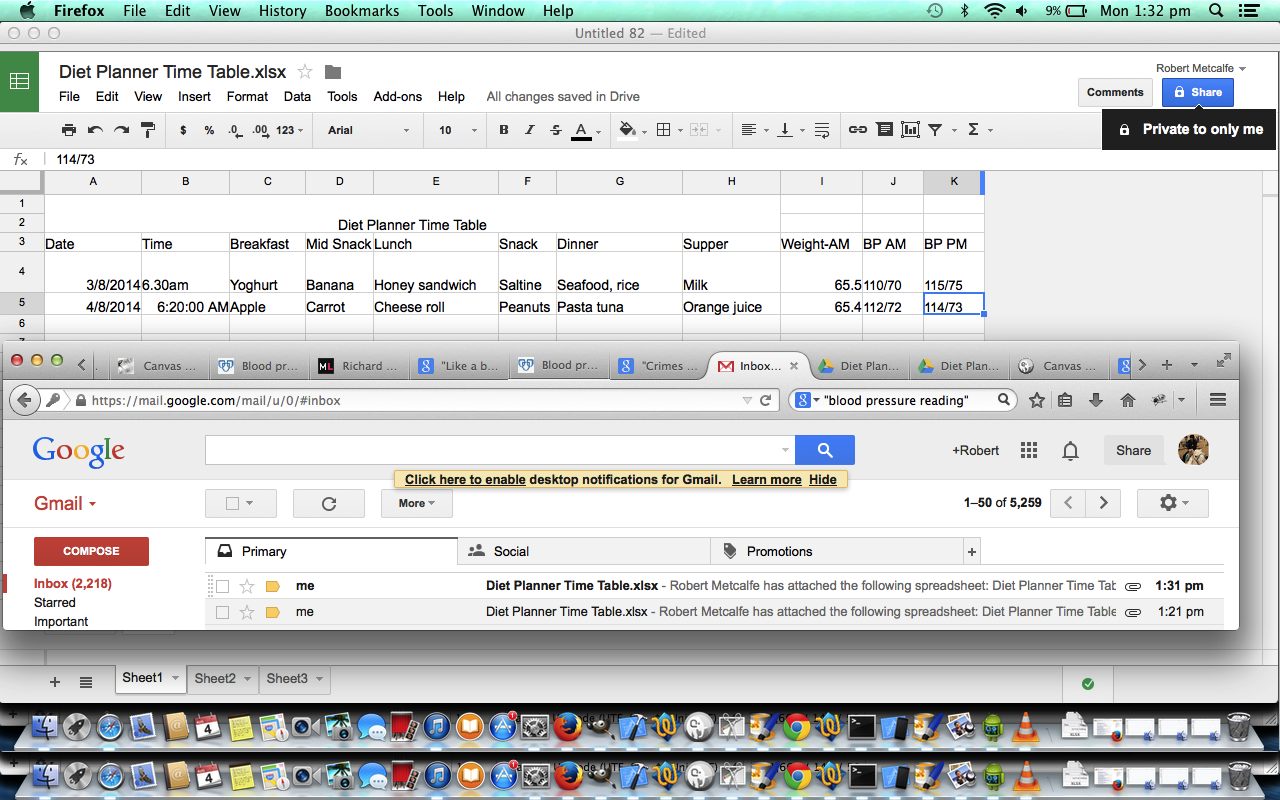
Having seen computer desktop work being overtaken by work taking place on the web, in the iCloud, in Google Docs, in dropboxes, or hosted data places, it should come as no surprise that spreadsheet work using the Microsoft Excel spreadsheet format should be able to be conducted by email (for example, Gmail) without “consciously” (ie. there are probably temporary files you can find) touching your laptop’s hard drive. Even so, this still strikes me as pretty good in that you can stay within your email application and do a whole lot of work related tasks without leaving that environment. Probably it was the use of tablets that pushed the need for such functionality, as tablets are not so keen on local storage of files.
I like to think of this as doing things in “mid-air” (or in the “ether”), but (this) is not purely correct, because, as you would expect, to restore the data before your eyes during your email session, the data more than likely came from a file on a web server, cloud server, dropbox, database or “centralized storage that is not your hard disk” … should we say. It is like “mid-air” though, in the sense that your work can hover around you as you travel, and you don’t have to use your laptop or tablet or phone to get at it at the other end (Gmail usage only relies on web browser access to the Internet).
Call me naive, but I can’t help but think that that is cute! Call me backward, perhaps, because it is probably par for the course for many people today who “Sync” their devices on a regular basis (often tablets and mobile phones).
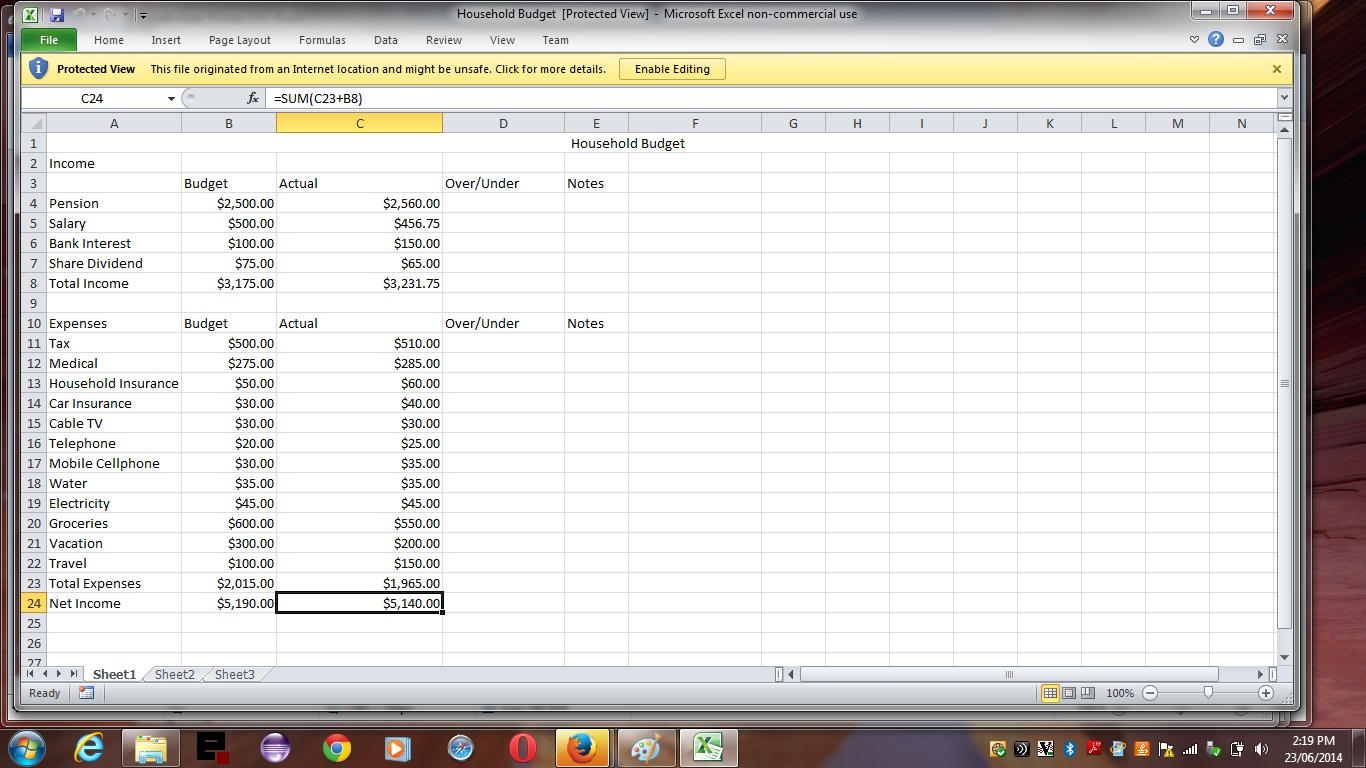
As with many good things, the progress can come at the expense of your control over data, because you hand it over, really, trusting this data is not used illegitimately, or without permission, or without your complicity or knowledge. All this, though, is not much to do with this tutorial. In this tutorial we show you a spreadsheet, created perhaps on a laptop’s hard disk, maybe a long time ago, but not needing to land back at that laptop’s hard disk, to be useful, anytime soon. So what sort of data suits such arrangements? Most obviously, a daily planner, or daily reporting arrangement, or regular anything, in the format of an Excel spreadsheet, at least, for today’s case. That (Microsoft) Excel spreadsheet functionality and usage is discussed in previous tutorial such as Microsoft Excel Spreadsheet Home Budget Tutorial below.
You may notice watching the tutorial that the spreadsheet is attached to the “mid-air” email, and that if it gets to the point where some security restriction would stop the email recipient opening an Excel spreadsheet email attachment (and some (mail servers) might (restrict such attachments), because of the concern about viruses in relation to Excel macros, for example) you can, in Gmail, send the attachment in PDF format. The other alternative could be to zip up the Excel spreadsheet and send that instead, but then you’d probably be using your laptop’s hard disk, whereas today’s scenario, in its pure sense, was trying to show that this was not necessary.
Previous relevant Microsoft Excel Spreadsheet Home Budget Tutorial is shown below.
One of the oldest topics regarding personal computers and software is the spreadsheet … the first “killer app” (read Wikipedia’s spreadsheet information and VisiCalc) that got so many people on board the enthusiastic embrace of the personal computer in the early 1980’s.
Given this history there is not much chance you’ll see anything that is “new under the sun” here, but can offer a strategy to teach yourself about spreadsheets, using Microsoft Office’s Excel application.
The first recommendation tackling spreadsheets is that you should have a plan regarding the spreadsheet before you open Excel to create a new spreadsheet style you do not create via other data sources as we showed with the previous Microsoft Excel Spreadsheet Primer Tutorial as shown below.
Another good suggestion regarding a spreadsheet design is to follow the lead of a good example in a book, and for this would recommend Computing for Seniors by Sue Price, with her Home Budget spreadsheet ideas. Just a few pages of good instructions and you are on your way to the creation of a useful and practical Home Budget spreadsheet.
Excel is part of the Microsoft Office suite of software and here is a download link.
Here is a good link for Microsoft Excel training resources at this link.
Previous relevant Microsoft Excel Spreadsheet Primer Tutorial is shown below.
One of the oldest topics regarding personal computers and software is the spreadsheet … the first “killer app” (read Wikipedia’s spreadsheet information and VisiCalc) that got so many people on board the enthusiastic embrace of the personal computer in the early 1980’s.
Given this history there is not much chance you’ll see anything that is “new under the sun” here, but can offer a strategy to teach yourself about spreadsheets, using Microsoft Office’s Excel application.
The first recommendation tackling spreadsheets is that you should have a plan regarding the spreadsheet before you open Excel to create a new spreadsheet style you do not create via other data sources.
So, for the scenario of starting from scratch with an Excel spreadsheet, that you design yourself:
- Draft out how you would like the spreadsheet to look on paper, or in soft form.
- Open Microsoft Office Excel, and use File->New to create a new Excel workbook.
- Expand the workbook, if possible, to show enough rows for the complete view of a spreadsheet page of interest.
- If a heading is to straddle more than one cell, drag the cursor to cover these cells and use the multiple cell icon (“Merge and Centre” icon) to allow the entry to be centred within those multiple cells.
- Finish the heading rows and column wording. We don’t do it, but you may want these headings to be made with a bold font. We don’t do it, but you may want to consider borders and shading adjustments to your spreadsheet here at this point, also. Bear in mind that the top left cell is a cell that can highlight your whole workbook should this formatting be best applied to the whole spreadsheet.
- Visit each column header cell and use the “$” icon for currency columns (eg. (Unit) Cost and (Unit) Price columns) and the right justify icon for other numerical columns (eg. Quantity).
- Place any totalling header cell wording in other areas of the spreadsheet page.
- Enter the first line of data, noting along the row that the format of the cells make sense.
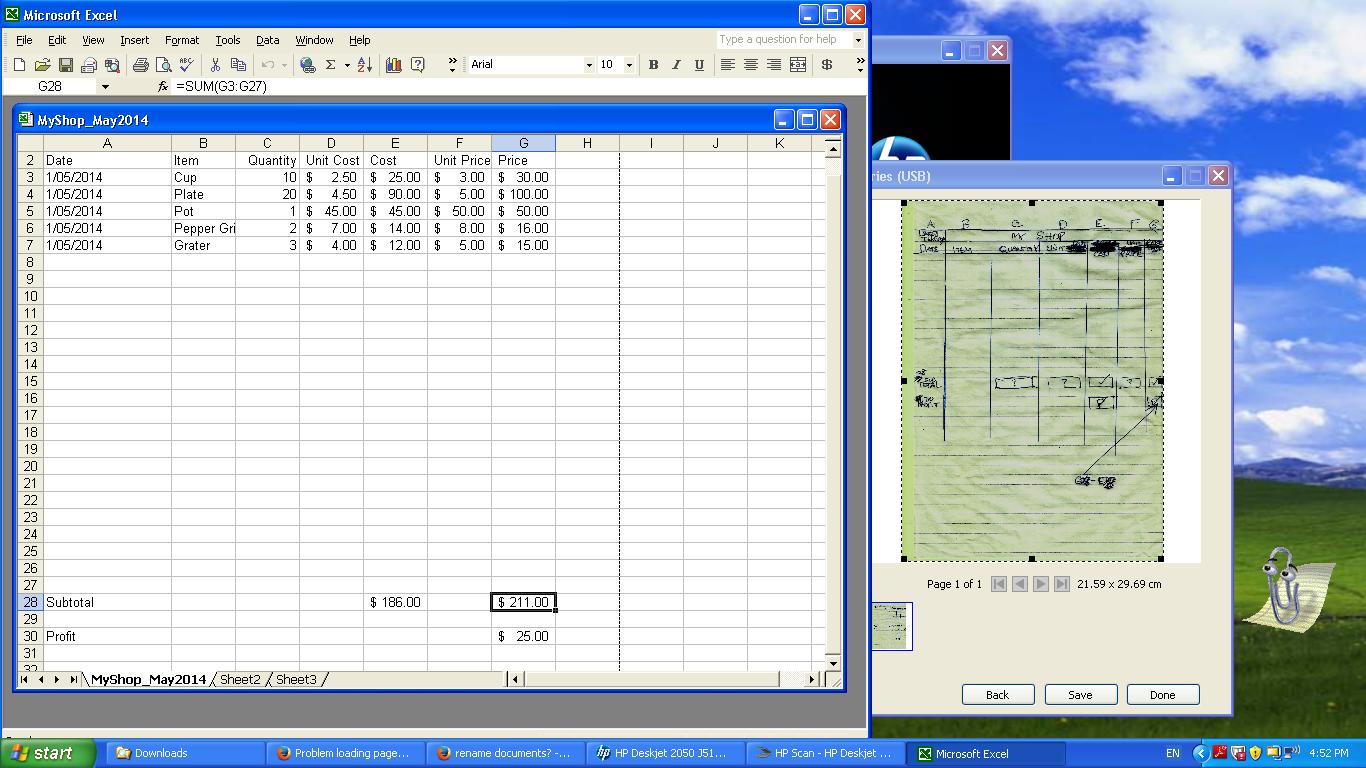
- For each of the totalling cells, click on that cell and hit the ∑ “sum of” icon, place the cursor to the right of the entry textbox and hit the Enter key. We did this for the ∑ “sum of” Cost and the ∑ “sum of” Price.
- If there is another level of totalling, as we have here with the “Profit” cell, hit the cell, hit the ∑ “sum of” icon to prime it with a formula and amend (in our case the formula ends up as “=(G28-E28)” (ie. profit = ∑ “sum of” Price minus ∑ “sum of” Cost)).
- Get all this correct and from then on, further data entries can be made and these totalling cells will be automatically updated.
- Once happy with all your data entered, use File->Save As to save the spreadsheet file to whichever format you wish (see today’s tutorial data as xls and csv and htm).
Please take a look at a session (on Windows, but please note you can get Mac versions of Excel as well) of doing the steps above on our MyShop_May2014 spreadsheet. One practical way to improve and streamline the practical use of this spreadsheet of this tutorial, would be to apply formulae to the Cost and Price columns, because by the time these are reached with your data entry you could formularize the Cost as Quantity x Unit Cost and formularize the Price as Quantity x Unit Price.
Excel is part of the Microsoft Office suite of software and here is a download link.
Here is a good link for Microsoft Excel training resources at this link.
If this was interesting you may be interested in this too.
If this was interesting you may be interested in this too.
If this was interesting you may be interested in this too.
If this was interesting you may be interested in this too.


22 Responses to Windows View Online via Hotmail Primer Tutorial