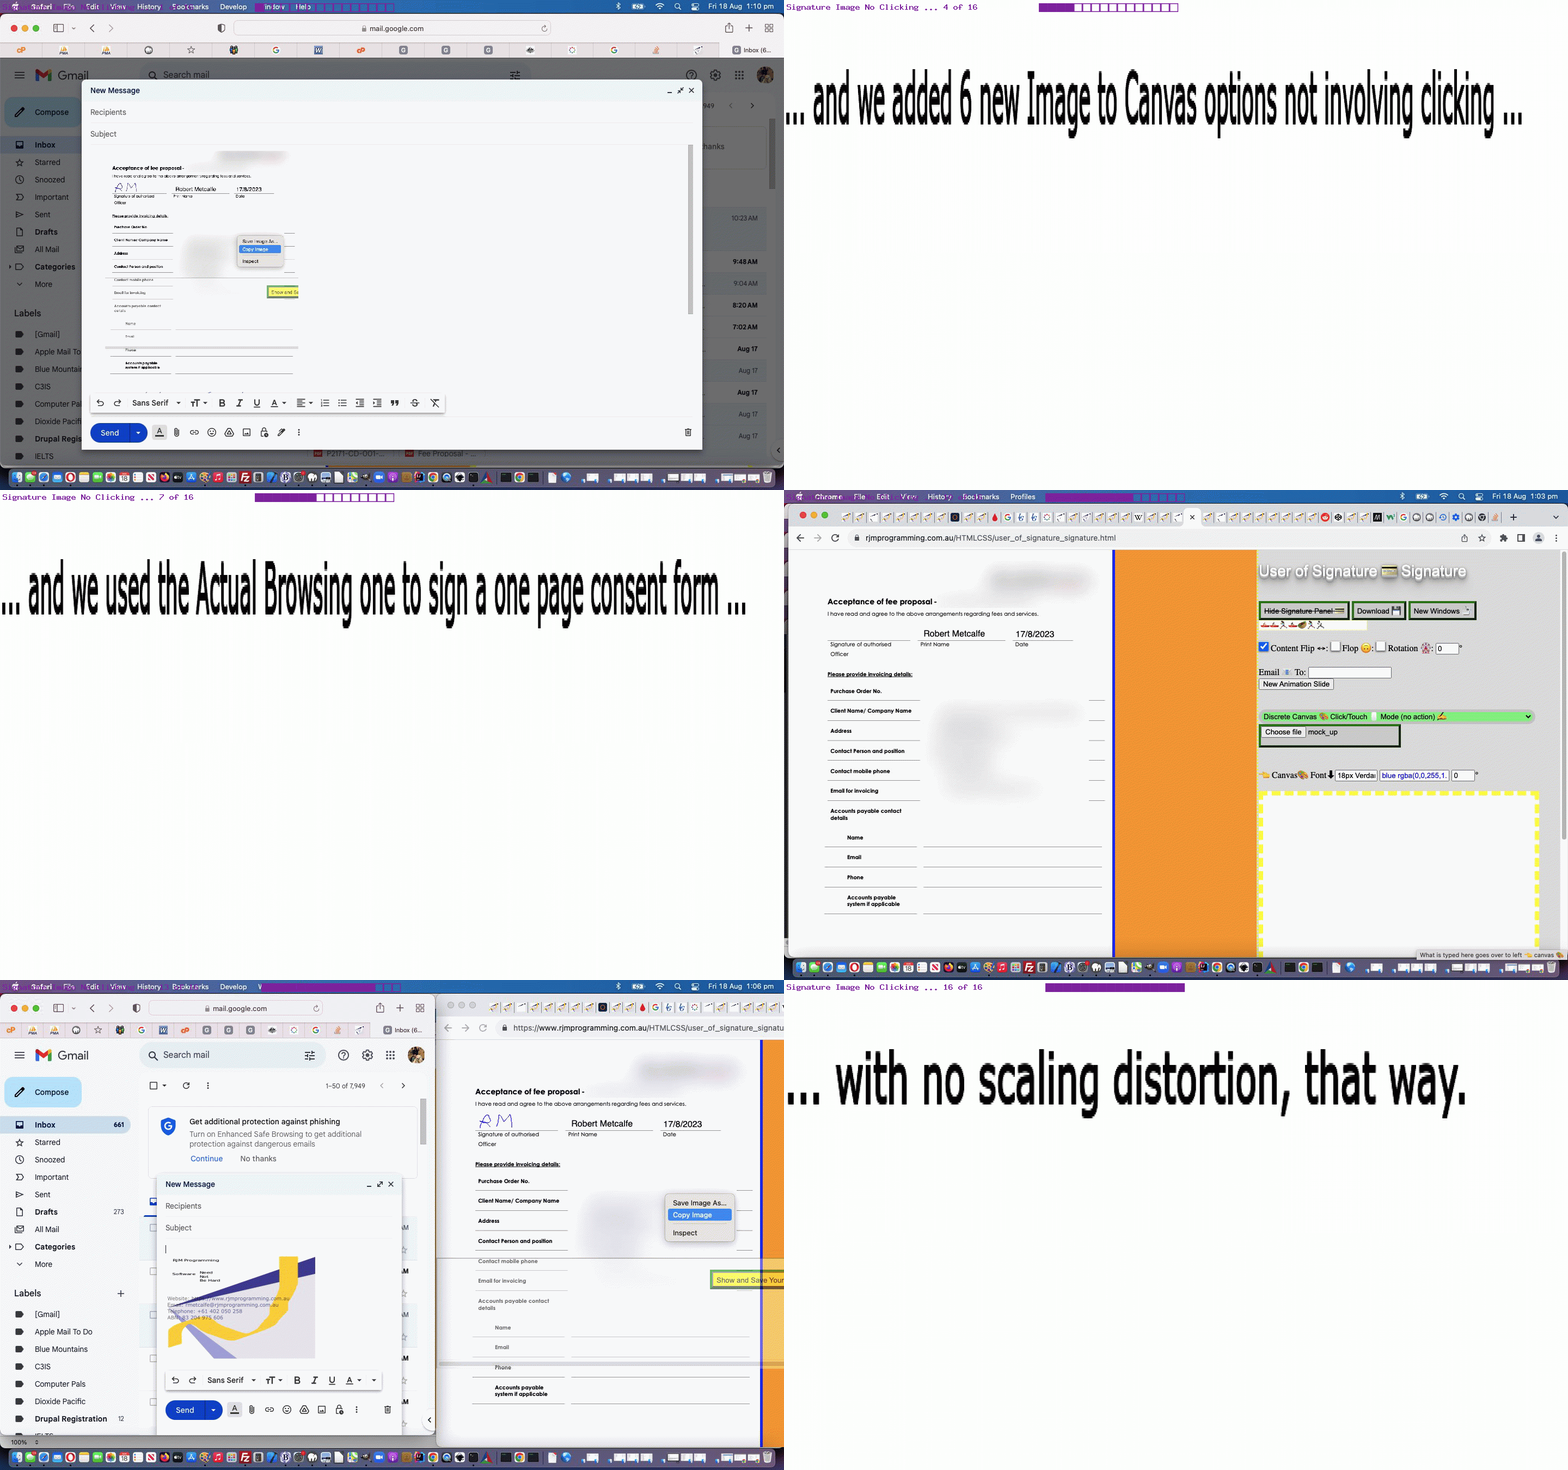
Surprisingly, it’s been more than a year since we changed anything to do with our …
- canvas based …
- images and annotation … accepting …
- scribble (ie. can handle signatures) … perhaps …
- form filling helping web application
… (when we presented Canvas Graphics Editing in Zoomed Webpage Tutorial) and we found that in order to add six more such Annotation option helpers into the mix …
| Image Input Mode | Image Sizing Modus Operandi |
|---|---|
| URL | Actual (canvas resized to image) |
| Contain (canvas) | |
| Cover (canvas) | |
| Browsing | Actual (canvas resized to image) |
| Contain (canvas) | |
| Cover (canvas) |
… we only needed to change the external Javascript signature_signature.js code used by our signature use in canvas supervisory web application so that when you can not ask so much of the user regarding image scaling, and avoid any canvas clicking that way, offering these six new annotation functionality options.
Previous relevant Canvas Graphics Editing in Zoomed Webpage Tutorial is shown below.
Software integration can be useful for a number of reasons …
- code reuse
- modularisation of functionality … and in our case …
- if you like coding via “intervention points” you will enjoy coding for software integration improvements
As you might imagine it is easier in terms of the fact you can change “both ends” of the software integration, if it is “inhouse”, and luckily, today, our software integration is “inhouse”.
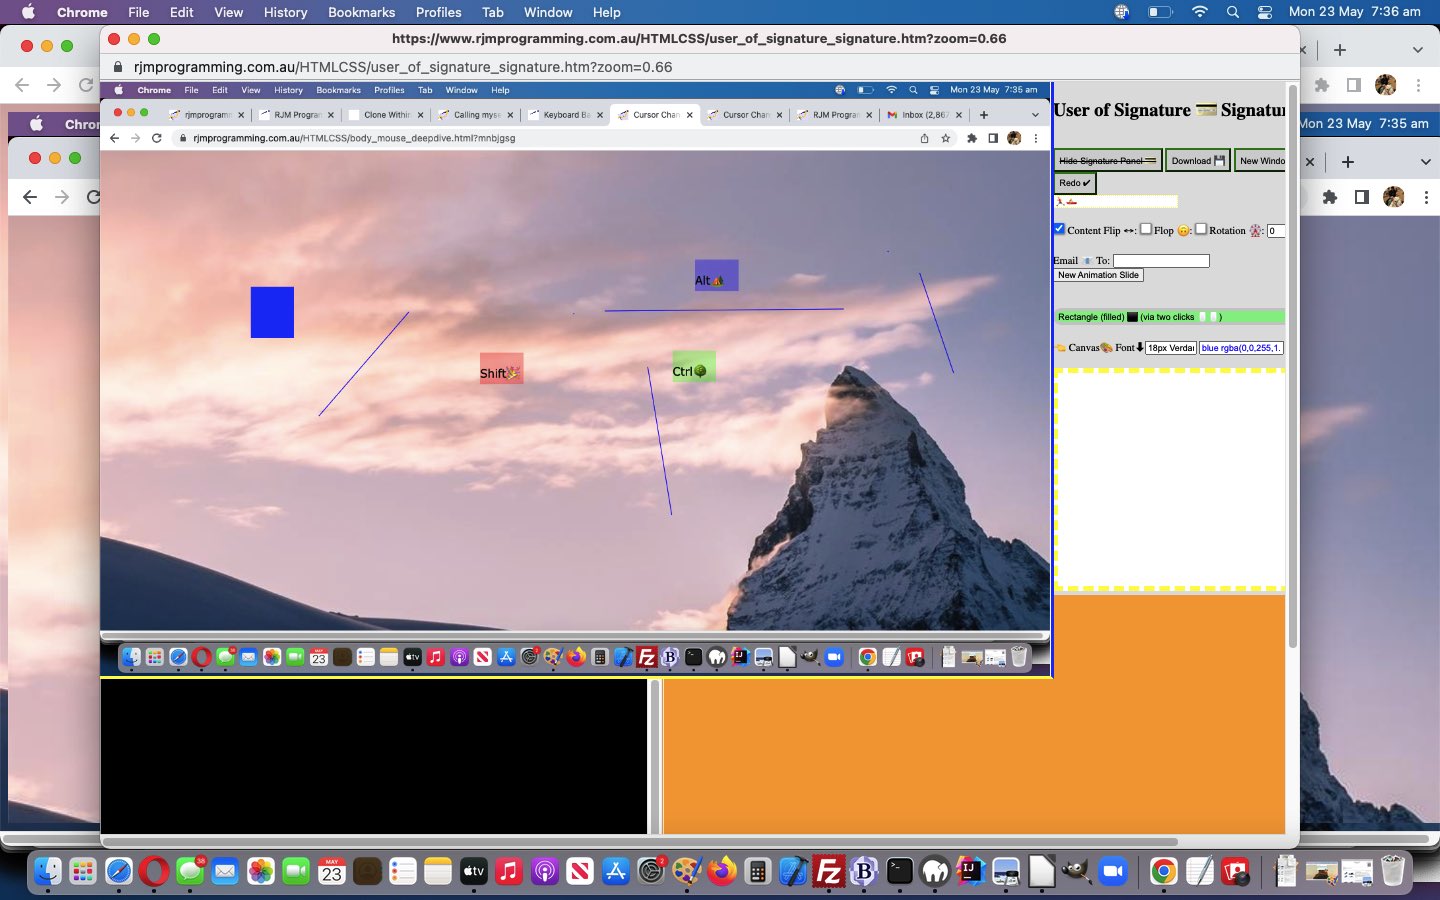
When we presented the recent Keyboard Based Cursor Canvas Content Copy Tutorial it focussed our attention on an improvement we could make to that user_of_signature_signature.htm canvas image editing web application. We wanted to offer the software integration with this web application to be able to successfully handle a webpage that has been zoomed to zoom factor different to 1.0 (or 100%).
We noticed before today’s very simple changes to external Javascript signature_signature.js code, graphic positioning on the canvas was wrong when the webpage had a zoom factor that is not 1.
Applying the canvas co-ordinate references through “the lens of” Javascript function zmb below …
var zzfac=location.search.split('zoom=')[1] ? decodeURIComponent(location.search.split('zoom=')[1].split('&')[0]) : "";

if (('' + location.hash).indexOf('zoom=') != -1) {    zzfac=decodeURIComponent(('' + location.hash).split('zoom=')[1].split(';')[0]);   }


 function zmb(inco) {

   if (zzfac != '') {

     if (zzfac.indexOf('%') != -1) {

       return eval(eval(eval('' + inco) / eval('' + zzfac.replace('%', ''))) * 100.0);

     } else {

       return eval(eval('' + inco) / eval('' + zzfac));

     }

   }

   return inco;

 }
… used in the following example code below …
    topelem.addEventListener('mousedown', function(event) {

       if (topin) {

         topin.value='- -' + isScribble + ',' + lastx + ',' + lasty + ',' + x + ',' + y;

       }

       if (isScribble == 1) {

          threebackpmore=twobackpmore;  twobackpmore=lastpmore; lastpmore=pmore;   pmore=' pxam1 ';

        isScribble=2;

       if (event.pageX || event.pageY) {

        ppx=zmb(event.pageX) - elemLeft;

        ppy=zmb(event.pageY) - elemTop;

       } else {

        ppx=zmb(event.clientX) - elemLeft;

        ppy=zmb(event.clientY) - elemTop;

       }

       if (pdgebi(topdcmcheck('dcm'))) {

       if (parent.document.getElementById(topdcmcheck('dcm')).value.indexOf('text') == 0) {

       //parent.document.title='here3 ' + tx + ',' + ty;

       if (1 == 2 && tlx < 0 && tly < 0) {

       tlx=ppx;

       tly=ppy;

       }

       if (tx >= 0 && ty >= 0) {

       prevtx=tx;

       prevty=ty;

       trotis=eval(((Math.atan2((ppy - prevty), (ppx - prevtx)) * 180.0 / Math.PI) + 360) % 360);

       if (pdgebi('trotation')) {

         if (parent.document.getElementById(topdcmcheck('dcm')).value.indexOf('textseq') == 0) {

         jsrectbits[0]=prevtx;

         jsrectbits[1]=prevty;

         jsrectbits[2]=ppx;

         jsrectbits[3]=ppy;

         if (Math.abs(prevty - ppy) > Math.abs(prevtx - ppx)) {

         trotis=eval(((Math.atan2((prevtx - ppx), (ppy - prevty)) * 180.0 / Math.PI) + 360) % 360);

         }

         }

         parent.document.getElementById('trotation').value=Math.floor(trotis);

         ppx=prevtx;

         ppy=prevty;

         prevtx=-1;

         prevty=-1;

         exceptwhen=endtrue(''); //true;

         if (parent.document.getElementById(topdcmcheck('dcm')).value.indexOf('textseq') == -1) parent.document.getElementById(topdcmcheck('dcm')).value = 'Text';

       }

       //alert(trotis);

       }

       tx=ppx;

       ty=ppy;

       } else {

       tx=ppx;

       ty=ppy;

       prevtx=-1;

       prevty=-1;

       }

       } else {

       tx=ppx;

       ty=ppy;

       prevtx=-1;

       prevty=-1;

       }

        lastx=0;  // new to scribble

        lasty=0;

        x=0;

        y=0;

       }

    });
… we now have reasonable graphic positioning for the canvas when its webpage window has a non 1.0 zoom factor applied.
Previous relevant Keyboard Based Cursor Canvas Content Copy Tutorial is shown below.
You may have noticed with yesterday’s Keyboard Based Cursor Share Content Copy Tutorial, crucial to the sharing code, was the use of the incredible HTML5 introduced canvas element, helped by that middleperson link to those public email and SMS sharing conduits, overseeing the great random Lorem Picsum background images and user created emoji and/or text initial annotations.
And this got us wondering whether there was a private (ie. inhouse) web application of the past that could further value add as another optional middleperson tool for (user) personalization (of the content) purposes. And yes, do you remember the canvas work involved in the featured web application of Emoji Borders and Backgrounds Canvas Annotation Tutorial?
It uses an interesting approach with the transference of data across from a canvas in one application to the canvas in that user_of_signature_signature.htm web application. Once our changed body_mouse_deepdive.html‘s “parent” web application has organized its canvas contents, it’s just a matter of …
  var awo=null;

  awo=window.open('./user_of_signature_signature.htm','_blank','top=100,left=100,width=800,height=800');
for the “child” canvas annotator to effectively “suck up” the canvas data into its canvas via …
var cancont='';

var elemode=location.search.split('elemode=')[1] ? (location.search.split('elemode=')[1].split('&')[0]) : "canvas";


if (('' + window.opener).replace('null','') != '') {

    var cans=window.opener.document.getElementsByTagName(elemode);

    if (cans.length > 0) {

      if (elemode == 'img') {

      cancont=cans[0].src;

      } else {

      cancont=cans[0].toDataURL('image/png');

      }

      if (cancontw < 0 && canconth < 0) {
      cancontw=cans[0].width;
      canconth=cans[0].height;
      }
    }
}
... possible because both "parent" and "child" exist on the same RJM Programming domain (web server).
Once there, another woooooorrrrrlllddd of image manipulations, via canvas, can await the user, perhaps ready for ongoing sharing possibilities with that "child".
Previous relevant Keyboard Based Cursor Share Content Copy Tutorial is shown below.
Yesterday's Keyboard Based Cursor Personalized Content Copy Tutorial has probably reached a point where some sharing mechanism is apt, for accountability and usefulness purposes, at the very least, regarding our recent web application allowing for foreground content on top of a random Lorem Picsum background image.
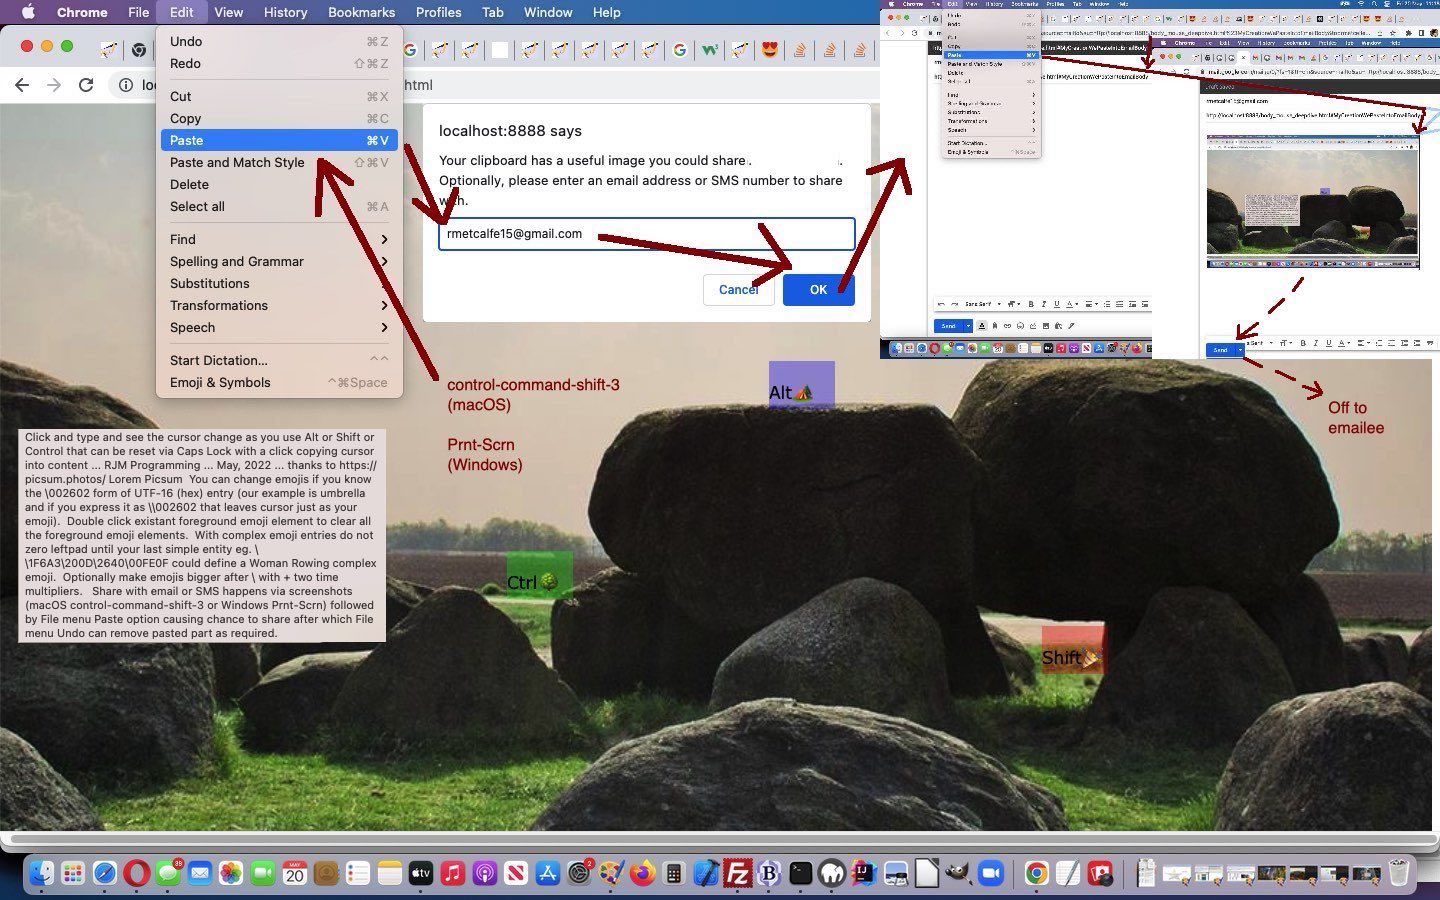
We've been helped out greatly by javascript - Can I take a screenshot from the clipboard? - Stack Overflow and html - How to render a blob on a canvas element? - Stack Overflow in the following new relevant Javascript code ...
function renderNoImage(canvas, blob) {  // thanks to https://stackoverflow.com/questions/38004917/how-to-render-a-blob-on-a-canvas-element

  const ctx = canvas.getContext('2d');

  const img = new Image();

  img.onload = (event) => {

    URL.revokeObjectURL(event.target.src) //  This is important. If you are not using the blob, you should release it if you don't want to reuse it. It's good for memory.

    ctx.drawImage(event.target, 0, 0)

  img.style.display='none';

  img.style.zIndex='-123';

  };

  img.src = URL.createObjectURL(blob);

}


function renderImage(canvas, blob) {  // thanks to https://stackoverflow.com/questions/38004917/how-to-render-a-blob-on-a-canvas-element

  const ctx = canvas.getContext('2d');

  const img = new Image();

  img.onload = (event) => {

    URL.revokeObjectURL(event.target.src) //  This is important. If you are not using the blob, you should release it if you don't want to reuse it. It's good for memory.

    ctx.drawImage(event.target, 0, 0)

  };

  img.src = URL.createObjectURL(blob);

}


  addEventListener("paste", ev => { // thanks to https://stackoverflow.com/questions/55559432/can-i-take-a-screenshot-from-the-clipboard

    for(const item of ev.clipboardData.items) { /// Clipboard may contain multiple elements of different type -- text, image, etc

        if(item.type.startsWith("image/")) { /// We are only interested in clipboard data that is an image

            if (emailee == '') {

            emailee=prompt('Your clipboard has a useful image you could share the image with.  Optionally, please enter an email address or SMS number to share with.');

            if (emailee == null) { emailee=''; }

            }

            if (emailee.indexOf('@') != -1) {

            document.getElementById('mydiv').style.overflow='scroll';

            document.getElementById('mycanvas').innerHTML='<br><canvas style="position:absolute;z-index:98;top:0px;left:0px;" id=thecanvas width=' + screen.width + ' height=' + screen.height + '></canvas>';

            elem=document.getElementById('thecanvas');

            context=elem.getContext('2d');

            renderImage(elem, item.getAsFile()); //context.drawImage(item.getAsFile(), 0, 0);

            document.getElementById('aemail').href=document.getElementById('aemail').href.replace(':?', ':' + emailee + '?');

            document.getElementById('aemail').click();

            document.getElementById('mycanvas').innerHTML='';

            } else if (emailee != '' && emailee.replace(/0/g,'').replace(/1/g,'').replace(/2/g,'').replace(/3/g,'').replace(/4/g,'').replace(/5/g,'').replace(/6/g,'').replace(/7/g,'').replace(/8/g,'').replace(/9/g,'') == '') {

            document.getElementById('mydiv').style.overflow='scroll';

            document.getElementById('mycanvas').innerHTML='<br><canvas style="position:absolute;z-index:98;top:0px;left:0px;" id=thecanvas width=' + screen.width + ' height=' + screen.height + '></canvas>';

            elem=document.getElementById('thecanvas');

            context=elem.getContext('2d');

            renderImage(elem, item.getAsFile()); //context.drawImage(item.getAsFile(), 0, 0);

            document.getElementById('asms').href=document.getElementById('asms').href.replace(':&', ':' + emailee + '&');

            document.getElementById('asms').click();

            document.getElementById('mycanvas').innerHTML='';

            } else {

            //document.getElementById('mydiv').style.overflow='scroll';

            document.getElementById('mycanvas').innerHTML='<br><canvas style="display:none;position:absolute;z-index:-98;top:0px;left:0px;" id=thecanvas width=' + screen.width + ' height=' + screen.height + '></canvas>';

            elem=document.getElementById('thecanvas');

            context=elem.getContext('2d');

            renderNoImage(elem, item.getAsFile()); //context.drawImage(item.getAsFile(), 0, 0);

            document.getElementById('mycanvas').innerHTML='';

            }

        }

    }

});
... which is explained to the user in the following way ...
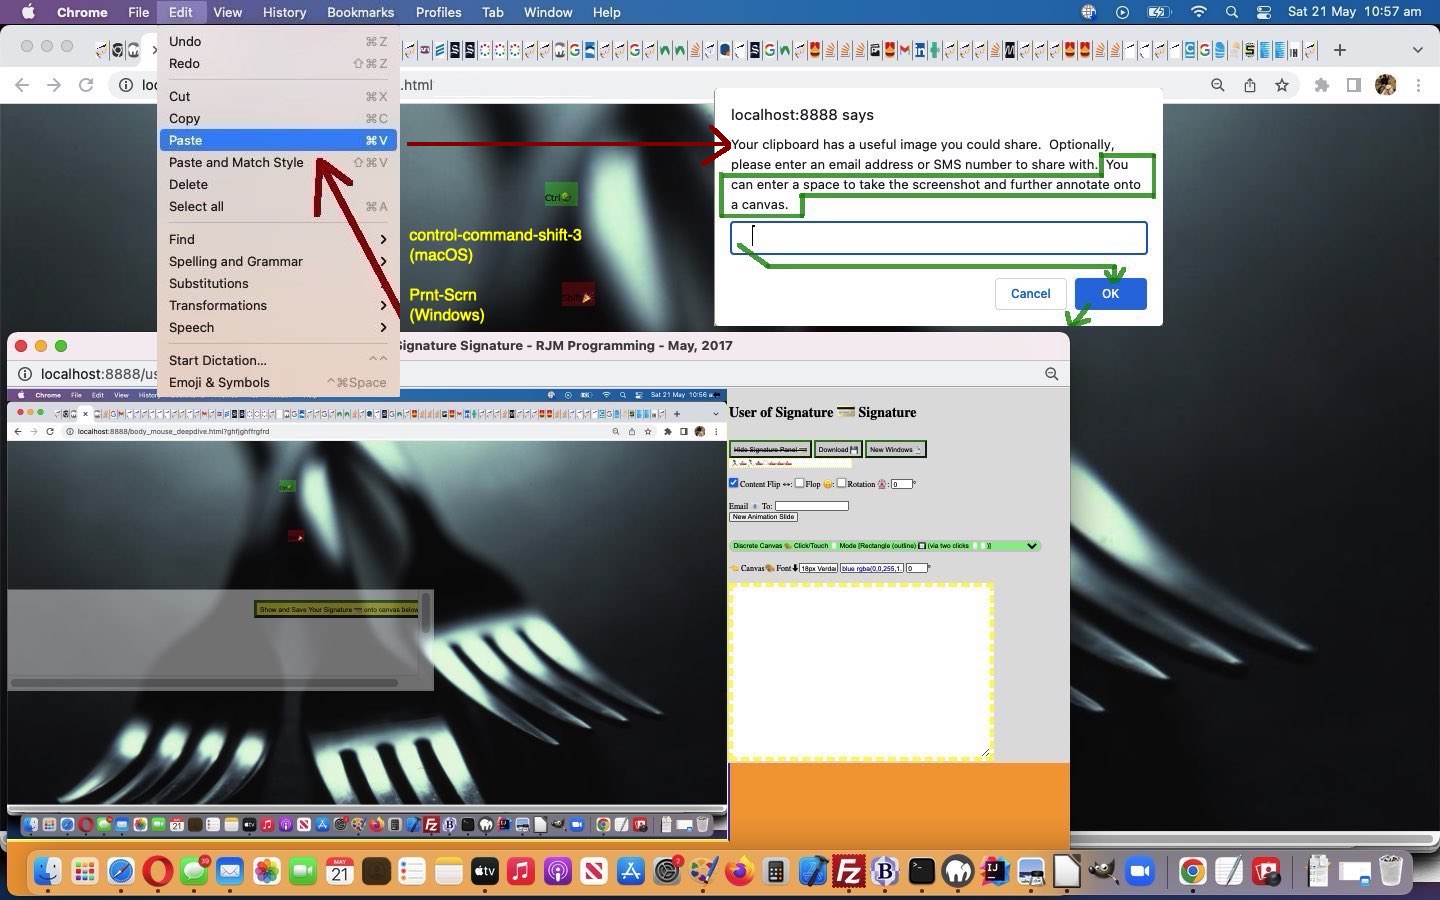
Share with email or SMS happens via screenshots (macOS control-command-shift-3 or Windows Prnt-Scrn) followed by File menu Paste option causing chance to share after which File menu Undo can remove pasted part as required.
... in the changed "proof of concept" body_mouse_deepdive.html live run.
Previous relevant Keyboard Based Cursor Personalized Content Copy Tutorial is shown below.
On top of yesterday's Keyboard Based Cursor Content Copy Tutorial we wanted to offer the user the chance for them to tailor their foreground content on top of the Lorem Picsum background image.
The user can enter this via the keyboard because there is an HTML div contenteditable=true pallette to work with ...
<div id=mydiv onfocus='setTimeout(alte, 1000);' ondblclick="this.innerHTML='';" onclick='stamp(event);' title='Click and type and see the cursor change as you use Alt or Shift or Control that can be reset via Caps Lock with a click copying cursor into content ... RJM Programming ... May, 2022 ... thanks to https://picsum.photos/ Lorem Picsum You can change emojis if you know the \002602 form of UTF-16 (hex) entry (our example is umbrella and if you express it as \\002602 that leaves cursor just as your emoji). Double click existant foreground emoji element to clear all the foreground emoji elements.' spellcheck='false' contenteditable=true style='width:100vw;height:100%;color:transparent;text-color:transparent;' onkeypress=kpcursorlook(event); onkeydown=cursorlook(event); onmousemove=xycursorlook(event); ontouchmove=xycursorlook(event);></div>
It's "title" attribute now talks about two new pieces of functionality, those being ...
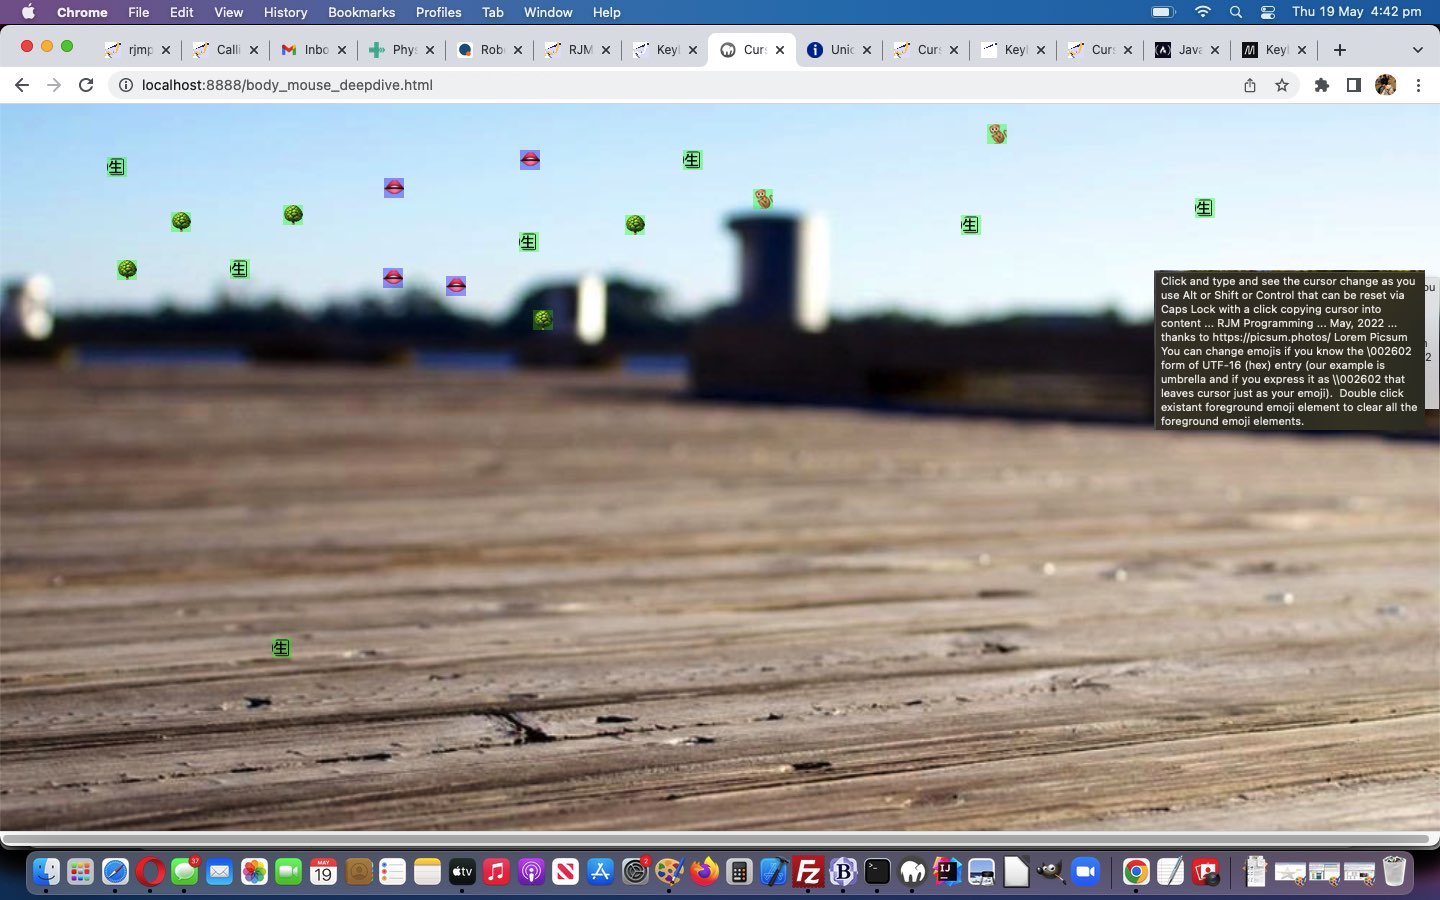
- You can change emojis if you know the \002602 form of UTF-16 (hex) entry (our example is umbrella and if you express it as \\002602 that leaves cursor just as your emoji).
- Double click existant foreground emoji element to clear all the foreground emoji elements.
The choice of keyboard input methodology also suits CSS "content" property definitions as one backslash followed by a hexidecimal value left padded with zeroes to a length of six. See us doing this below for an umbrella emoji (which could also be expressed in an HTML hexadecimal entity way ☂ ☂ the information for which you can find at Unicode Character 'UMBRELLA' (U+2602) we normally get to by entering "U+2602" at a web browser address bar, the knowledge for which we arrive at via entering "umbrella emojipedia" and moving down the top link's webpage to find the "U+2602") ...
<style> #myumbrella::after { content: '\002602'; } </style>
... that feeds into some new "onkeypress" keyboard event logic ...
  function kpcursorlook(evt) {

    var atofa=['a','b','c','d','e','f'];

    var rgbit='';

    if (evt.keyCode == 92) {

     if (newu.length == 1) { gro=true; } else { gro=false; }

     newu=("\\").substring(0,1);

    } else if (evt.keyCode >= 48 && evt.keyCode <= 57) {

     newu+=('' + eval(-48 + evt.keyCode));

    } else if (evt.keyCode >= 65 && evt.keyCode <= 70) {

     newu+=('' + atofa[eval(-65 + evt.keyCode)]);

    } else if (evt.keyCode >= 97 && evt.keyCode <= 102) {

     newu+=('' + atofa[eval(-97 + evt.keyCode)]);

    }

    if (newu.length == 7) {

     if (lastcursor.indexOf(("\\\\").substring(0,2)) != -1) {

       rgbit=lastcursor.split(("\\\\").substring(0,2))[1].substring(6);

       lastcursor=lastcursor.split(("\\\\").substring(0,2))[0] + ("\\").substring(0,1) + newu + rgbit;

       document.head.innerHTML+='<style> html {  cursor: ' + lastcursor + '; } </style>';

     } else if (lastcursor.indexOf(("\\").substring(0,1)) != -1) {

       rgbit=lastcursor.split(("\\").substring(0,1))[1].substring(6);

       lastcursor=lastcursor.split(("\\").substring(0,1))[0] + newu + rgbit;

       if (gro) {

         lastcursor=lastcursor.replace('>Shift/Alt/Ctrl', '>').replace('>Shift', '>').replace('>Alt', '>').replace('>Ctrl', '>').replace(" width='126'", " width='20'").replace(" width='66'", " width='20'").replace(" height='48'", " height='20'").replace('0 0 100 100', '0 0 20 20');

       }

       document.head.innerHTML+='<style> html {  cursor: ' + lastcursor + '; } </style>';

     }

    }

   // console.log(evt.keyCode);

  }
... in the changed "proof of concept" body_mouse_deepdive.html live run.
Stop Press
Two more "title" attribute pieces of functionality are now ...
- With complex emoji entries do not zero leftpad until your last simple entity eg. \\1F6A3\200D\2640\00FE0F could define a Woman Rowing complex emoji.
- Optionally make emojis bigger after \ with + two time multipliers.
The choice of keyboard input methodology also suits CSS "content" property definitions as one backslash followed by "first off" sets of HTML entities they should not left zero pad in their entry, followed by a last HTML entity hexidecimal value left padded with zeroes to a length of six to finish up with. See us doing this below for a woman rowing emoji (which could also be expressed in an HTML hexadecimal entity way 🚣‍♀️ the information for which you can find at 🚣♀️ Woman Rowing Boat Emoji we normally get to by entering "woman rowing emoji" at the web browser address bar) ...
<style> #myrowing::after { content: '\01f6a3\00200d\002640\00fe0f'; } </style>
... in the changed "proof of concept" body_mouse_deepdive.html live run.

Previous relevant Keyboard Based Cursor Content Copy Tutorial is shown below.
The "onkeydown" keyboard event can involve in its logic three mouse event (event object) property usages that caught our interest recently ...
... and we wanted to have "keyboard" meets "mouse" events, along with the brilliance of Lorem Picsum regarding background image randomosity and quality, working with HTML ...
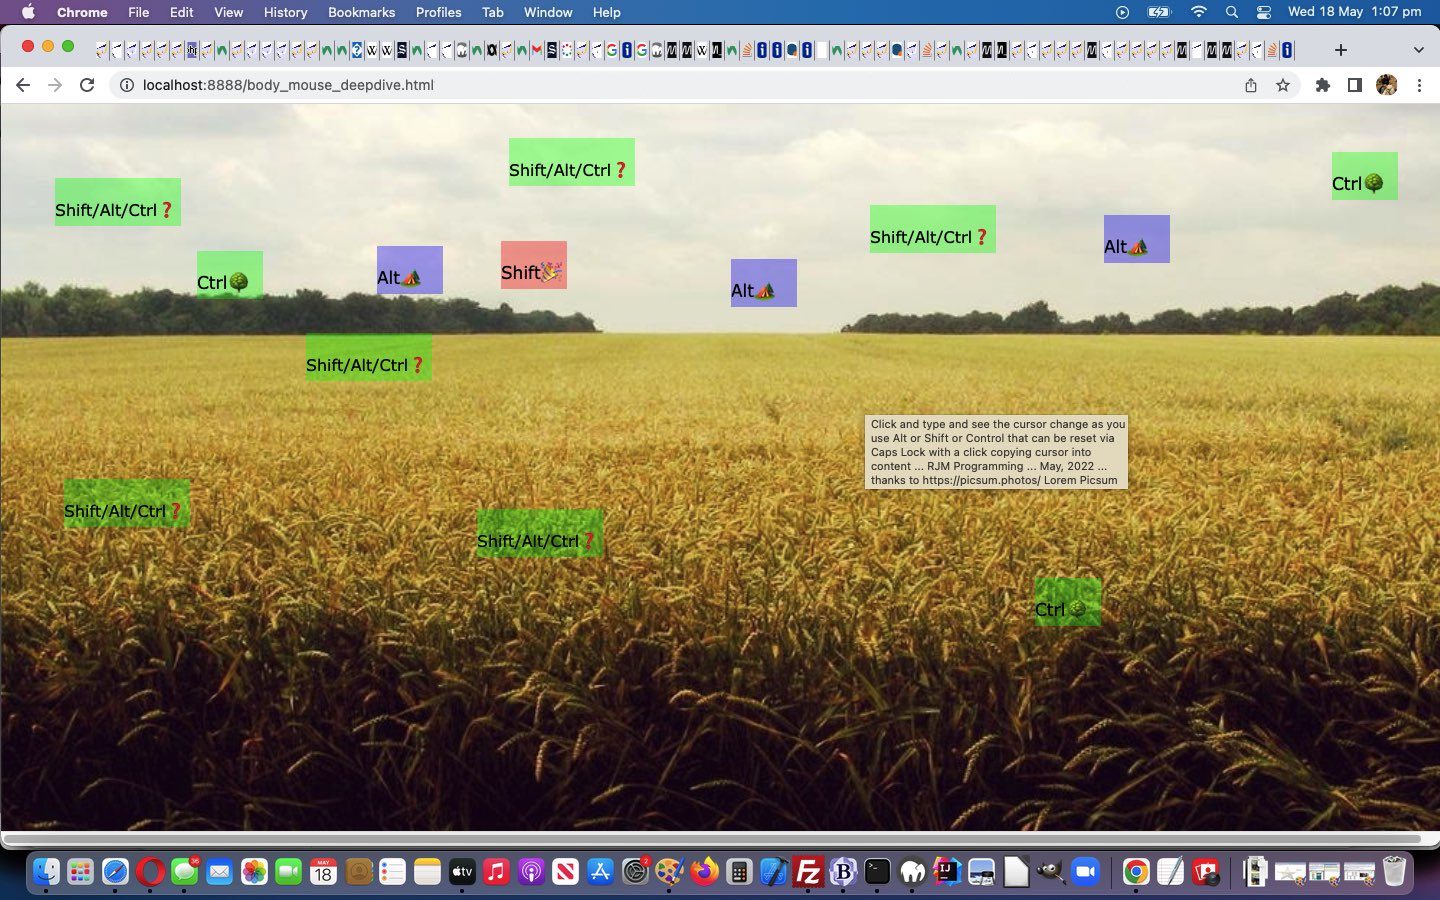
<div id=mydiv onfocus='setTimeout(alte, 1000);' onclick='stamp(this);' title='Click and type and see the cursor change as you use Alt or Shift or Control that can be reset via Caps Lock with a click copying cursor into content ... RJM Programming ... May, 2022 ... thanks to https://picsum.photos/ Lorem Picsum' spellcheck='false' contenteditable=true style='width:100vw;height:100%;color:transparent;text-color:transparent;' data-onkeypress=xycursorlook(event); onkeydown=cursorlook(event); onmousemove=xycursorlook(event); ontouchmove=xycursorlook(event);></div>
... in a way we hadn't tried before that called on some inhouse cursor SVG creations (and so is, alas, just a non-mobile fully featured experience), in the sense that ...
- keyboard helps creating the "what" regarding content ...
<script type='text/javascript'>

  var lastkeymodifier=''

  var lastcursor="Url(\"data:image/svg+xml;utf8,<svg xmlns='http://www.w3.org/2000/svg' width='126' height='48' viewport='0 0 100 100' style='border-radius:15px;background-color:rgba(0,255,0,0.3);fill:black;font-family:Verdana;font-size:16px;'><text y='80%'>Shift/Alt/Ctrl\\002753</text></svg>\") 16 0, crosshair";

  var pos3=-1, pos4=-1;

  var subdiv=1;

  var lastpos3=-2, lastpos4=-1;

  var allowable=false;


  function cursorlook(evt) {

    if (evt.altKey) {

      if (lastkeymodifier != 'alt') {

        lastcursor="Url(\"data:image/svg+xml;utf8,<svg xmlns='http://www.w3.org/2000/svg' width='66' height='48' viewport='0 0 100 100' style='border-radius:15px;background-color:rgba(0,0,255,0.3);fill:black;font-family:Verdana;font-size:17px;'><text y='80%'>Alt\\01f3d5</text></svg>\") 16 0, progress";

        document.head.innerHTML+='<style> html {  cursor: ' + lastcursor + '; } </style>';

        lastkeymodifier='alt';

      }

    } else if (evt.ctrlKey) {

      if (lastkeymodifier != 'ctrl') {

        lastcursor="Url(\"data:image/svg+xml;utf8,<svg xmlns='http://www.w3.org/2000/svg' width='66' height='48' viewport='0 0 100 100' style='border-radius:15px;background-color:rgba(0,255,0,0.3);fill:black;font-family:Verdana;font-size:17px;'><text y='80%'>Ctrl\\01f333</text></svg>\") 16 0, pointer";

        document.head.innerHTML+='<style> html {  cursor: ' + lastcursor + '; } </style>';

        lastkeymodifier='ctrl';

      }

    } else if (evt.shiftKey) {

      if (lastkeymodifier != 'shift') {

        lastcursor="Url(\"data:image/svg+xml;utf8,<svg xmlns='http://www.w3.org/2000/svg' width='66' height='48' viewport='0 0 100 100' style='border-radius:15px;background-color:rgba(255,0,0,0.3);fill:black;font-family:Verdana;font-size:17px;'><text y='80%'>Shift\\01f389</text></svg>\") 16 0, grab";

        document.head.innerHTML+='<style> html {  cursor: ' + lastcursor + '; } </style>';

        lastkeymodifier='shift';

      }

    } else {

      if (lastkeymodifier != '') {

        lastcursor="Url(\"data:image/svg+xml;utf8,<svg xmlns='http://www.w3.org/2000/svg' width='126' height='48' viewport='0 0 100 100' style='border-radius:15px;background-color:rgba(0,255,0,0.3);fill:black;font-family:Verdana;font-size:16px;'><text y='80%'>Shift/Alt/Ctrl\\002753</text></svg>\") 16 0, crosshair";

        document.head.innerHTML+='<style> html {  cursor: ' + lastcursor + '; } </style>';

        lastkeymodifier='';

      }

    }

  }

</script>
- mouse "onmousemove" or "ontouchmove" helps with the "where" regarding content above ...
<script type='text/javascript'>

  var pos3=-1, pos4=-1;

  var subdiv=1;

  var lastpos3=-2, lastpos4=-1;

  var allowable=false;


  function xycursorlook(e) {

    e = e || window.event;

    e.preventDefault();


       if (e.touches) {

       if (e.touches[0].pageX) {

       pos3 = e.touches[0].pageX;

       pos4 = e.touches[0].pageY;

       } else {

       pos3 = e.touches[0].clientX;

       pos4 = e.touches[0].clientY;

       }

       //console.log('pos3=' + pos3 + ',pos4=' + pos4);

       } else if (e.clientX || e.clientY) {

        pos3 = e.clientX;

        pos4 = e.clientY;

       } else {

        pos3 = e.pageX;

        pos4 = e.pageY;

       }

  }

</script>
- preparations for "onclick" way a cursor can be plonked into (real lasting) content ...
<script type='text/javascript'>

  var lastcursor="Url(\"data:image/svg+xml;utf8,<svg xmlns='http://www.w3.org/2000/svg' width='126' height='48' viewport='0 0 100 100' style='border-radius:15px;background-color:rgba(0,255,0,0.3);fill:black;font-family:Verdana;font-size:16px;'><text y='80%'>Shift/Alt/Ctrl\\002753</text></svg>\") 16 0, crosshair";

  var pos3=-1, pos4=-1;

  var subdiv=1;

  var lastpos3=-2, lastpos4=-1;

  var allowable=false;


  function stamp(divo) {

    if (('' + pos3).indexOf('-') == -1) {

    if (allowable) {

    //if (allowed) {

    //allowed=false;

    //setTimeout(reseta, 2000);

    divo.innerHTML+='<div id=div' + subdiv + ' style="position:absolute;top:' + pos4 + 'px;left:' + pos3 + 'px;width:126px;height:48px;background-color:transparent;"></div><style> #div' + subdiv + ' { background:' + lastcursor.split(') ')[0] + ') no-repeat; } </style>';

    subdiv++;

    //console.log('lastpos4=' + lastpos4 + ' and pos4=' + pos4);

    //console.log('lastpos3=' + lastpos3 + ' and pos3=' + pos3);

    lastpos3=pos3;

    lastpos4=pos4;

    //}

    }

    }

  }

</script>
... with the "proof of concept" body_mouse_deepdive.html live run.
If this was interesting you may be interested in this too.
If this was interesting you may be interested in this too.
If this was interesting you may be interested in this too.
If this was interesting you may be interested in this too.
If this was interesting you may be interested in this too.
If this was interesting you may be interested in this too.
