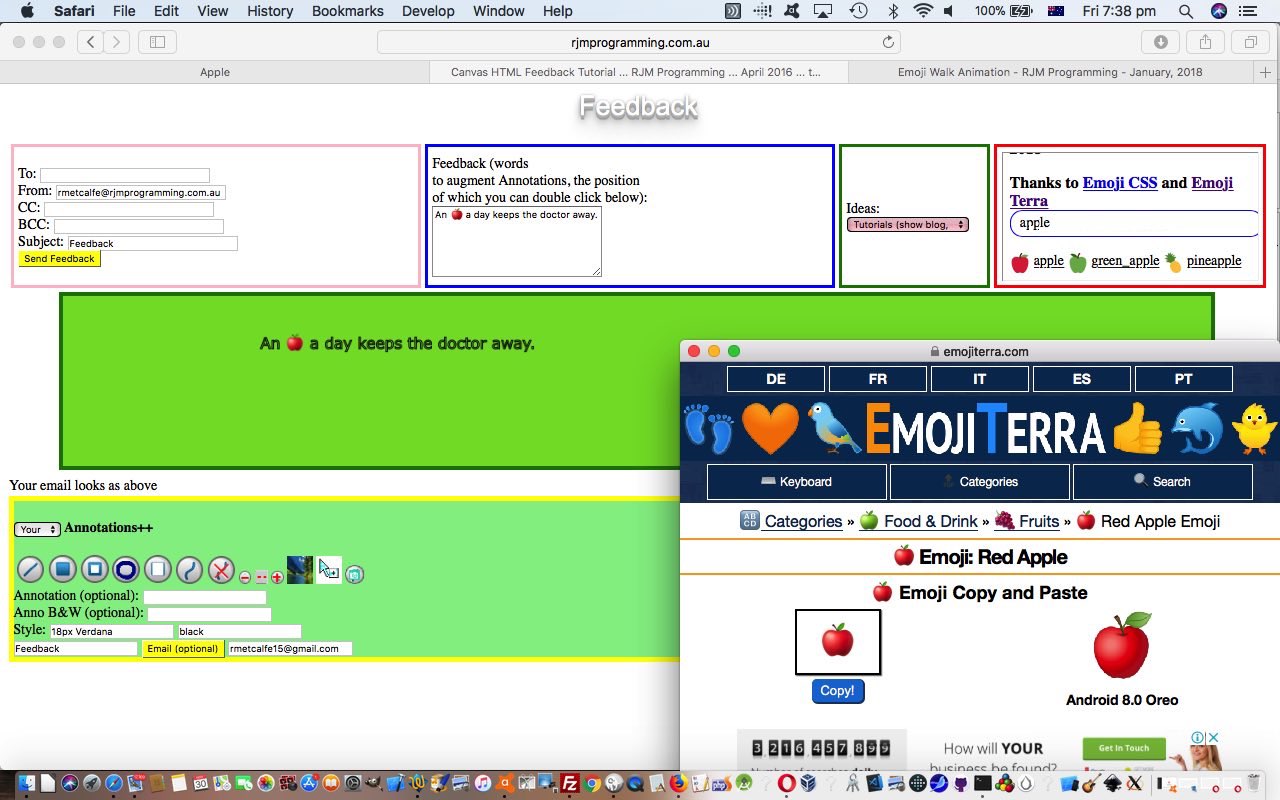
As we said early on in the recent blog postings on this thread of postings last talked about with yesterday’s Emoji Contact Us Feedback Copy and Paste Tutorial …
… but we envisage, optimistically, to involve animation and more refined positioning possibilities
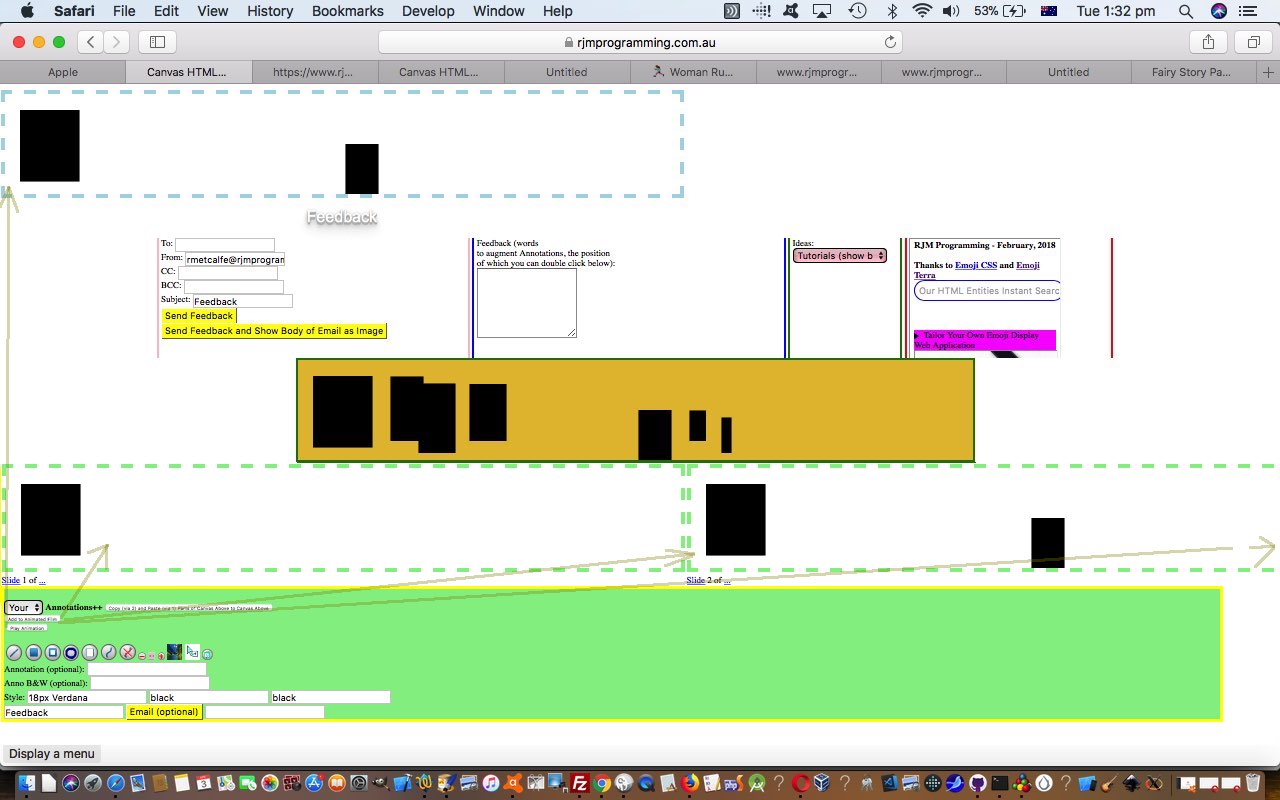
Well, the news is, we’re getting closer, by allowing for the “internal use only” creation (and playing) of an animation slideshow from changing canvas image representations, if that is what you want to do, that is. It uses a self-destructing HTML div element presentation we’re not sure whether we’ve ever used before. As you may know, an HTML div element, being the “container” (innerHTML) element that it is, can self-destruct via a myriad of methods, the last of which below being our method for today’s work …
- Javascript DOM [divElementObject].style.display=’none’;
- Javascript DOM [divElementObject].style.visibility=’hidden’; // this one may leave whitespace depending
- Javascript DOM [divElementObject].style.width=’0px’; (or [divElementObject].style.height=’0px’; … you get the gist?)
- Javascript DOM [divElementObject].style.top=’-700px’; (or [divElementObject].style.left=’-500px’; … you get the gist?)
- Javascript DOM [divElementObject].style.opacity=’0′;
- Javascript DOM [divElementObject].style.fontColor=’transparent’; // if data is textual and this one may leave whitespace depending
- Javascript DOM [divElementObject].className='[classThatMakesDivElementInvisible]’; (or [divElementObject].className+='[classThatMakesDivElementInvisible]’; … you get the gist?)
- Javascript DOM [divElementObject].innerHTML=”;
… which we make happen today, after that HTML div is given the contents of each “slide” of the animation (or slideshow), separated, just for now, via a 4 second delay as per …
var filmslidenumber=1, fromfilmslidenumber=0, tofilmslidenumber=0;


function tanimation() {

  if (fromfilmslidenumber < tofilmslidenumber) {

  document.getElementById('dslideshow').innerHTML='<img style="border:8px dashed lightblue;" src=' + document.getElementById('tablefilmimg' + eval(1 + fromfilmslidenumber)).src + '></img>';

  fromfilmslidenumber++;

  setTimeout(tanimation, 4000);

  } else {

  document.getElementById('dslideshow').innerHTML='';

  }

}


function animation() {

  fromfilmslidenumber = 0;

  tofilmslidenumber = eval(-1 + filmslidenumber);

  document.getElementById('dslideshow').innerHTML='<img style="border:8px dashed lightblue;" src=' + document.getElementById('tablefilmimg1').src + '></img>';

  location.href='#dslideshow';

  fromfilmslidenumber++;

  setTimeout(tanimation, 4000);

}


function addtofilm() {

  var ptoh=elem.toDataURL('image/png',0);

  if (filmslidenumber == 1) {

    if (document.getElementById('eimg').innerHTML == '') {

    if (document.getElementById('divannotation')) {

    if (('' + document.getElementById('divannotation').style.top).indexOf('525') != -1) {

    document.getElementById('divannotation').style.top=eval(eval(('' + document.getElementById('divannotation').style.top).replace('px','')) + 240) + 'px';

    }

    }

    }

    document.getElementById('eimg').innerHTML='<table id=tablefilm><tr id=tablefilmtr><td id=tablefilmcell1><img id=tablefilmimg1 style="border:8px dashed lightgreen;" src=' + ptoh + '></img></td></tr><tr id=tablefilmfooter><td id=tablefilmfooter1><a href=#tablefilmfooter1>Slide</a> 1 of ...</td></tr></table>';

  } else {

    document.getElementById('tablefilmtr').innerHTML+='<td id=tablefilmcell' + filmslidenumber + '><img id=tablefilmimg' + filmslidenumber + ' style="border:8px dashed lightgreen;" src=' + ptoh + '></img></td>';

    document.getElementById('tablefilmfooter').innerHTML=document.getElementById('tablefilmfooter').innerHTML.replace(' ...',' <a href=#tablefilmfooter' + filmslidenumber + '>...</a>') + '<td id=tablefilmfooter' + filmslidenumber + '><a href=#tablefilmfooter1>Slide</a> ' + filmslidenumber + ' of ...</td>';

  }

  if (filmslidenumber == 2) {

    document.getElementById('daddtofilm').innerHTML+=' <input style=display:inline-block; type=button onclick=animation(); value="Play Animation" id=banimation></input>';

  }

  filmslidenumber++;

}
… helped out by additional HTML as per …
document.write('<table style=width:100%;><tr><td><div id=dslideshow></div><h1 id=myh1 align="center">Feedback</h1></td><td style=width:90%; nowrap><div style=display:inline-block;width:100%;overflow-x:scroll; id=dviai><form style=display:none;width:100%;overflow-x:scroll; action=fairy_story_assistant.php method=GET target=fsa><input name=emoji id=iemoji value=></input><input type=submit id=isubm value=Submit></input></form><iframe style=display:none;width:100%;overflow-x:scroll; id=fsa name=fsa src=></iframe></div></td></tr></table>');
… and some changed Javascript as per …
document.getElementById('divannotation').innerHTML=document.getElementById('divannotation').innerHTML.replace('Annotations++','Annotations++ <input onclick="document.getElementById(' + "'" + 'canbet' + "'" + ').value=' + "'" + 'transparent' + "'" + ';" type=button value="Copy (via 2) and Paste (via 1) Parts of Canvas Above to Canvas Above"></input><br><div id=daddtofilm><input onclick="addtofilm();" value="Add to Animated Film" type="button" title="Make an Animation"></input></div>').replace('<input type="text" id="mycolour"','<input type="color" id="myrcolour" value="black" onchange="if (this.value.toLowerCase().indexOf(' + "'" + 'transparent' + "'" + ') == -1) { obeforetransparent=this.value; } document.getElementById(' + "'" + 'mycolour' + "'" + ').value=this.value;"></input> <input onblur="if (this.value.toLowercase().indexOf(' + "'" + 'transparent' + "'" + ') == -1) { obeforetransparent=this.value; }" type="text" id="mycolour"').replace('<input id="mycolour"','<input type="color" id="myrcolour" value="black" onchange="if (this.value.toLowerCase().indexOf(' + "'" + 'transparent' + "'" + ') == -1) { obeforetransparent=this.value; } document.getElementById(' + "'" + 'mycolour' + "'" + ').value=this.value;"></input> <input onblur="if (this.value.toLowerCase().indexOf(' + "'" + 'transparent' + "'" + ') == -1) { obeforetransparent=this.value; } " id="mycolour"').replace("</form>","<input type=hidden id=canbet value=></input><input type=hidden name=from id=from value=''></input></form>").replace("</form>","<input type=hidden name=cc id=cc value=''></input></form>").replace("</form>","<input type=hidden name=bcc id=bcc value=''></input></form>");
Now to think about emailing these optional animations.
Today, also, we’ve made the CSS much better suited to the mobile devices you may be using, by introducing the equivalent canvas onclick event logic mapped to the touchstart event, that mobile devices detect.
Today’s changes just involved feedback.htm HTML and Javascript feedback functionality that changed from that last time in this way and which you can test for yourself at this live run link.
Previous relevant Emoji Contact Us Feedback Copy and Paste Tutorial is shown below.
We’ve got quite a variety of functional improvements on top of what was there already with yesterday’s Emoji Contact Us Feedback Cross-Browser Tutorial (optionally email) Feedback web application. These changes, today, in brief, involved …
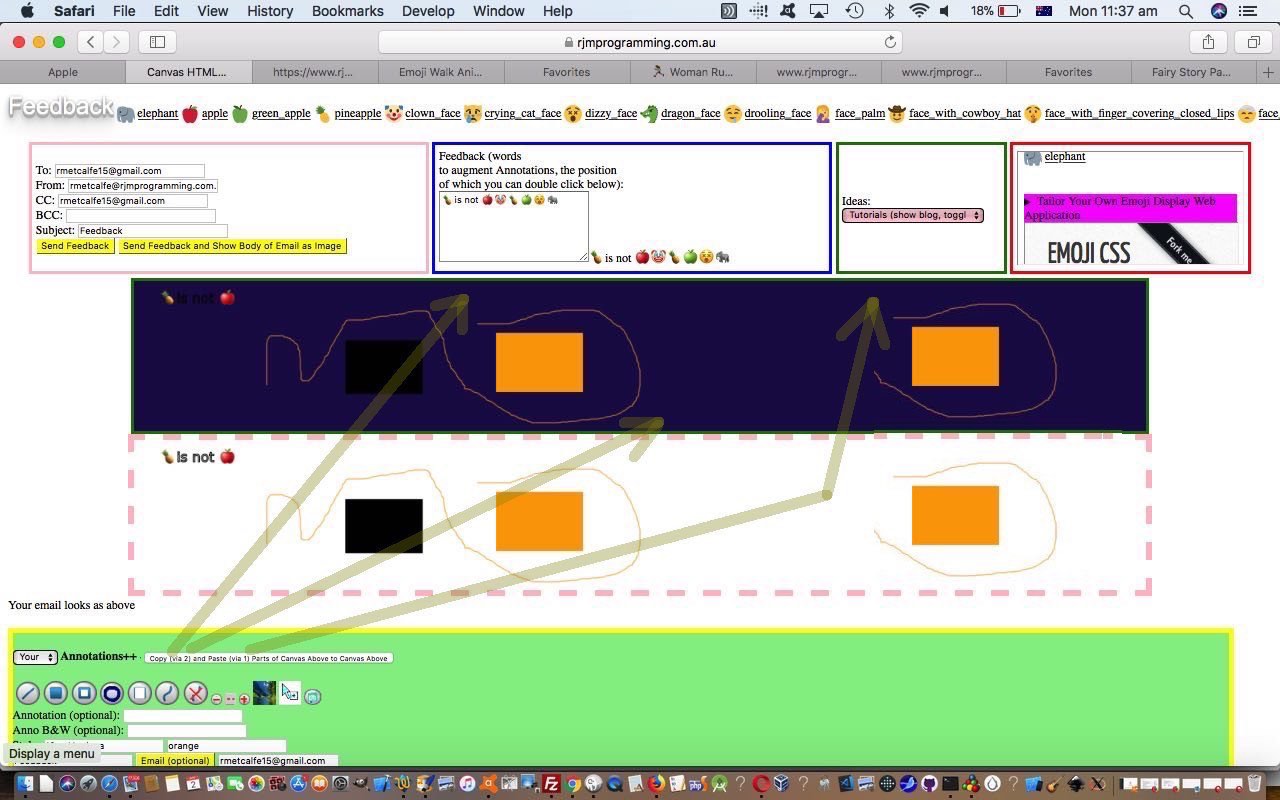
- copy and paste with the canvas element whose image representation forms the body of an email sent via this web application
- in order to ensure the consistency of canvas (y or top) positioning we had quite a lot to do, such as …
- no longer placing the image that results from “Send Feedback and Show Body of Email as Image” up the top right, but now to under the canvas with a pink dashed border (for clarity)
- no longer making the emojis map (big) into the header h1 element but now in a table cell as per …
<td style=width:90%; nowrap><div style=display:inline-block;width:100%;overflow-x:scroll; id=dviai><form style=display:none;width:100%;overflow-x:scroll; action=fairy_story_assistant.php method=GET target=fsa><input name=emoji id=iemoji value=></input><input type=submit id=isubm value=Submit></input></form><iframe style=display:none;width:100%;overflow-x:scroll; id=fsa name=fsa src=></iframe></div></td>
… ensuring it takes up as little height as possible, but stretches out to the right as much as it likes, but you can scroll to those parts way out off the screen to the right
- allowing some web browsers make use of their HTML5 input type=color colour wheel methods of defining annotation and canvas drawing foreground colour
- inform the user, via a self-closing popup window, that the PHP mail has sent an email, the look of which has a little bit of “Android toast” about it
So let’s talk about the “Copy (via 2) and Paste (via 1) Parts of Canvas Above to Canvas Above”. After a little dead end thinking pixel level thoughts might be the go … no … it was image level thoughts we needed, trapped at the canvas element’s onclick logic …
- the Copy (via 2 click/touch) aspects via [canvasElement].toDataURL(‘image/png’,0) copies the whole canvas, but while we are at that we are recording the user’s last two click’s …
- The x coordinate where to start clipping
- The y coordinate where to start clipping
- The width of the clipped image
- The height of the clipped image
… which we’ll come back to, and now to convert that into image data (for the statically defined HTML <img id=’myim’ style=’dispay:none;’ src=” title=” alt=”></img>), we …
      omyimgdata=elem.toDataURL('image/png',0);

      document.getElementById('myim').style.width=elem.style.width;

      document.getElementById('myim').style.height=elem.style.height;

      document.getElementById('myim').src=omyimgdata;

      omidatax=eval(Math.min(x,lastx));

      omidatay=eval(Math.min(y,lasty));

      omidataw=Math.abs(x - lastx);

      omidatah=Math.abs(y - lasty);
- the Paste (via 1 click/touch) aspect using the “full might” of the [canvasContext].drawImage() calling incarnations as per …
context.drawImage(document.getElementById('myim'),omidatax,omidatay,omidataw,omidatah,x,y,omidataw,omidatah);
Code changes, today, involved the PHP email helper …
- world.php, changed this way, whose job it is to help create the PHP mail created email attachments, in the form of image renderings on the canvas we use … supervised by …
- feedback.htm HTML and Javascript feedback functionality that changed from that last time in this way and which you can test for yourself at this live run link
Previous relevant Emoji Contact Us Feedback Cross-Browser Tutorial is shown below.
Yesterday’s Emoji Contact Us Feedback Textarea Tutorial had us more integrated involving emojis with the HTML5 canvas element we use as the source for an image attachment to a potential email for use as Feedback, perhaps.
There are cross-browser issues here.
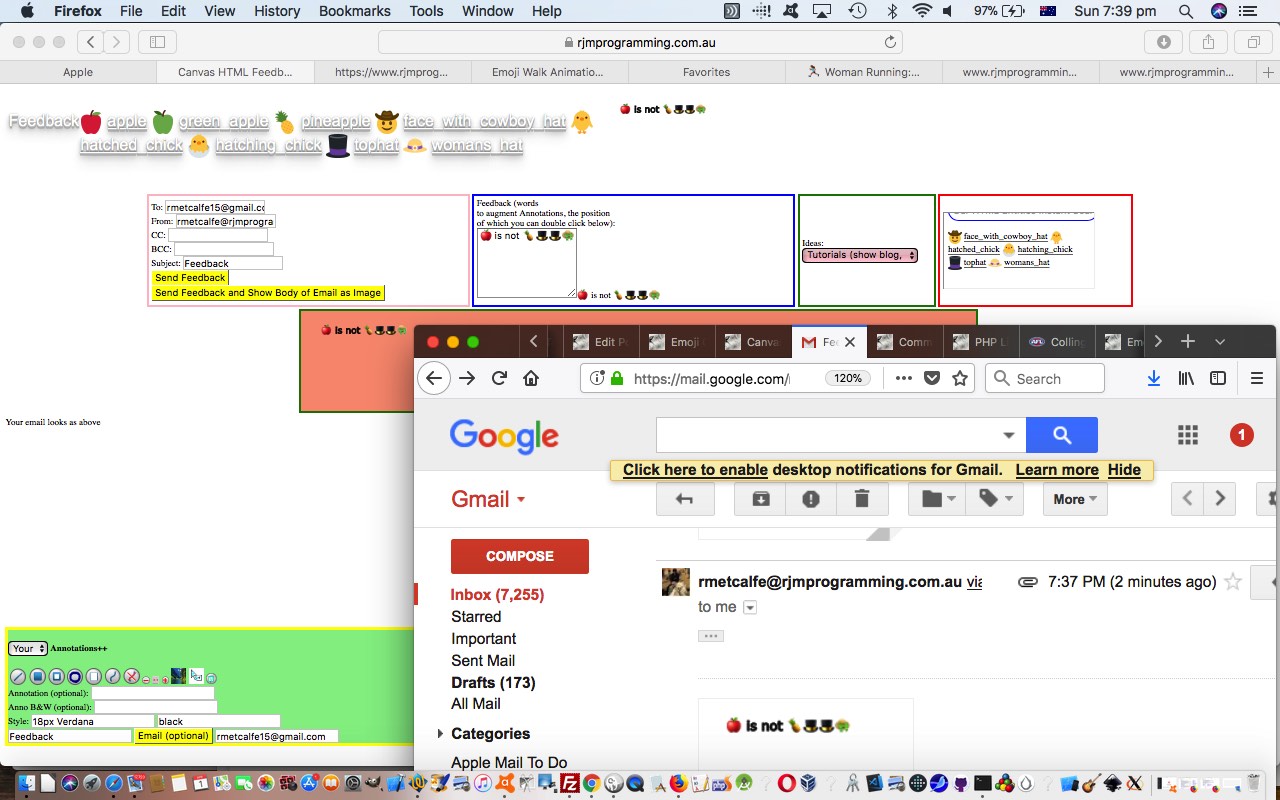
- Firefox is not transferring the emojis to the canvas, at least for us.
- And Safari does not offer great two finger gesture options when hovering over the canvas, such as “Save Image As…”. So, today, we offer those Safari users the chance to be able to “Save Image As…” image (email attachment) download possibilities by offering a new button called “Send Feedback and Show Body of Email as Image”. Use this, and that image that results is downloadable.
In order to allow for that last one, and not wrongly overlay the Annotations div element menus, we adjust the top (y) co-ordinate of the Annotations div element menus as per …
    if (document.getElementById('divannotation')) {

     if (('' + document.getElementById('divannotation').style.top).indexOf('485') != -1) {

      document.getElementById('divannotation').style.top=eval(eval(('' + document.getElementById('divannotation').style.top).replace('px','')) + 300) + 'px';

     }

    }
… a technique that may fail for elements that do not define the top property, whether that be teamed or not (as for today) with position:absolute property …
document.getElementById('divannotation').style.top='485px';
A different child PHP helper to yesterday’s one needed work today …
- world.php, changed this way, whose job it is to help create the PHP mail created email attachments, in the form of image renderings on the canvas we use … supervised by …
- feedback.htm HTML and Javascript feedback functionality that changed from that last time in this way and which you can test for yourself at this live run link
Previous relevant Emoji Contact Us Feedback Textarea Tutorial is shown below.
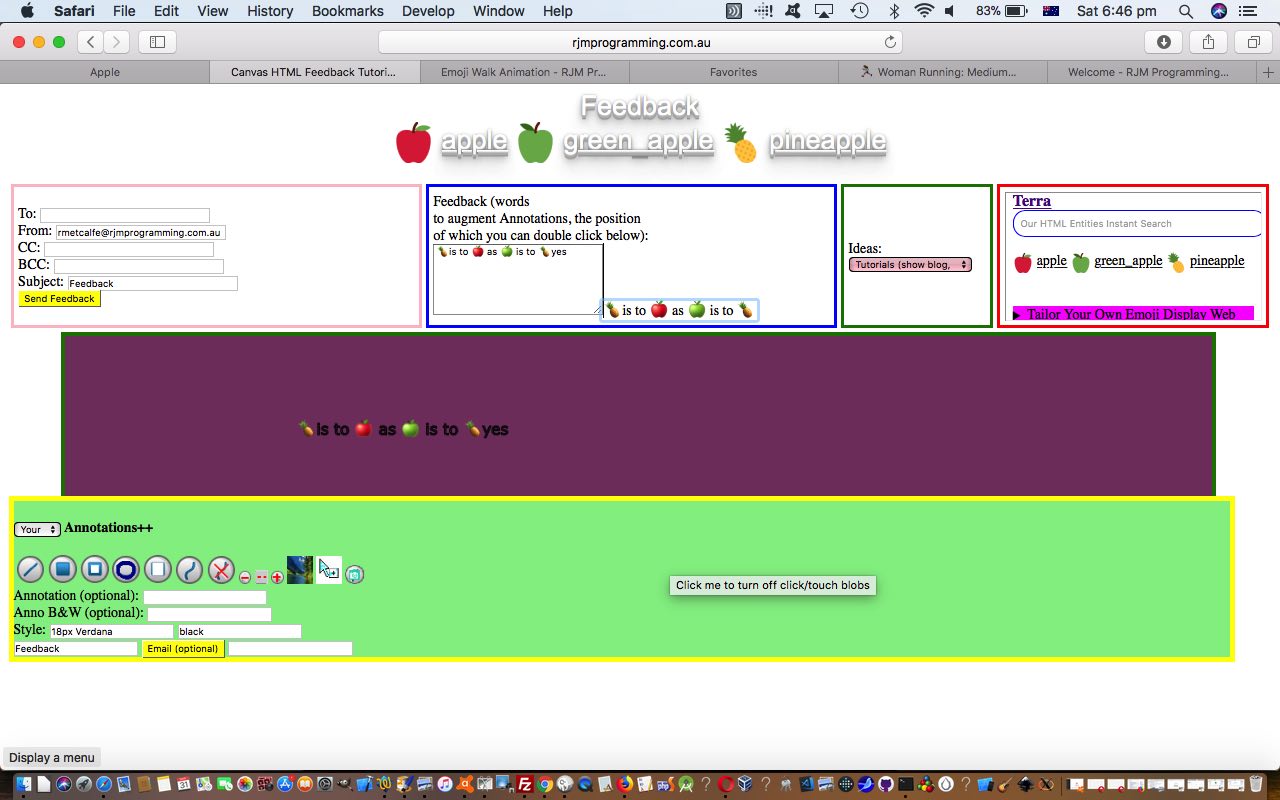
Yesterday’s Emoji Contact Us Feedback Integration Tutorial started us down the road of trying to make emoji usage more functional with the annotation aspects of our Feedback (Contact Us type of) web application.
We have a textarea HTML element currently in use as a means by which we collect textual data, that may go into the feedback, and then onto an email, perhaps. We’ve lately been preferring to use …
- div contenteditable=true … in preference to …
- textarea
… and though we keep the textarea as the interfacing element of “textual data collection” for the user, today, it gets helped out by accompanying …
- div contenteditable=true … and encompassing the textarea we have a new …
- div … acting as a parent
How come? Well, in our experience, when you mix up the keyboard character type of text with emoji HTML Entity “textual” data, the relationship between the textarea’s …
- value property
- innerHTML property
… unique among elements, and really generally useful, stuffs up, or we stuff up, one of the two.
But … and didn’t you just know there’d be a “but” … combine the content of the first “shadowing” div element with a complete rewrite of the textarea via the innerHTML property of the “encasing” second div (parent) element and you can go back to the conditions at the start of the web application, as far as the textarea is concerned, where you can place HTML Entity representations of that mix of textual data that may include emojis, into the textarea’s innerHTML via code like …
// store current innards of the textarea
var mtv=top.document.getElementById('myfeedback').value;
// at to those textarea innards the current HTML Entity emoji data addition and place into the innerHTML of the "shadowing" div contenteditable=true element
top.document.getElementById('dmyfeedback').innerHTML=mtv + cnotatend;
// clear contents of textarea
top.document.getElementById('myfeedback').value='';
// repopulate textarea in an innerHTML (HTML Entity friendly) way by reinstating its whole (outerHTML) instantiation by setting the innerHTML of that textarea's encasing div element, and in between where > meets </textarea> place that same div contenteditable=true innerHTML where spaces map to (HTML Entity)
top.document.getElementById('ddmyfeedback').innerHTML='<textarea style="color=lightgray;width:200px;" rows=6 cols=40 id="myfeedback" title="Feedback" value="" onchange=" pseudo_sentence=this.value; placetext(); " onblur=" pseudo_sentence=this.value; placetext(); ">' + mtv.replace(/\ /g,' ') + cnotatend + '</textarea>';
… all carried out with an HTML iframe hosted child PHP helper …
- fairy_story_assistant.php, changed this way, whose job it is to get the great Emoji Terra website help us out, via its ideal permalink arrangements, with emoji search lookups, thanks … supervised by …
- feedback.htm HTML and Javascript feedback functionality that changed from that last time in this way and which you can test for yourself at this live run link
Previous relevant Emoji Contact Us Feedback Integration Tutorial is shown below.
We’re revisiting the work of Contact Us Feedback Android Tutorial which features …
- feedback
- canvas
… with some early days integration with the recent work of Emoji Name Search Fairy Story PHP Tutorial, because we think the addition of more sophisticated emoji search (and later, usage) functionality would be a good improvement. Who’s to know if we can do it, but we envisage, optimistically, to involve animation and more refined positioning possibilities.
Hope you can hang around for the full journey that starts with feedback.htm HTML and Javascript feedback functionality that changed from that last time in this way and which you can test for yourself at this live run link.
Previous relevant Contact Us Feedback Android Tutorial is shown below.
A couple of days ago we presented Contact Us Feedback Primer Tutorial as shown below … and said …
Maybe you remember reading about the recent Feedback functionality here at RJM Programming when we presented Feedback Email Attachment Iframe Tutorial. It struck us that it would be good to extend the “Contact Us” webpage here at RJM Programming by adding a “Feedback” form to the “Contact Us” now presented via an HTML select “dropdown” element.
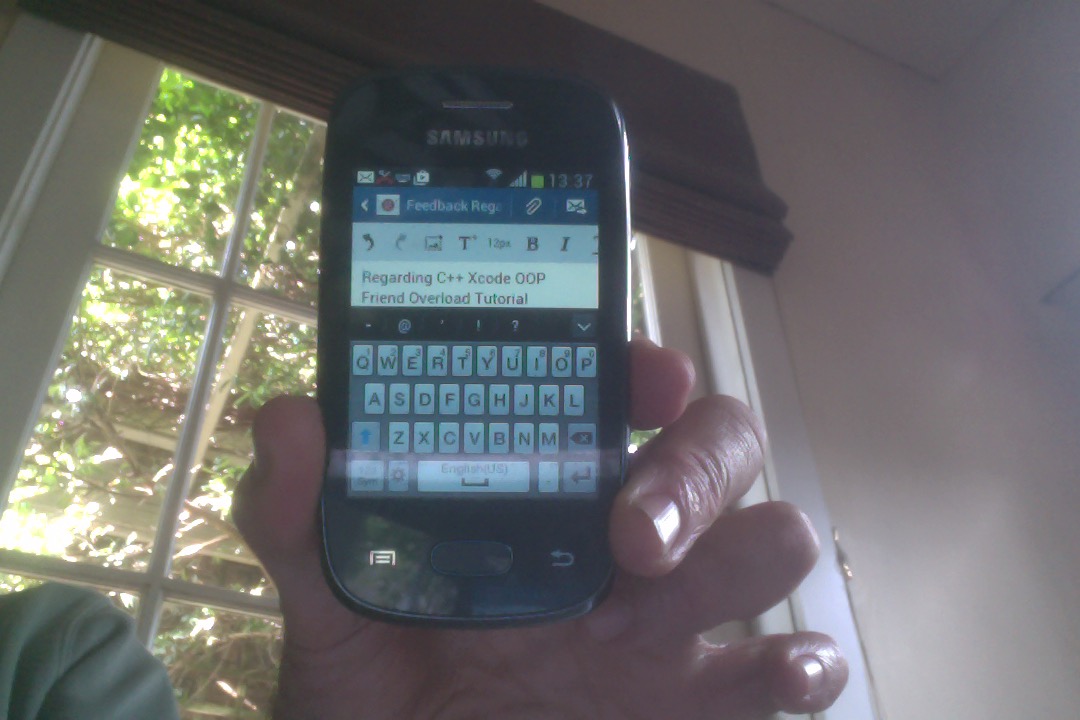
… well, we discovered down the track that the behaviour of the HTML a tag’s mailto: href parameter navigation needs to be nuanced for Android (mobile) usage.
A bit of reading on this lead us in one direction and the useful link pulled us completely back into a good line, thanks, via the advice …
window.top.location = “http://example.com”;
… but, for us, that goes (something like) …
window.top.location = "mailto:fill.in@email.address?subject=blah&cc=&bcc=&body=Lots%20Of%20Blah";
… presumably to get the external Android Mail app into the picture. On the way this link was useful, also, so, thanks.
Trap for young players? (Am blushing)
So for feedback functionality what changed for this Android fix (which also has trouble, perhaps, with inhouse Javascript functions called “capture”?!) was …
- feedback.html HTML and Javascript feedback functionality changed from last time in this way
- world.js external Javascript annotation functionality changed from last time in like this
So … pleeeeease don’t fall in the trap, like me?!
Previous relevant Contact Us Feedback Primer Tutorial is shown below.
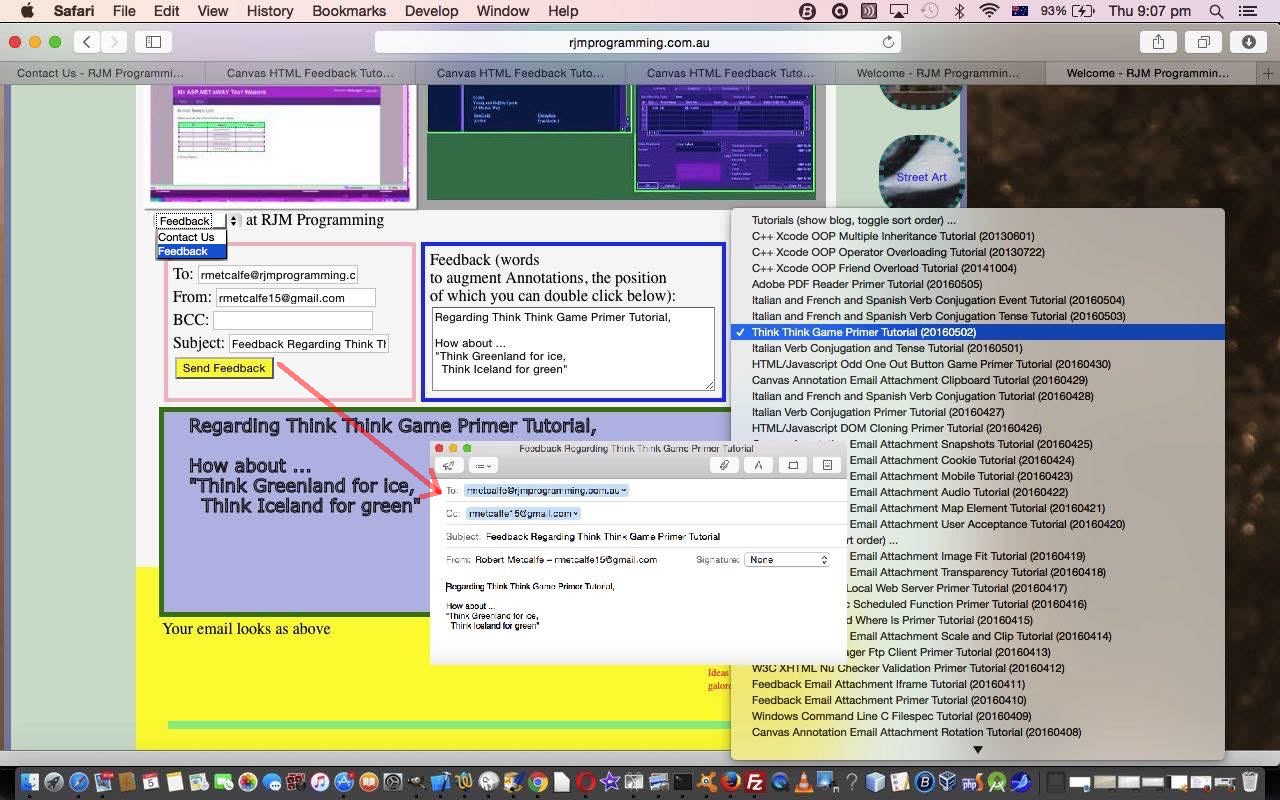
Maybe you remember reading about the recent Feedback functionality here at RJM Programming when we presented Feedback Email Attachment Iframe Tutorial. It struck us that it would be good to extend the “Contact Us” webpage here at RJM Programming by adding a “Feedback” form to the “Contact Us” now presented via an HTML select “dropdown” element.
You can see the gist of what is involved with today’s tutorial picture for the creation of a short worded feedback email, via your default email client (ie. an HTML a mailto: link is used), perhaps regarding a tutorial here at this blog, which can be chosen via an HTML select “dropdown” element populated from the RJM Programming Landing Page, the logic for which you can read about with Client Pre-emptive Iframe Crontab Curl Rotated Report Tutorial. As you would glean from this blog posting title, what we are involving here is …
- WordPress Blog’s MySql database
- curl call of PHP to extract blog posting information
- crontab scheduled execution of PHP to assemble this data into an updated HTML select “dropdown” element in the RJM Programming Landing Page
- an HTML iframe element loads the Landing Page and the crontab/curl inspired PHP/MySql data is extracted (at that iframe’s onload event) and reworked to the purposes of this Feedback functionality
So what changed here?
- Contact_Us.html changed in the bold ways below …
          <div id="id4" style="height: 36px; left: 17px; position: absolute; top: 304px; width: 674px; z-index: 1; " class="style_SkipStroke_3">

            <div class="text-content style_External_674_96" style="padding: 0px; ">

              <div class="style_2">

                <!--p style="padding-bottom: 0pt; padding-top: 0pt; " class="Caption">Contact Us at RJM Programming</p-->

                <div style="padding-bottom: 0pt; padding-top: 0pt; " class="Caption"><select id=mysel onchange=" var huhs; var dds=document.getElementsByTagName('div'); for (var idds=0; idds<dds.length; idds++) { huhs=dds[idds].innerHTML.split('<div ');  if (huhs.length == 1) { huhs=dds[idds].innerHTML.split('<img ');  if (huhs.length > 5) { dds[idds].style.display='none';  } }  }  document.getElementById('mycrawler').style.display='none';  document.getElementById('widget2b').style.height='500px'; document.getElementById('widget2-frame').height='500px'; document.getElementById('widget2-frame').style.height='500px';  document.getElementById('widget2-frame').style.zIndex='5'; document.getElementById('widget2-frame').src=this.value; "><option value="http://www.rjmprogramming.com.au/Contact_Us_files/widget2a_markup.html">Contact Us</option><option value="http://www.rjmprogramming.com.au/HTMLCSS/feedback.html?contact=contact">Feedback</option></select> at RJM Programming</div>

              </div>

            </div>

          </div>
- feedback.html HTML and Javascript feedback functionality changed from last time in this way
- world.js external Javascript annotation functionality changed from last time in like this
Maybe this is food for thought for your own “Contact Us” page, perhaps second only to “Landing Page” in popularity on today’s websites of the “net”.
If this was interesting you may be interested in this too.
If this was interesting you may be interested in this too.
If this was interesting you may be interested in this too.
If this was interesting you may be interested in this too.
If this was interesting you may be interested in this too.
If this was interesting you may be interested in this too.
If this was interesting you may be interested in this too.

