Today’s that “wee bit” of an exciting blog posting. We’ve had quite a few …
- “Making of” blog posts after the main context … but today … da, da da, da da da da … we have …
- “Getting to” blog post about the goings on before … yay!!!!! … well, you had to be there
How you get to a point can, of course, be of great import. Does history not teach us a great deal? Supplied answer: Yes. Rome wasn’t built in a day. Supplied reaction: Interesting. Rolling stones gather no moss. Supplied disgust: ?
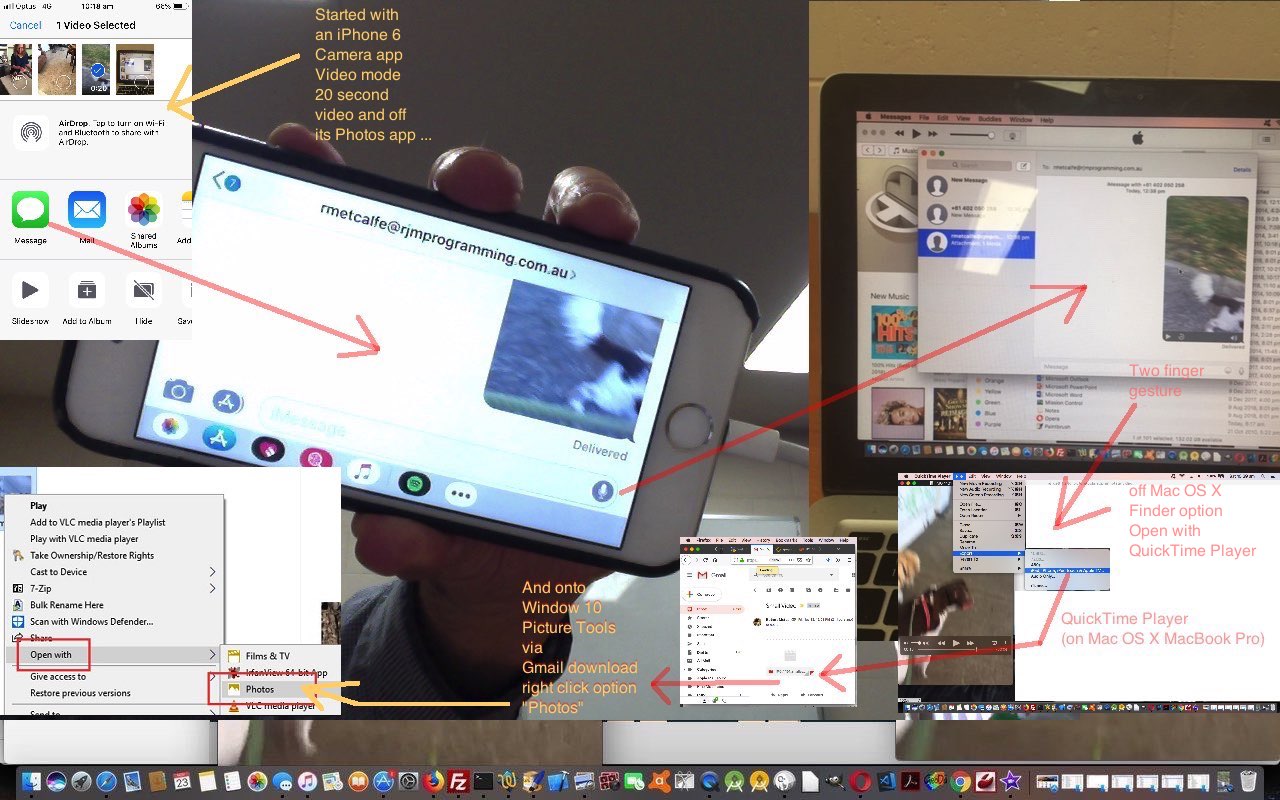
We dedicate today’s “Getting to” need for a blog posting to our continued bemusement and amusement with getting AirDrop to work with our Mac OS X MacBook Pro’s sharing of the “airwaves” with our iPhone and iPad iOS devices, the Apple friendly woooooorrrrrlllllddd where AirDrop lives, but comes and goes in our life. Anyway, the video we captured (via its Camera app’s Video option) on our iPhone of Nala and Luna, which featured in yesterday’s Windows Picture Tools Application Annotating Video Tutorial, was all of 20 seconds long, and we thought it might squeeze through, sizewise, as an email attachment. Alas, no, however.
Queue the iOS and Mac OS X Sharing options screen (off the iOS Photos app), to try to download the video to the MacBook Pro (laptop), after the lack of success with its Mail option (almost always our first port of call here). The Mac OS X and iOS Sharing screen is great, don’t get me wrong. Actually enjoy seeing the options change over time … instructive in itself. The funny thing for us, though, is the dominance of AirDrop in the option layout, with its 2/134 score of success for us. We tried it again for today’s work, with no success … 2/135.
Out of those non-first-port-of-call options, then we tried the Message option, its score being about 2/5 for us. It was great, and worked for the 20 seconds worth of iPhone 6 video content … 3/6.
How was the “Old (original)” video of yesterday’s Windows Picture Tools Application Annotating Video Tutorial created? We used the wonderful, the stupendous, Mac OS X MacBook Pro desktop application QuickTime Player to File -> Export -> iPad, iPhone, iPod touch & Apple TV… it on the MacBook Pro. That resultant video was then small enough to be able to email (to myself) via an attachment, and over to “Windows 10 land” (a Windows desktop PC), via the Gmail webmail (ie. URL link in a web address bar on a web browser). From there, we downloaded the attachment to the Windows 10 hard disk Downloads directory. And from there we right clicked that video and chose the “Photos” option, which got us to the Picture Tools desktop application, which was the centrepiece of yesterday’s Windows Picture Tools Application Annotating Video Tutorial outlining how we created the “New (annotated)” video version.
Take a look at visual version of “Getting to” with today’s tutorial picture.
Previous relevant Windows Picture Tools Application Annotating Video Tutorial is shown below.
The Windows 10 Picture Tools application is great, but we’ve found most use for it with videos. Remember with Making Of No Sim Card iPhone Capabilities Tutorial below, how we …
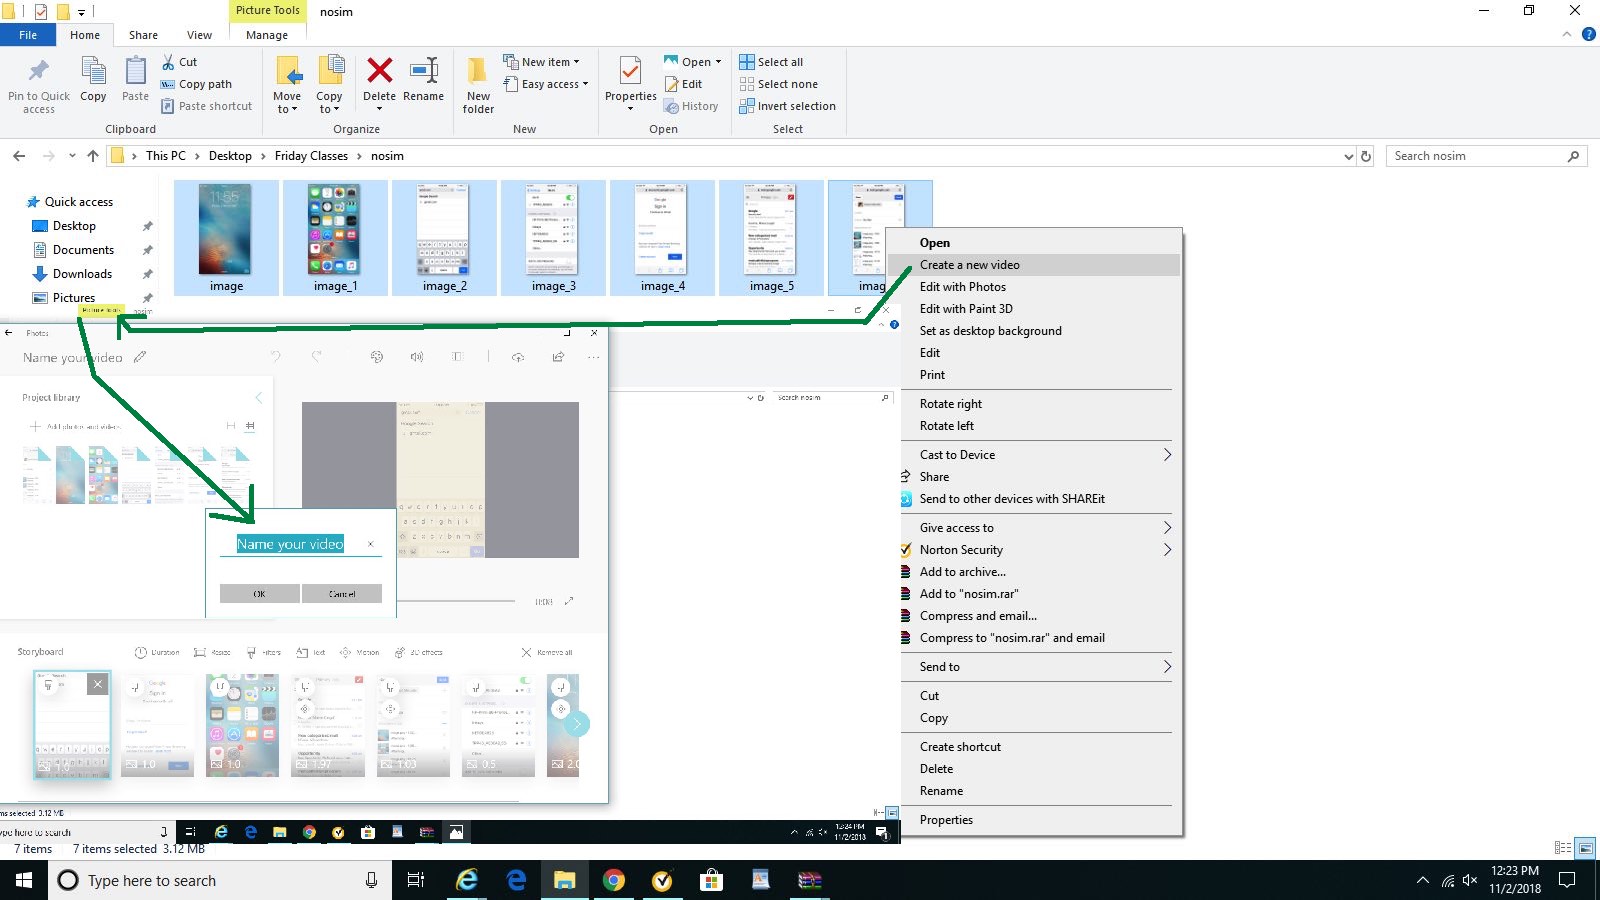
- created a video from multiple images as a right click “Create Video” option? … well today …
- we use the Windows 10 Picture Tools application to edit an existant video, effectively annotating some of it
… which is what we wanted to do in the first place, but imagined we’d be using Mac OS X’s iMovie to do this, but it doesn’t do this. Out of the box, on Windows 10, the Picture Tools application, does edit videos in a rudimentary fashion. Cute, huh?! Sometimes, it’s only “rudimentary” we need.
We hope you have a look at and enjoy the PDF slideshow we’ve created for this blog posting to show you what we mean here.
| New (annotated) | Old (original) |
|---|---|
You can also see this play out at WordPress 4.1.1’s Windows Picture Tools Application Annotating Video Tutorial.
Previous relevant Making Of No Sim Card iPhone Capabilities Tutorial is shown below.
Do you always need manuals or online Google searches to work out what’s going on with operating systems like Windows or Mac OS X? We’d venture “no” for the most part. Even if you are confused by version changes and rearrangements of icon displays, getting to the desktop or Windows Explorer or Mac OS X Finder window, and in Windows, right clicking and in Mac OS X, using a two finger gesture over a file or group of files, in itself, teaches you a lot. Follow this up by “diving in and exploring” and/or looking up for more information about words you see in resultant menus, and you can discover a lot.
So it was for me when I constructed the video of No Sim Card iPhone Capabilities Primer Tutorial shown below. Yes, we have another “Making Of” blog posting today.
For this video, we simply …
- got to a Windows 10 Explorer window with some screenshotted images
- right clicked all of them at once via use of the Ctrl key … to get up …
- “Open With” menu brought up Picture Tools as one of the options called “Create a Video”, to … anyone, anyone? … yes, Edward G Robinson … create a video out of a series of (probably related) images
Just what we were after, and it reminded us a lot of constructing PDF Slideshows on Mac OS X via two finger gesture of a series of image files that you “Open With” Preview.
As with any really good desktop program, from here, you would expect the advice “follow your nose” from us, and this is certainly true here with the great Windows 10 Picture Tools method of turning images into a video.
You might like to see a slideshow of us doing this with today’s PDF Slideshow (courtesy of Mac OS X Preview … sparing us the Making Of The Making Of No Sim Card iPhone Capabilities Tutorial!).
Previous relevant No Sim Card iPhone Capabilities Primer Tutorial is shown below.
Just as we should not “dis” anybody’s “disabilities”, we think you should not “cap” the “capabilities” of (an old) iPhone with no Sim Card.
Naturally a lot of us are interested in Sim Cards for our mobile devices, like discussed at our previous Sim Card via iPad with WiFi Primer Tutorial, as Sim Cards are the conduit to a Carrier Service, but this is by no means all there is to the modern mobile device and/or smart phone.
So having had an “onwater incident” with our iPhone 6 recently, we resorted to trying to use an old iPhone that had no Sim Card, initially just with the aim to get the time (of day … maybe even of night … we didn’t check whether this little iPhone takes any time off). But then we realized almost an entire new world opened before our ideas, as long as you can hook up that “no Sim Card iPhone” to Wi-Fi. Once you do that (and we’re not sure you’ll get too far without this), you can, at the very least …
- do emails via a webmail URL in a web browser (but maybe even the Mail App can be set up … we didn’t … life’s too short)
- take photos just the ways you ever did
- attach (and otherwise share) those photos in an email as attachments out to emailees
- surf the net
… the list goes on and on. This should be no surprise. A laptop doesn’t care about Carriage Services for a lot of its “natural smarts” either. It is worth looking back at what was underappreciated perhaps, but useful, is our “take home” from the video presentation …
… we have for you today, showing a bit of all this in action.
Previous relevant Sim Card via iPad with WiFi Primer Tutorial is shown below.
We’ve got to admit to a funny history with Sim cards, and so it was, with a sense of trepidation, I approached a Sim card job on an iPad with WiFi for a student recently. It’s bad enough stuffing up your own things, but other people’s?! This could end disastrously, and for a full four minutes, that looked to be the case. Some of this comes, for me, from changing those fancy light bulbs that you can make obsolete by just handling them the wrong way even before installing them. Well, today, during the steps …
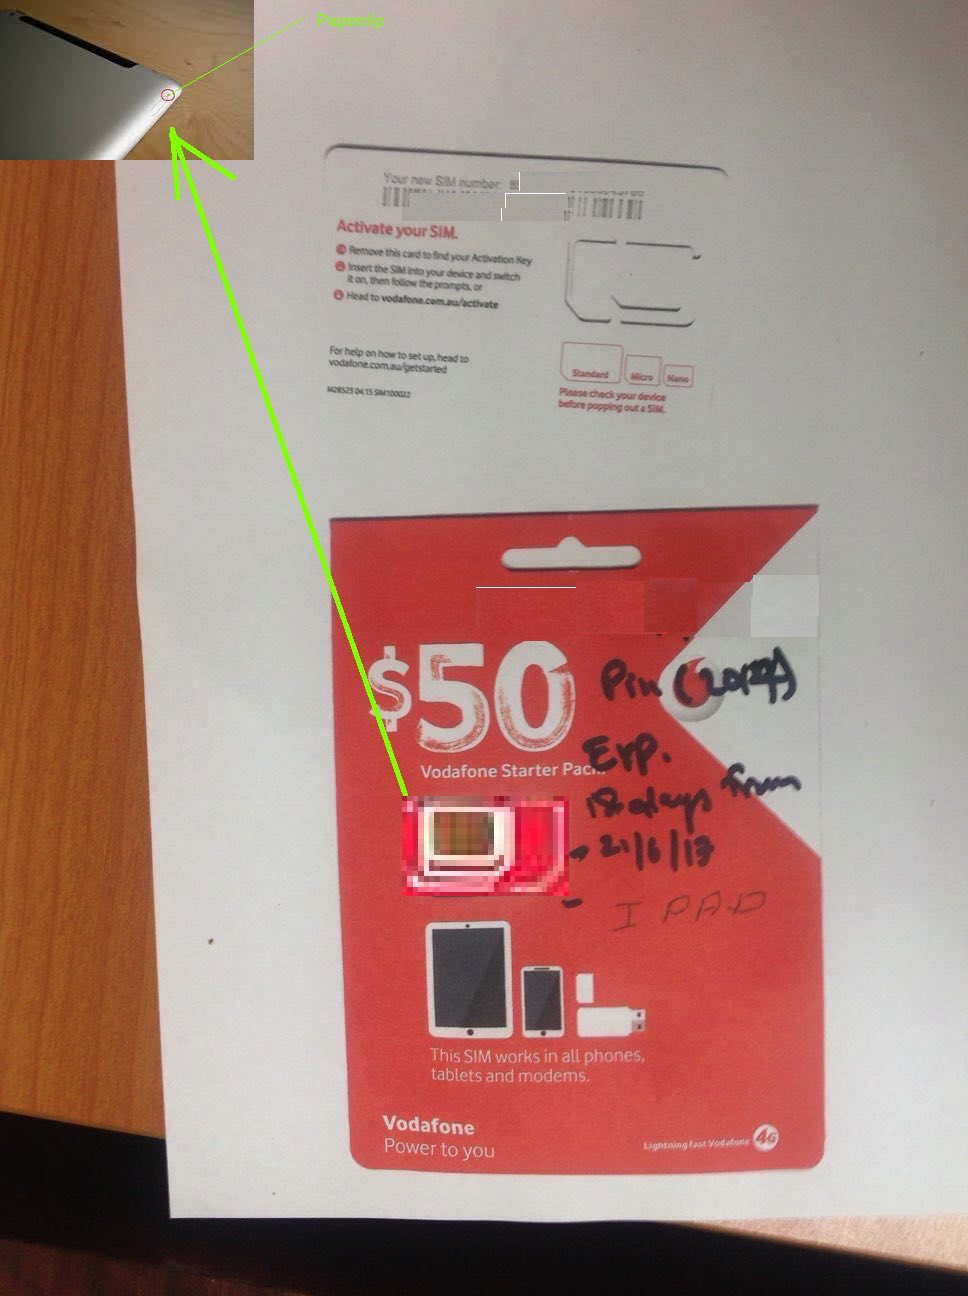
- student arrived with a suitably sized Sim card, and plan, in her case, from Vodaphone, for use with her “iPad with WiFi”
- the “iPad with WiFi” Sim card slot is a tiny recessed rectangular slot at the side of the iPad, that you can recognise as the one with a tiny little hole next to it … so, getting all technical …
- access a paperclip of some quality … the Burgundy region would be good … and pull out one of the legs … no paperclips were permanently harmed in the making of this blog posting … to have a thin pointing piece of metal to …
- press into that hole with the paperclip to open the rectangular slot … help paperclip return to normal
- pull out the (probably empty) WiFi slot, and, as required empty it … and here’s the tricky bit, at least for us …
- pull out the Sim card (with its cardboard backing in place)
- fit the Sim card into the WiFi slot (out of the iPad) … four minutes later for us …
- push the WiFi slot back into the iPad (and judge which way by the sloping of the WiFi slot)
- on the iPad touch the Settings icon
- in General settings regarding WiFi and Mobile look out for your new Sim card to appear (for Activation purposes, perhaps?), else wait for it (the Sim card smarts themselves) to prompt you for Activation itself (which is what happened for us)
- on the iPad touch the Safari icon and test out the connectivity to reach the Internet … yayyyyyy!
- while you are about it, set up in Settings the Mail settings for your Email, as required, and check this out touching the Mail icon … double yayyyyyyyyyyy!
… I must have touched the Sim card for sure, but it still worked, so maybe that can be a word of comfort for you, too, should you have my strange beliefs as well.
The end result, is pretty cute, that being an iPad acting like your mobile phone picking up the outside telephone network when not able to reach any in home WiFi, perhaps. As we’ve found again and again with web application projects we gravitate towards, we have great trouble “condensing” applications into iPhone screen size usefulness, though we know we could given some thought time. But there you have the wonderful iPad making so much more sense the screen size it is to see what’s going on with data driven web applications of some complexity. My student has that luckier extra ability with the Sim card with out and about usage with her “model” of “iPad with Wifi” (think is how it is marketed?). Don’t know if you’ve used an iPad yourself, but it seems very robust and useful to me, as a touch device, with room to move.
Previous relevant Sim Card Primer Tutorial is shown below.
Sometimes with our dogs, Luna and Nala  they do funny (or stupid) things that make me think of them as “Sinatra’s Dogs”. Why Sinatra? Well, it’s the name, sometimes, he used to refer to something as “stUpid” … and it runs in the family … he and Nancy (seem to remember) sang …
And then I go and spoil it all by saying something stUpid like “I love you”
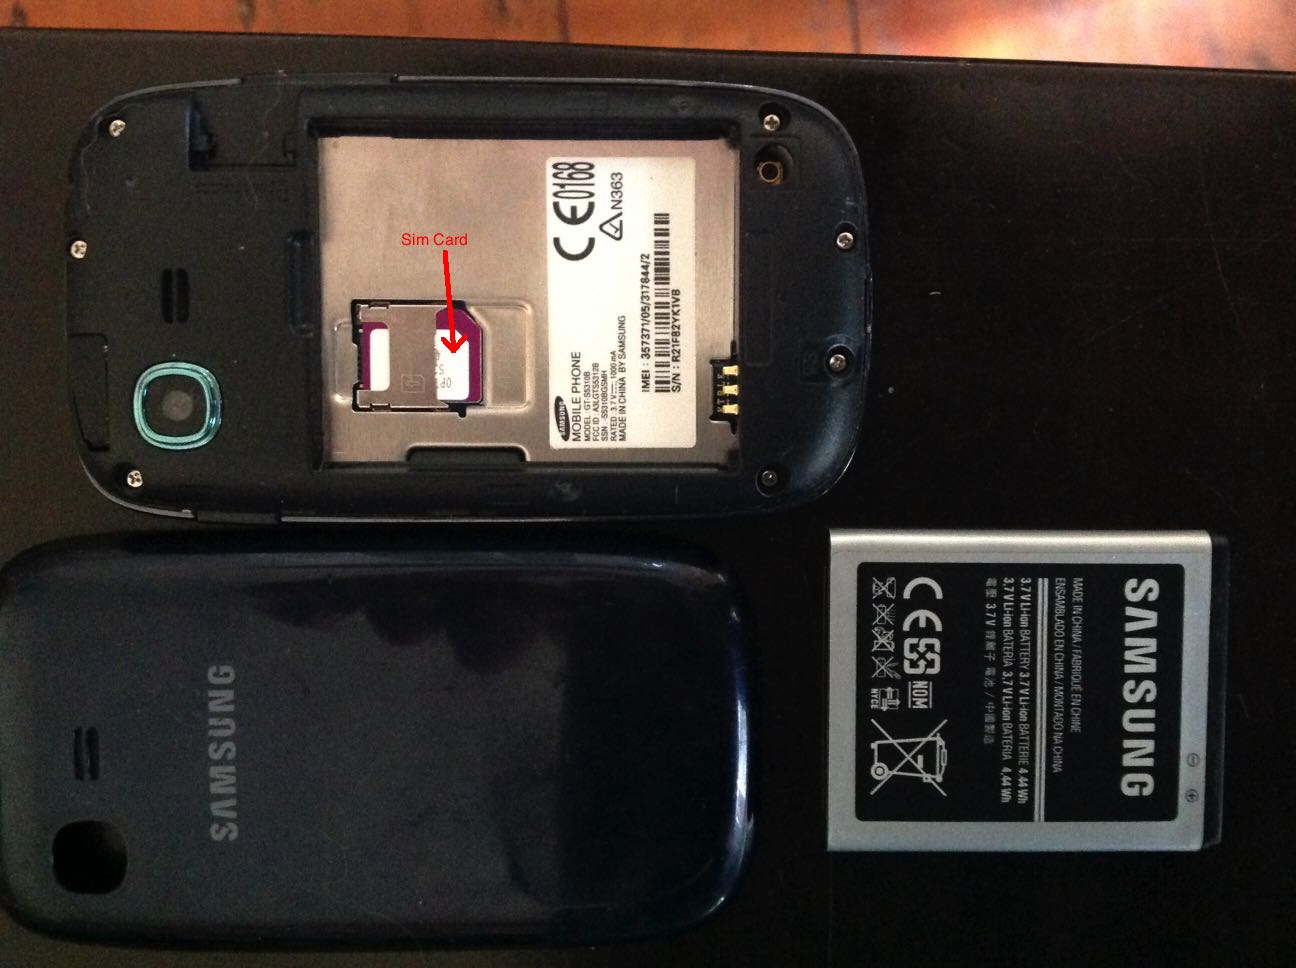
… and that is what brings me around to today’s topic … Android mobile phone Sim Cards no less … did something “stUpid” with my phone’s one, so that it needed replacement, and that process of replacing set me to thinking about Sim Cards. Hopefully you’ll forgive my hardware lack of knowledge, but sometimes asking the questions you are scared to ask yourself can help you learn (from mistakes, perhaps), and so we structure this tutorial, as “the questions I was scared to ask about Sim Cards … and looked up Google to find out” …
- Q: Can a mobile phone do anything without a Sim Card in place?
Liked (in particular) A: The short answer, Yes.The short answer, Yes. Your Android smartphone will absolutely work without a SIM card. In fact, you can do almost everything you can do with your smartphone without paying any carrier a monthly fee. All you need is Wi-Fi, a few different apps, and any Android device and you’re good to go.
- Q: What do you lose when you replace a Sim Card with the same mobile number?
A: Got told, Contacts, and that seems to be the case and links (off last link) talk about how to transfer them from Sim Card to Sim Card … for the rest read off the link before that, though can tell you for a fact you don’t lose apps you had installed - Q: What did you do to make your Sim Card be inoperable?
A: Oh, did you mean me? Sorry about that. - Q: What is difference between Standard, Micro and Nano Sim Cards?
A: Try more detail here
Anyway, for our (mobile phone) provider, to replace the Sim Card, we …
- Go to provider shop and buy a new Sim Card (that has its own new serial number), and get given the phone number to ring, and important information to read on the Sim Card packaging you get … my new Sim Card only cost $2 Australian
- Ring the number, discuss the issue, because the provider wants to know what went wrong (though that would be pretty “stUpid” to go into that in detail here, of course) and they organize a new Sim Card (linked to the same mobile phone number, as requested) to be Activated within a few hours, given that new Sim Card’s serial number and proof of who you are … and?
- Install the Sim Card in the phone depending on that Standard, Micro or Nano Sim Card size advice you glean (above … or know,
manperson)
If this was interesting you may be interested in this too.
If this was interesting you may be interested in this too.
If this was interesting you may be interested in this too.
If this was interesting you may be interested in this too.
If this was interesting you may be interested in this too.
If this was interesting you may be interested in this too.


