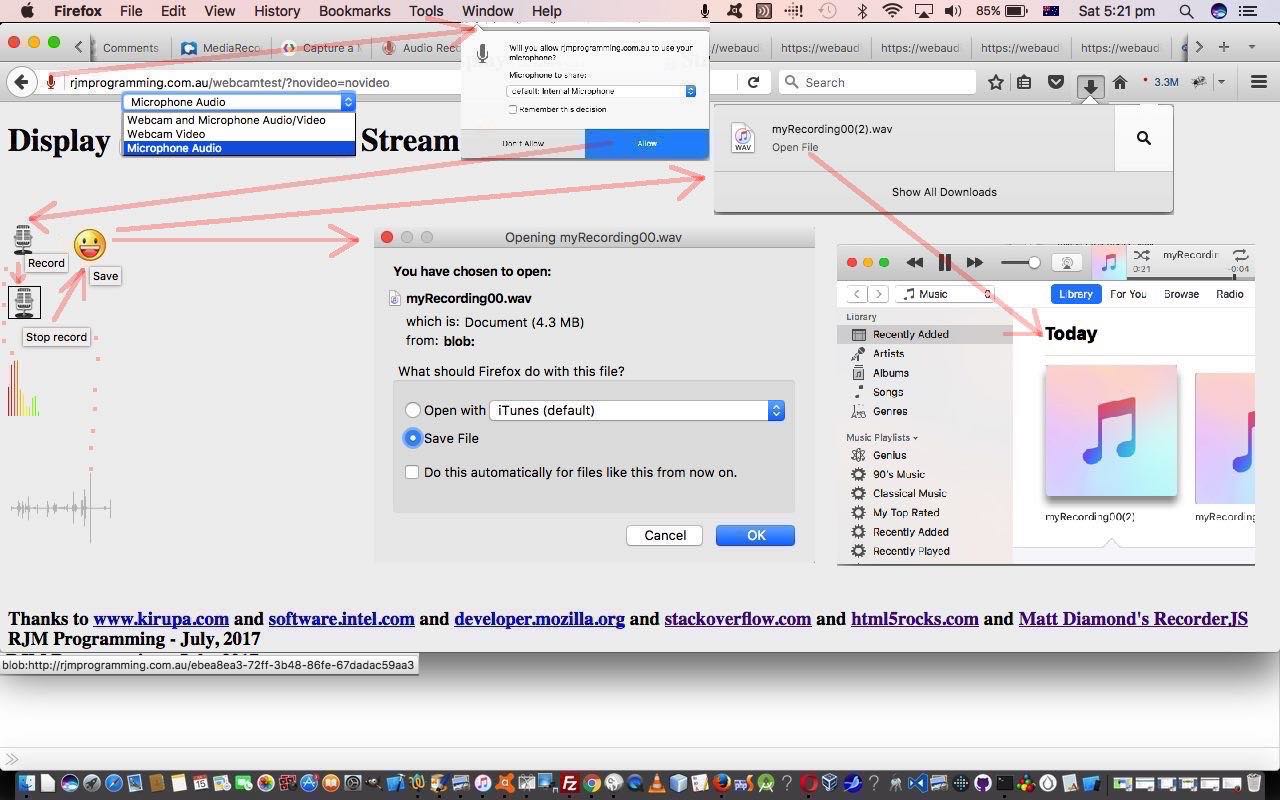
The blog posting Webcam Mobile Tutorial set us up for using navigator.getUserMedia and on that occasion we used it mainly in conjunction with a device webcam and web application video element along with a web application canvas element, this all being very HTML5’y by nature. Today, we add another mode of use, presented in a new HTML select element dropdown, to this same web application as per …
- Webcam and Microphone Audio/Video display
- Webcam Video display
- Microphone Audio display and capture … suitable to capture a Voice Memo
This new Microphone Audio display and capture functionality’s basis has been used before when we presented YouTube Embedded Video in Iframe API RegEx Tutorial directly “hotlinked” to the wonderful mattdiamond/Recorderjs GitHub project‘s live run demonstration webpage. But today, we do not “hotlink”, and we comply with Open Source licencing requirements by leaving unchanged Javascript code that is now referenced by all modes live run and microphone audio mode live run links that now involves the HTML and Javascript of webcamtest.htm that changed in this way regarding this new Microphone Audio capture web application functionality, consisting of …
- a microphone device connection via
navigator.getUserMedianavigator.MediaDevices.getUserMedia … but this time …
navigator.getUserMedia({video: false, audio: true}, handleAudio, videoError);
navigator.MediaDevices.getUserMedia({video: false, audio: true}).then(function(mediaStream) { handleAudio(mediaStream); }).catch(function(err) { videoError(err) });
- the recording of recorded audio capture in .wav format via a user click to Start Recording
- clicking the same button to Stop Recording then sets up the chance to …
- click Save button to download the .wav file, as required, to your local (client) file system
We hope you get some ideas here.
Previous relevant Webcam Mobile Tutorial is shown below.
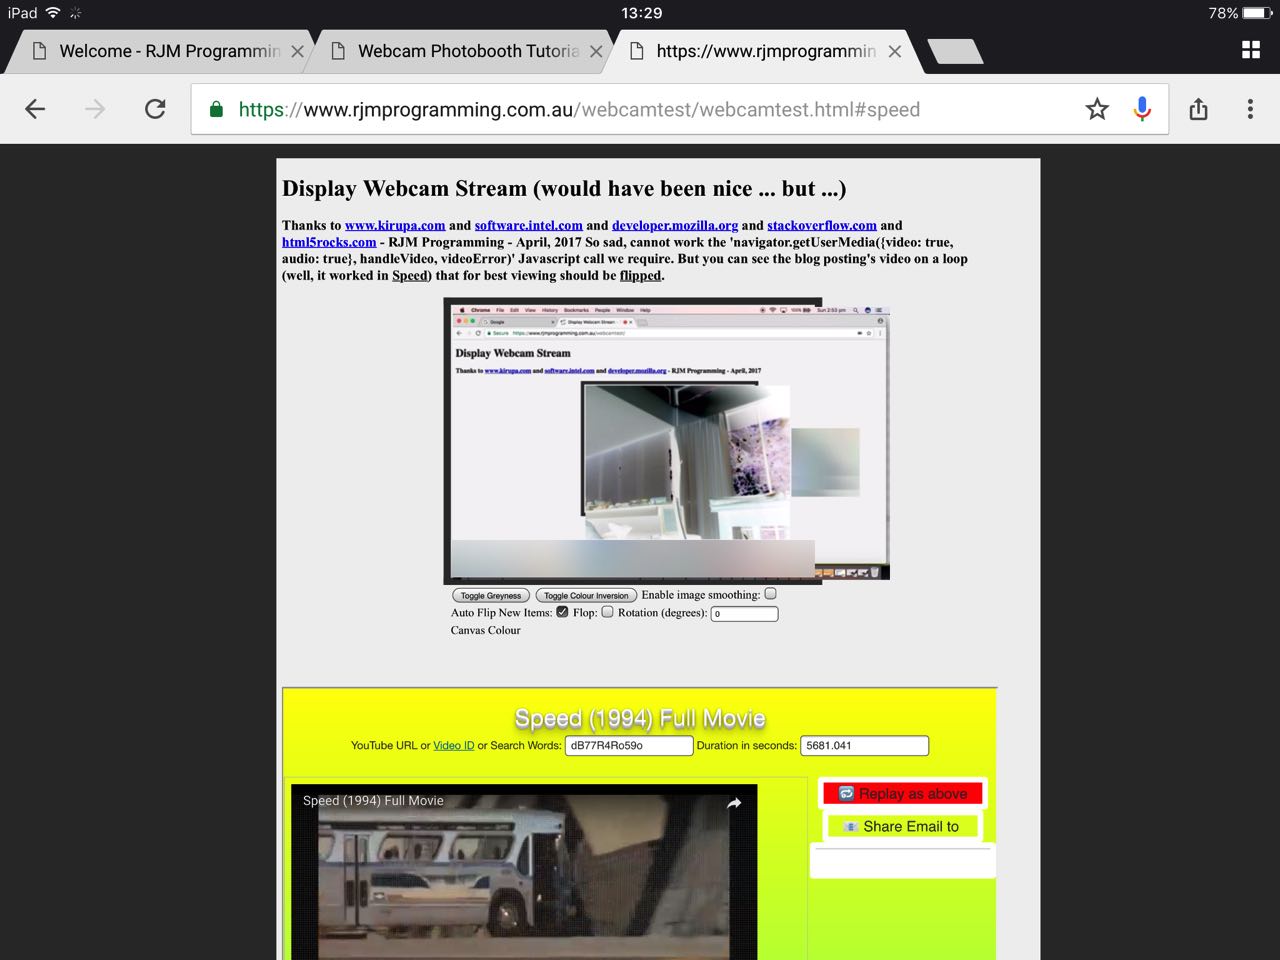
Am hoping most of you laptop and desktop computer users were able to see a webcam working with our web application we left off last with Webcam Photobooth Tutorial as shown below, and that’s great if that is the case, but the fact is that lots of platforms, predominantly mobile ones, it would appear do not support a Javascript call like …
navigator.getUserMedia({video: true, audio: true}, handleVideo, videoError);
… alas and alack! However, for all you long suffering (mainly mobile device) blog readers … thanks for reading … for what we taketh away, let us now putteth innereth a bitteth today. The webcam is a “streaming” video, but the next best thing we can do short of “streaming” is to loop an existing video, wouldn’t you say? Even there, though, platforms like Safari on iOS (ie. on an iPad or iPhone) still want that user clicking intervention to start any video … remember our last discussion regarding this Apple bandwidth concern when we presented Piano Playing Web Application Mobile Tutorial … and we cater for that with a four second chance for these Safari iOS users to “click away”.
On a mobile platform what form could the “webcam” (as a camera device) take? We think it can be worked, like with mobile iOS apps like Photobooth, the “webcam” can take the form of the mobile device camera, and we touched on that when we used the HTML(5) input capture syntax when we presented Audio/Video HTML5 Form Input Capture via PHP Download Tutorial, as food for thought in this area, should you be curious?!
By the way, before we forget, today’s thanks go to a regular here at this blog, the incredible html5rocks.com website, a great HTML5 and more other web ideas resource … so … thanks.
We “loop” the (webcam) video via Javascript DOM code like …
if (navigator.getUserMedia) {

    navigator.getUserMedia({video: true, audio: true}, handleVideo, videoError);

} else {


    video.type = "video/mp4";

    video.loop = true;

    video.autoplay = true;

    video.controls = true;

    video.src = 'webcamtest.m4v';

    video.style.visibility = 'visible';

    document.getElementById('errmsg').innerHTML = "So sad, cannot work the 'navigator.getUserMedia({video: true, audio: true}, handleVideo, videoError)' Javascript call we require.  But you can see the blog posting's video on a loop (well, it worked in <a onclick=putOnSpeed(); style=text-decoration:underline;cursor:pointer;>Speed</a>) that for best viewing should be <a style=text-decoration:underline;cursor:pointer; onclick=document.getElementById('autoflip').click();>flipped</a>.";

    document.getElementById('sosad').innerHTML = " (would have been nice ... but ...)";


    setTimeout(andno,4000);

}


function andno() {

    video.style.visibility = 'hidden';

}
A big curiosity for our tiny scrambled brain is that, if you are one of these “previously deprived” (but now sooooooo well looked after … crumpets, Jeeves?!) and have seen what happens with that looping local video (that same one from this blog posting thread’s “Primer” tutorial), is that it is one of those “flipped” scenarios, so we suggest one of …
- viewing this blog posting in your vehicle’s side mirror … but please, not while driving … or …
- stand on your head, rotate 180 degrees and do the “flop” while viewing this blog posting’s web application (“you can call this technique ‘flop and click'”) … of course … off you go … or …
- use the Auto Flip New Items checkbox we put in at that last Webcam Photobooth Tutorial to do the job
… to unscramble, and “stay calm”.
And so that brings us to the opportunity for a live run link that now involves the HTML and Javascript of webcamtest.html that changed in this way regarding this “what do we do if there is an error” commonplace coding scenario, especially regarding cross-platform and cross-browser considerations, with our webcam/video/canvas web application.
Maybe at the live run link above the “putteth innereth a bitteth” bit was apparent to you, but for you other readers (and other bewildered users?!), visit this link to see what we mean.
Previous relevant Webcam Photobooth Tutorial is shown below.
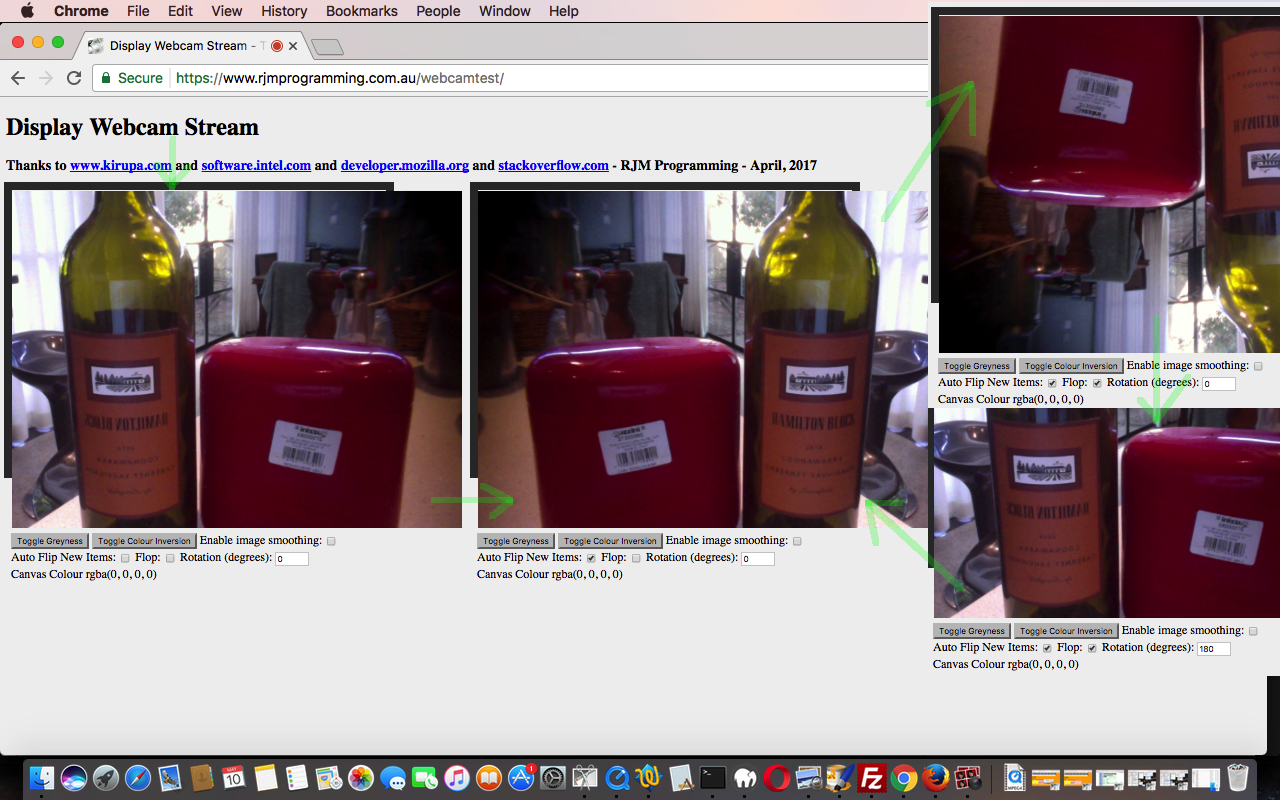
The webcam of a computer device can be like a video selfie except that when filming something it can be flipped horizontally, like when dealing with mirrors, on occasions, especially after a heavy night! And that’s where the Mac OS X (and iOS) Photobooth desktop (or mobile “desktop”) application comes to our thinking. It has a very useful option Edit > Auto Flip New Items, a simulation of functionality we’d like to add onto the web application of our previous Webcam Primer Tutorial as shown below. The thought of doing all this to the implicit video of the Webcam sounds daunting, but the clue to this being easier than expected came from the “bowels” of that previous tutorial, basing itself on the help of a few excellent links you can link into below too, and its use of an HTML(5) canvas element to be an intermediary between the webcam (video) and your dear little selves. And it is on this canvas (sounds apt to say “palette” today) that there are tremendous HTML5 “goodies” functionality-wise to call on to be able to …
… and so, effectively (horizontally) “flip” (or also today’s “we didn’t know” flop (meaning vertically flip)) the canvas right there in the middle of the action, doing twirls and triple pikes just for you gals and guys … awwwww, shucks! This ability of our Webcam application was precisely what was missing as we lamented in yesterday’s Windows Memory Stick Research Primer Tutorial …
The YouTube’s genesis was from the Mac OS X desktop application PhotoBooth, mainly done this way because of its excellent Edit -> Auto Flip New Items option, otherwise we’d have used our recent Webcam web application.
We’d like to thank this webpage for a great Javascript function to manipulate our HTML(5) canvas element this way.
This opens our web application up to allowing you to use a Webcam to show a “filmed” thing in an unmirrored context, and so, if you, as we did today with our YouTube video …
… record this from afar, as we did with an iPad Camera app’s Video mode, it will appear the correct way around, as the Photobooth application can also do, and was the genesis of our inspiration to do today.
We’ll leave you the HTML and Javascript code we’ve got those three four links above to thank for, mainly. The code can be downloaded and/or perused via the webcamtest.html (https:) source code link, that changed for today’s purposes in this way. To try it out for yourself, if your computer device suits, try this live run link.
Previous relevant Webcam Primer Tutorial is shown below.
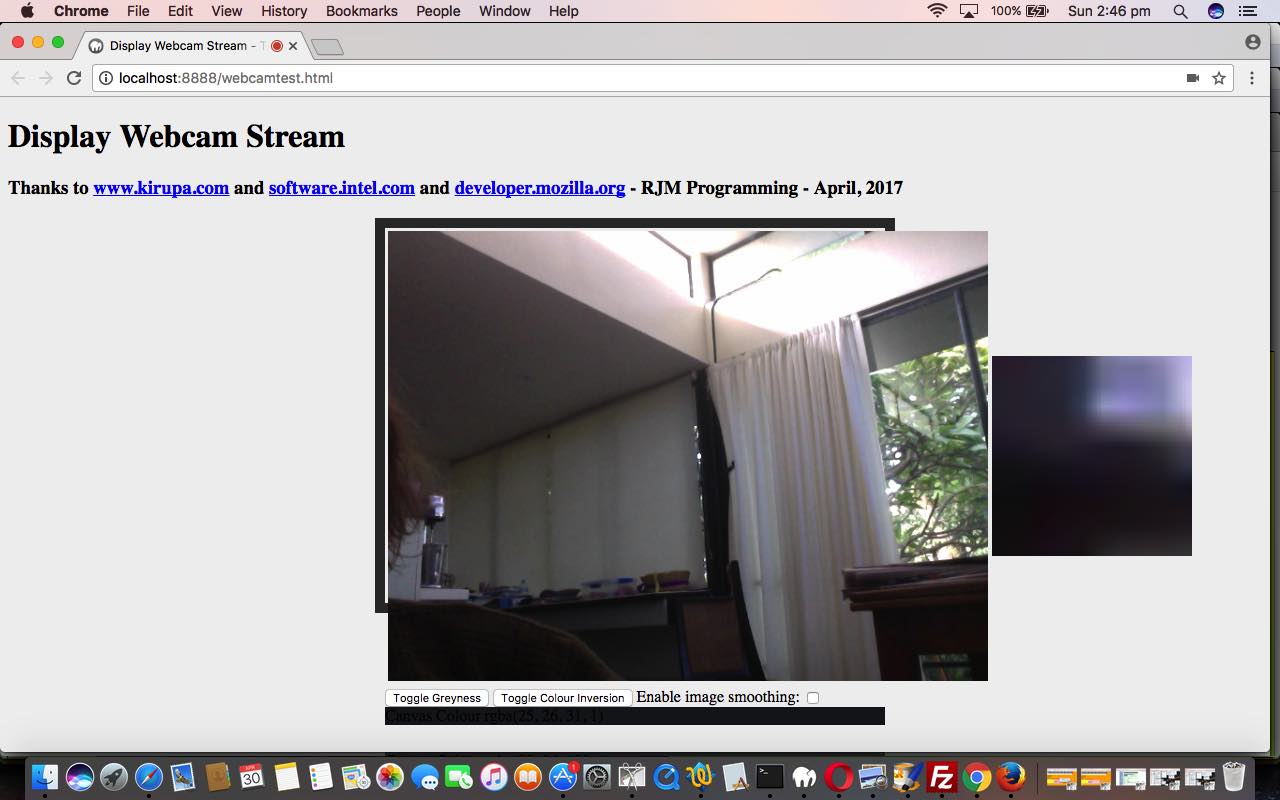
The webcam of a computer device can be a very useful piece of hardware. We’ve written an “entry level” web application using your device’s webcam, should it have one, and should you give permission for the web application to access it, and if the web browser and platform combination you use suits some or all of the functionality offered in this first draft. We would like to thank three great online resources for the code stitched together for this first draft web application, those being …
- www.kirupa.com link taught us about the getUserMedia method of the navigator object …
- software.intel.com link helped us with code and event logic allowing for a 33mS refresh of the webcam’s underlying video to an HTML(5) canvas element, along with a greyscale manipulation of that canvas element’s “snapshot in time” contents
- developer.mozilla.org link helped us with some other image within canvas pixel level functionalities such as colour reversal, and zooming in ((like a magnifier) as you see often on eCommerce product pages) and an individual canvas pixel rgba(r,g,b,opacity) report
None of this functionality calls on anything else but HTML(5) and Javascript “smarts”, and is eye opening in that way, no doubt.
And so today’s first draft is mainly about the webcam (hardware) “capture” capabilities, its “conduit” to the outside world … that being you user gals and guys … say hello … is that curious and exciting notion that you capture the webcam video streaming “snapshot” fast enough into a canvas element, it looks like you are just dealing with a “magical” canvas, though the (usually green) webcam light on your device (and the web browser tab (usually red) light, and any other web browser webcam icons shown) should be the giveaway that a webcam underpins the goings on.
There are cross-platform and cross-browser issues with webcams, that is for sure. Maybe you’ve gone and clicked the live run equivalent of clicking the tutorial’s picture, already, above, and noticed a slightly different pattern of arrangement to our usual. We direct you to an https: URL, because the Google Chrome web browser asks for this type of URL to go with allowing permission to access the device’s webcam.
And so that leaves us to show you the HTML and Javascript code we’ve got those three links above to thank for, mainly. The code can be downloaded and/or perused via the webcamtest.html (https:) source code link. We also direct you to a video we made for you to visualize all this, below …
If this was interesting you may be interested in this too.
If this was interesting you may be interested in this too.
If this was interesting you may be interested in this too.
If this was interesting you may be interested in this too.


