One of the oldest topics regarding personal computers and software is the spreadsheet … the first “killer app” (read Wikipedia’s spreadsheet information and VisiCalc) that got so many people on board the enthusiastic embrace of the personal computer in the early 1980’s.
Given this history there is not much chance you’ll see anything that is “new under the sun” here, but can offer a strategy to teach yourself about spreadsheets, using Microsoft Office’s Excel application.
The first recommendation tackling spreadsheets is that you should have a plan regarding the spreadsheet before you open Excel to create a new spreadsheet style you do not create via other data sources.
So, for the scenario of starting from scratch with an Excel spreadsheet, that you design yourself:
- Draft out how you would like the spreadsheet to look on paper, or in soft form.
- Open Microsoft Office Excel, and use File->New to create a new Excel workbook.
- Expand the workbook, if possible, to show enough rows for the complete view of a spreadsheet page of interest.
- If a heading is to straddle more than one cell, drag the cursor to cover these cells and use the multiple cell icon (“Merge and Centre” icon) to allow the entry to be centred within those multiple cells.
- Finish the heading rows and column wording. We don’t do it, but you may want these headings to be made with a bold font. We don’t do it, but you may want to consider borders and shading adjustments to your spreadsheet here at this point, also. Bear in mind that the top left cell is a cell that can highlight your whole workbook should this formatting be best applied to the whole spreadsheet.
- Visit each column header cell and use the “$” icon for currency columns (eg. (Unit) Cost and (Unit) Price columns) and the right justify icon for other numerical columns (eg. Quantity).
- Place any totalling header cell wording in other areas of the spreadsheet page.
- Enter the first line of data, noting along the row that the format of the cells make sense.
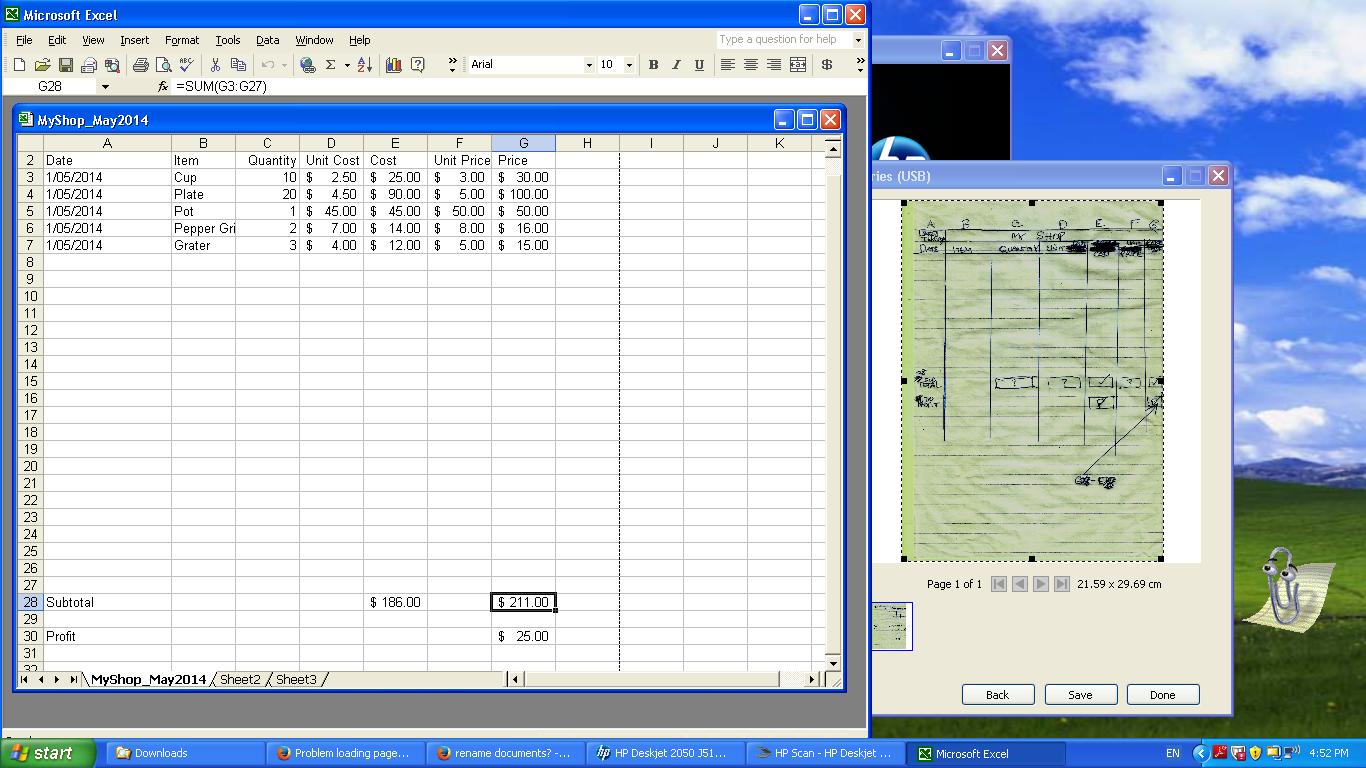
- For each of the totalling cells, click on that cell and hit the ∑ “sum of” icon, place the cursor to the right of the entry textbox and hit the Enter key. We did this for the ∑ “sum of” Cost and the ∑ “sum of” Price.
- If there is another level of totalling, as we have here with the “Profit” cell, hit the cell, hit the ∑ “sum of” icon to prime it with a formula and amend (in our case the formula ends up as “=(G28-E28)” (ie. profit = ∑ “sum of” Price minus ∑ “sum of” Cost)).
- Get all this correct and from then on, further data entries can be made and these totalling cells will be automatically updated.
- Once happy with all your data entered, use File->Save As to save the spreadsheet file to whichever format you wish (see today’s tutorial data as xls and csv and htm).
Please take a look at a session (on Windows, but please note you can get Mac versions of Excel as well) of doing the steps above on our MyShop_May2014 spreadsheet. One practical way to improve and streamline the practical use of this spreadsheet of this tutorial, would be to apply formulae to the Cost and Price columns, because by the time these are reached with your data entry you could formularize the Cost as Quantity x Unit Cost and formularize the Price as Quantity x Unit Price.
Excel is part of the Microsoft Office suite of software and here is a download link.
Here is a good link for Microsoft Excel training resources at this link.
If this was interesting you may be interested in this too.


