Here’s our aim today …
We fill out a timesheet in its hardcopy form, for which our supply has reached one. Our recipient does not have to have “Original Document” resolution, but the timesheet, in digital form, must be readable, and of suitable printout resolution.
Our printer has no scanner.
But we have …
1) iPhone (with its Camera app and Mail app and, optionally, its Photos app)
2) MacBook Pro (with its Mail app and Preview app)
3) Brother HL-L2375DW (laser printer with no scanner, but can be set up (as) Wireless(ly connected) and can work with AirPrint (please refer to Mac AirPrint Wireless Printing Tutorial))
… and before we start, we want to point out that an iOS mobile app such as the “Genius Scan” one tried out at Genius Scan App PDF Email Tutorial could be an alternative to the solution we ended up with. But we are keen to explain a method “out of the (3) box(es)” of the three pieces of equipment above.
And before we (try to re-)start we must explain that the discovery, at least for us, that AirPrint printouts were too dark could be catered with, by having an iOS image editor that can adjust Brightness and Contrast for images, could be another alternative as well. This alternative, like the Genius Scan one, may not need the MacBook Pro piece of equipment, above, at all.
So, what did we do, where “up the garden path” bits will be over to the right?
| Step Description | Optional “up the garden path” Bits That Happened For Us |
|---|---|
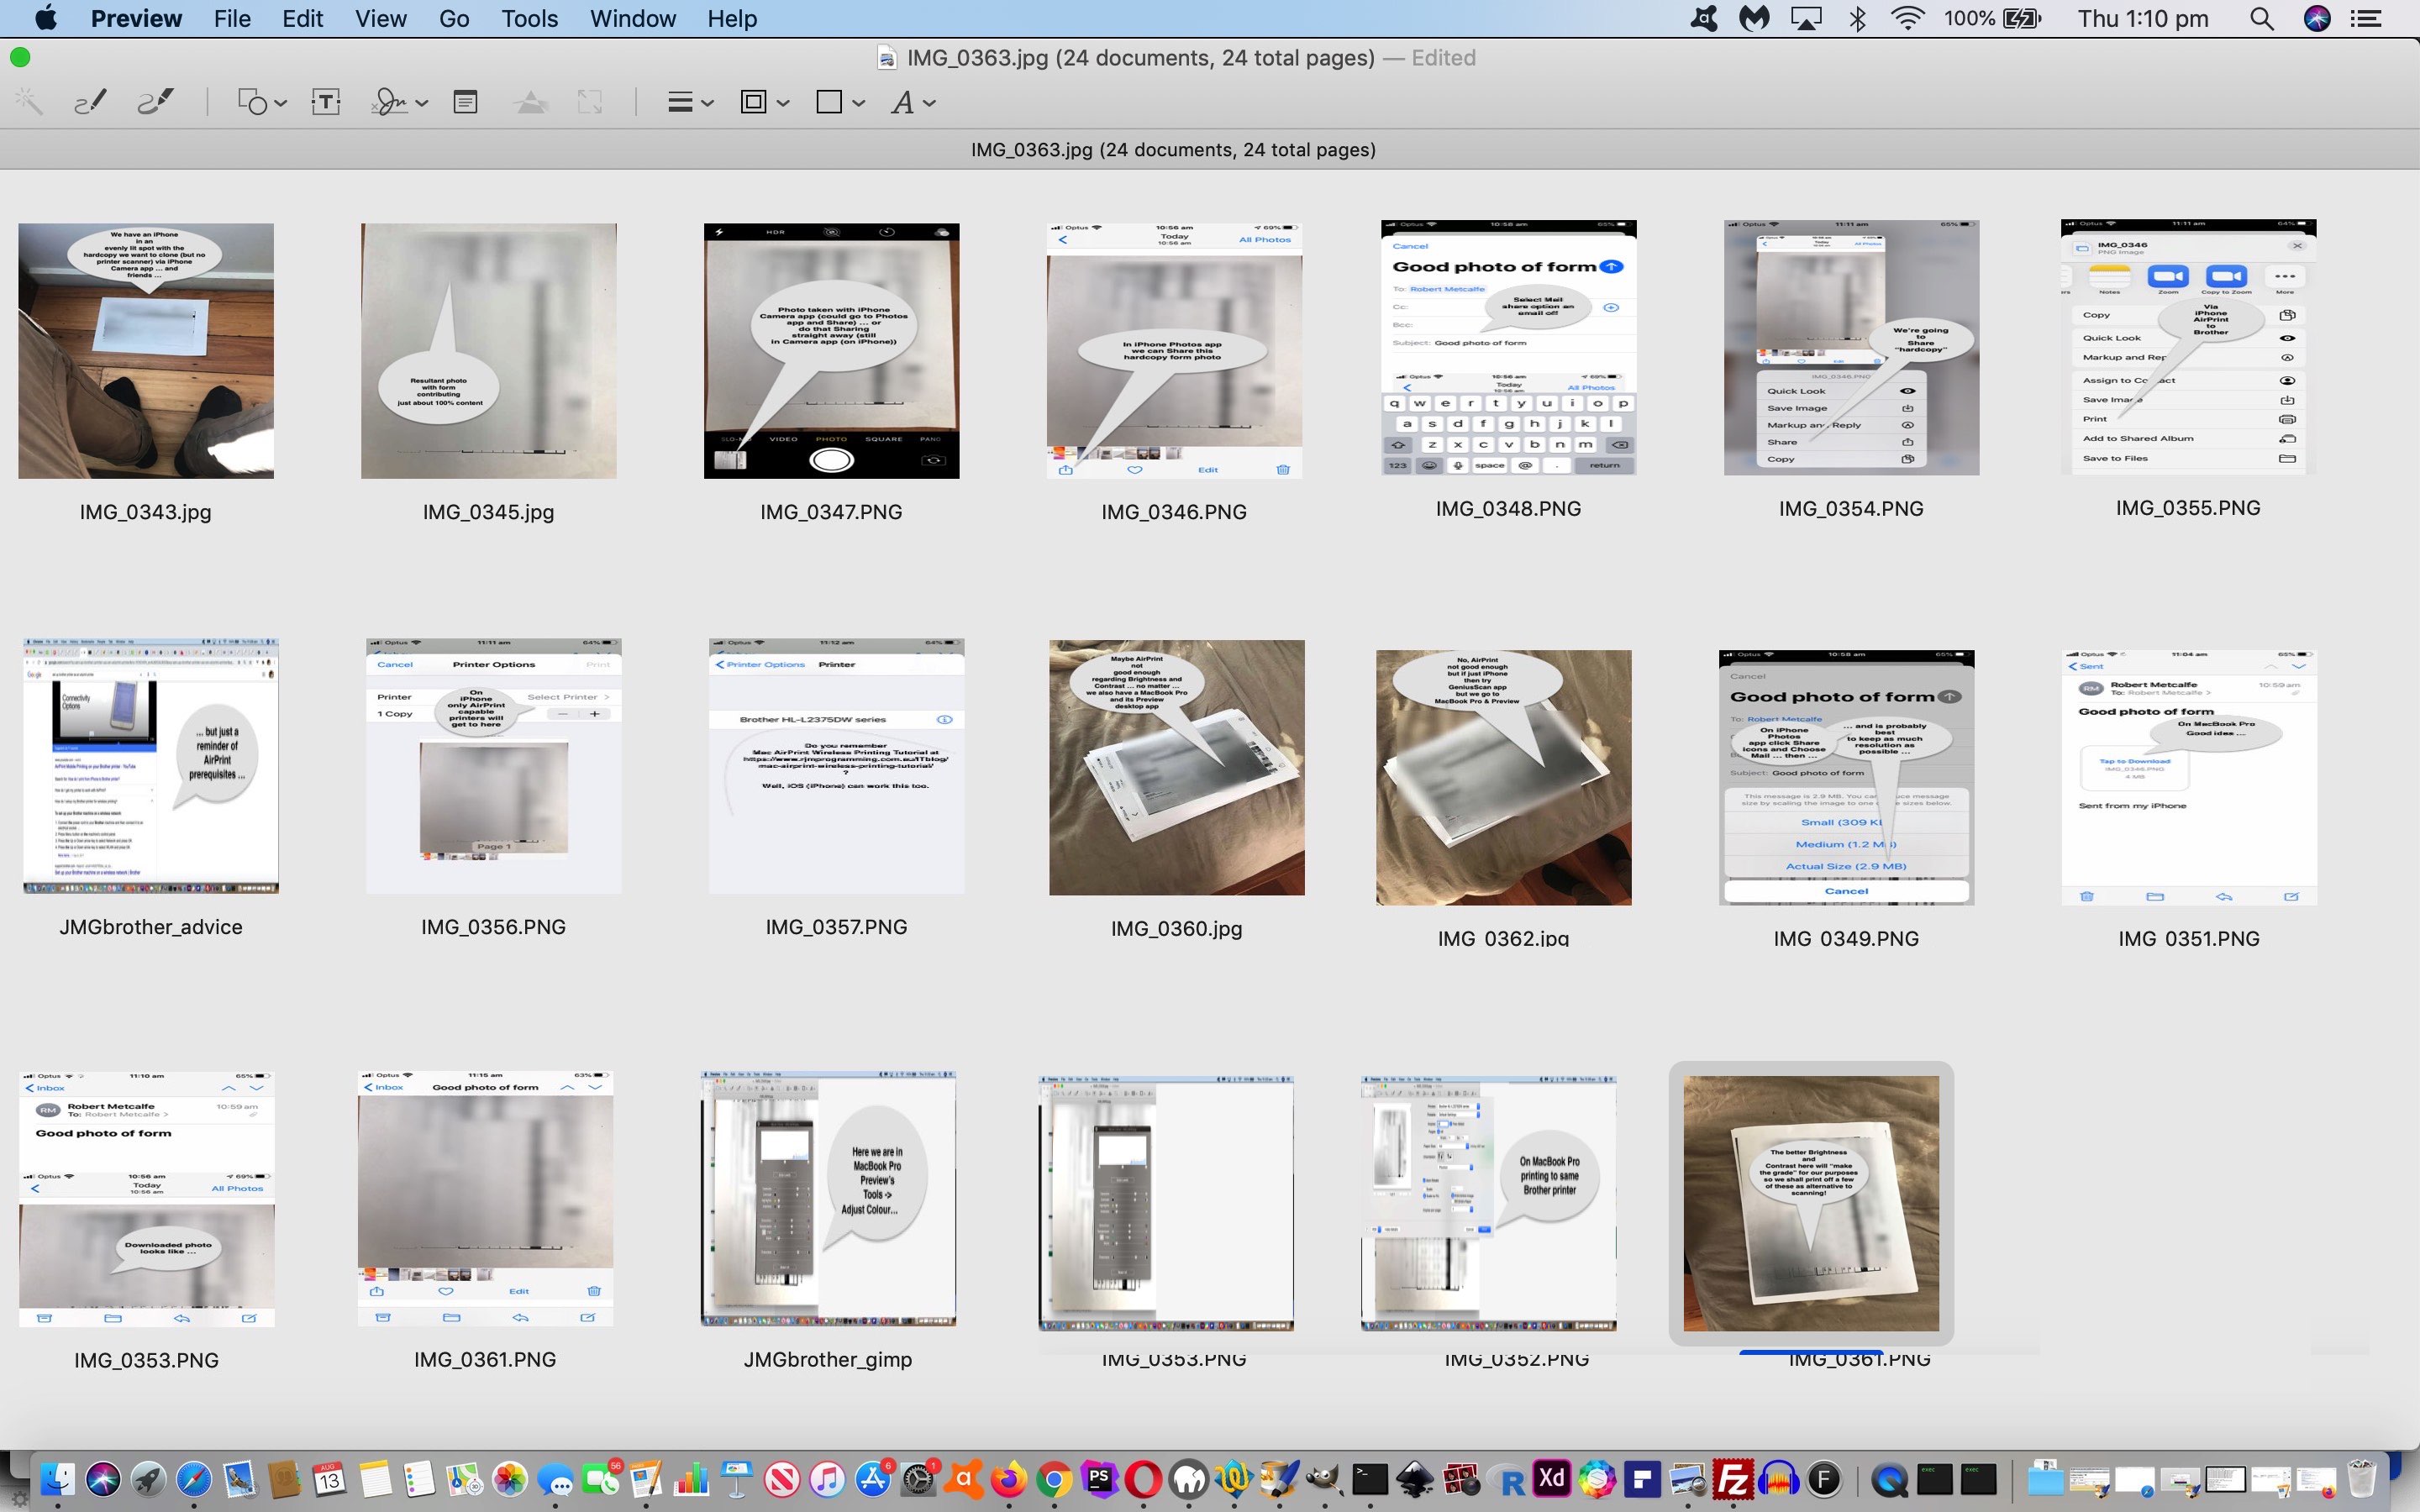
| Take the last hardcopy timesheet form and lie it down on evenly well lit spot on floor below and comfortable to photograph from above (could use a tripod system) |
|
| With iPhone Camera app position photo framing form close to completely within view |
|
| Still within iPhone Camera app touch photo just taken to reach Share functionality |
Bit of a waste of time is to open the Photos app to get to Share functionality |
| Choose Mail option and email to myself |
Choose Print option and select Brother HL-L2375DW (turned on, and set up for Wireless, and iPhone talks to it via AirPrint) but we discovered the printouts to be too dark |
| On MacBook Pro in its Mail app we open the email with attachment that is the timesheet form photo and choose to Download this |
|
| Open the Downloaded image in Preview and choose Tools -> Adjust Colours… Brightness and Contrast and Sharpness to look clear as a hardcopy form to fill in with pen then use File -> Print… (several copies, more than likely) to print to the same Brother HL-L2375DW printer as hardcopy and then (after filling one form in with pen, took) with the iPhone Camera app in “Photo” mode a photograph to email off to the recipient |
… which you can view with today’s PDF presentation.
Previous relevant Genius Scan App PDF Email Tutorial is shown below.
The raw camera functionality on an iPad is amazing, but short of using stands or rigging up a tripod, its capabilities resolution wise for the scanning of filled out forms can be questionable. We’ve been wanting to do a bit of this recently, and found that the iPad’s Genius Scan (mobile) app we introduced at this blog with Genius Scan App Primer Tutorial (when using it to organize some recipes) could succeed (where raw iPad camera functionality couldn’t (at least for us)) …
- get the qualities of photograph resolutions required to see “clearly enough” (the emailee complained about the resolution using native iPad Camera work only) filled out form data
- could assemble into the one PDF several scans (meant to be together) in the one document … and then …
- share that PDF document by, in our case, emailing it off, to an emailee (ie. recipient)
Cute, huh?!
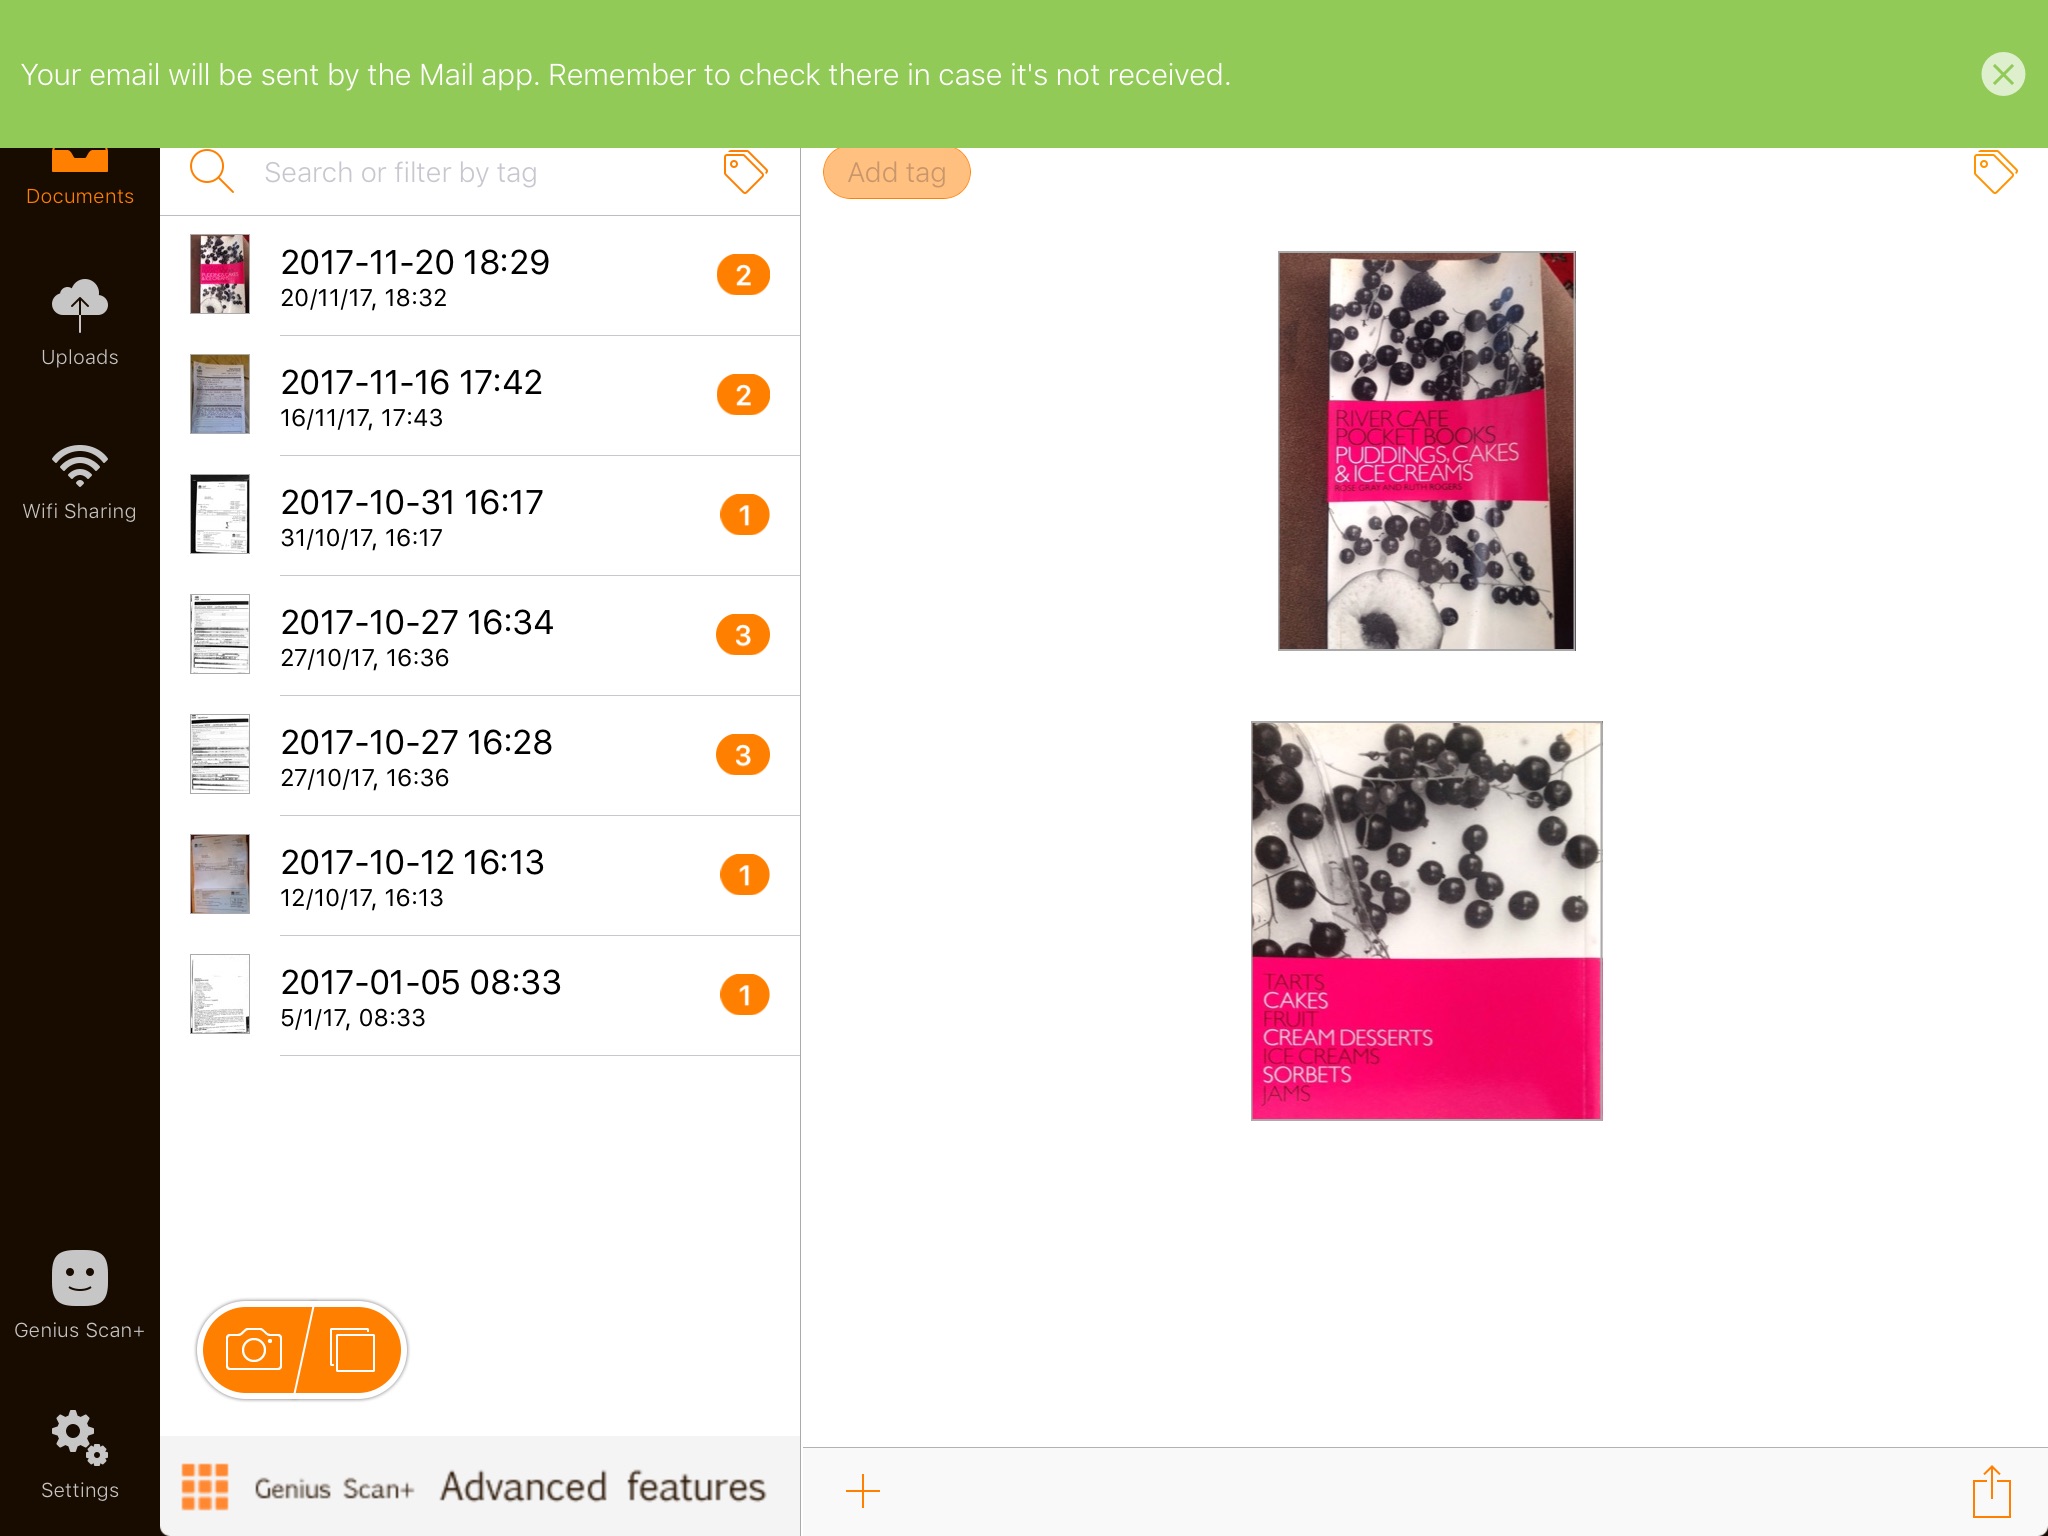
Today’s PDF slideshow created back on a MacBook Pro’s Preview desktop application illustrates these basic steps (for a two page PDF email attachment) …
- If not installed already install the iOS Genius Scan app onto an iPad (in our case, but should work on an iPhone too) via a search of the App Store app for “Genius” … then touch that icon on the iPad desktop to open “Genius Scan” (mobile) app
- Touch Camera icon
- When form (or other “subject” 1) lined up click the “Shutter” icon
- Save to a New Document
- Touch Camera icon
- When form (or other “subject” 2) lined up click the “Shutter” icon
- Save to a Existing Document
- Touch that newest Existing Document to open it … so that we can …
- Touch the Share icon down at the bottom right
- In the Export window that opens up touch the Email icon … which opens a …
- Email window with the usual To: CC:/BCC: Subject: Body: filled with the Genius Scan PDF as an email attachment … so we …
- Fill out the relevant fields as above and touch the Send “button” up the top left … at which point we can …
- Use the iPad’s Home button to bid farewell to the Genius Scan (mobile) app … and in our case open our iPad’s Mail app to view the email ourselves (because we sent it to ourselves)
Pretty efficient really?!
Previous relevant Genius Scan App Primer Tutorial is shown below.
When you come across a great mobile application it can be a great boon to your relationship with computer equipment. And if it links hardcoded material to the online world all the better. Do you remember when we talked about QR Codes with QR Codes Writer Primer Tutorial? Well, today, with our tutorial about the great iOS mobile application called Genius Scan (and you can just type “Genius” at the App Store application to find it) it feels a bit like the QR Code creation way a mobile device takes a photo of something that is then used to do something else. That “something else” today is that that photo, perhaps of some hardcoded material, can be turned into a PDF by the Genius Scan app and shared, in our case today, by email.
Around our house we used the Genius Scan app to photograph a loose collection of recipes, in poor condition, and centralise (via reprinting) them via …
- If not installed already install the iOS Genius Scan app onto an iPad (in our case, but should work on an iPhone too) via a search of the App Store app for “Genius” …
- Take photos of the loose collection of recipes and store them as PDFs on the iPad
- Another user, meanwhile, has a USB memory stick ready using a MacBook Pro (and in our case we used the Finder application to two finger gesture in the root folder arrived at by clicking the USB Disk and two finger gesturing a New Folder called Recipes)
- In batches, email (up to about 11, in our case, of) these off to an email address accessed by a user using a MacBook Pro, and we used a web browser session of Gmail for this
- Click Download all Attachments to a zip file in the Downloads folder (of MacBook Pro)
- Click the zip file creating a new folder within the Downloads folder
- Click that new folder to open its contents
- Click (ie. tap) top file
- Two finger gesture to Copy all these as you click/tap last file
- Click USB folder (and in our case we also click Recipes sub folder)
- Two finger gesture Paste files to USB
- Repeat from “In batches …” above until all done
- Take the USB to Officeworks serve yourself document printing machine, in a similar way, but with photos that last time, that we visited good ol’ Officeworks when we presented Holiday Snaps Printing Primer Tutorial as shown below (and the other thing we’ve learnt since then is that they can recycle some of your old printers if you drop it off at their store)
- We found it was too much trouble to do one printout per click for $1.00 Australian per sheet and instead got help from an Officeworks employee to put all the 121 files into a batch job at $0.80 cents per printout … voila …
A good result all round!
Previous relevant Holiday Snaps Printing Primer Tutorial is shown below
We had occasion to think about USB Memory Sticks the other day, perhaps a hardware device on the list of ones in danger of slipping away from relevance if we keep moving on in the mobile device and cloud storage direction.
The history of removable media started a long time ago even before the first Windows, back at DOS, and can remember some Wang 8 inch floppies. Back then it was a lot to do with a very finite amount of disk space reflecting when I.T. was more about “real word” processing, rather than, so much, graphical processing. Nowadays, with removable media, and the relatively modern … but for how long? … memory stick holding several gigabytes of media storage, usually, there are media formatting requirements now that have moved on from the default Windows media formatting supporting a File Allocation Table (FAT) file system.
We’ll get to what’s better to use regarding a USB memory stick media formatting arrangement later, but for now, what happens if you …
- in Windows or DOS get to a formatting Window and choose to format a USB memory stick of 2gB capacity, for example in “MS-DOS (FAT)” format … or …
- in Mac OS X Applications -> Utilities -> Disk Utility -> Selected USB memory stick of 2gB capacity -> Erase tab -> Format -> MS-DOS (FAT)
… well, respectively …
- it will have been formatted to have the disk space of a 3 1/4 inch floppy, it looks like, and work on Windows and DOS and Mac OS X
- it will have been formatted to have the disk space of a 3 1/4 inch floppy, it looks like, and work on Mac OS X and Windows and DOS
… which is okay but kind of wasteful, in the context of a removable USB 2gB memory stick we wanted to use to store about 320 holiday “snaps” and get printed out. We have these scenarios possible in a house half Mac OS X and half Windows.
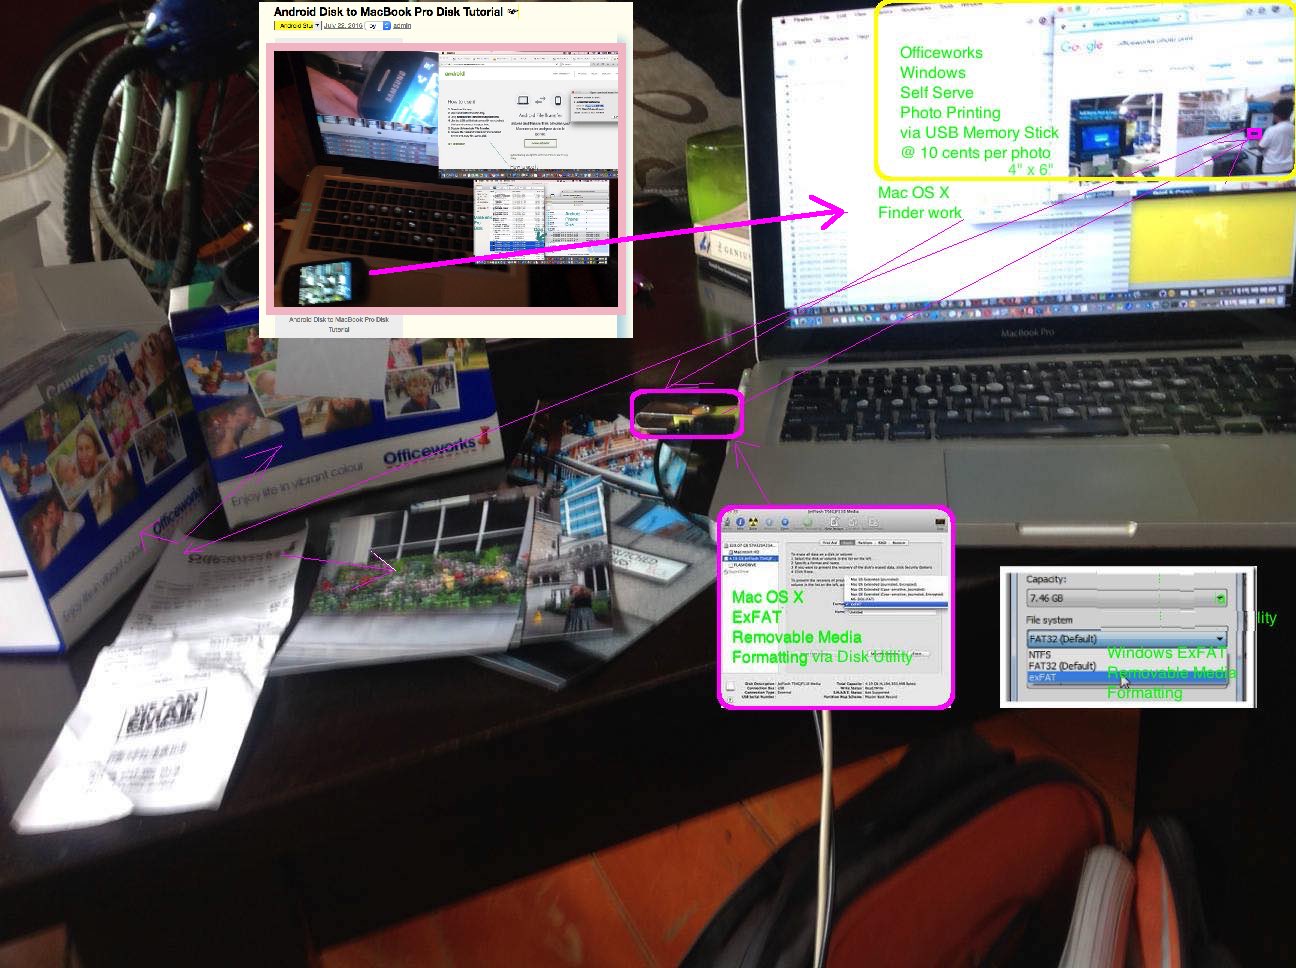
So here’s the bit of the tutorial where we can’t help but advertise. Officeworks, with various branches here in Sydney, print 4″ x 6″ photo prints, satin or glossy, at 10 cents per photo. Pretty good, huh? And this can even be done Dragging and Dropping photos online, but up to 20mB, that is. Our 320 holiday “snaps” represented considerably more, and more than for any “MS-DOS (FAT)” file system arrangement, that would get taken for a Same Day do it yourself at a Windows personal computer, with your own USB memory stick arrangement.
So, what is the go to …
- use the full capacity of the USB memory stick
- be able to fit 320 photos onto the USB memory stick
- for normal day to day use, be able to use it on any Mac OS X or Windows computer around the house
- have a workable and readable USB memory stick to use at the Officeworks photo printing Do It Yourself Windows personal computers
… having seen unreadable USB memory sticks, at Officeworks Windows personal computers using “in Mac OS X Applications -> Utilities -> Disk Utility -> Selected USB memory stick of 2gB capacity -> Erase tab -> Format -> Mac OS Extended (Journaled)” formatting?
Well, I asked the Fat Controller … of course … what do you take me for? … and they said …
“ExFat” DotDotDot
manperson
… and, lo and behold … not having registered its existence before … there it was as an option achieving both as per …
- in Windows or DOS get to a formatting Window and choose to format a USB memory stick of 2gB capacity, for example in “exFAT” format … or …
- in Mac OS X Applications -> Utilities -> Disk Utility -> Selected USB memory stick of 2gB capacity -> Erase tab -> Format -> ExFAT
… resulting in, respectively …
- it will have been formatted to have the disk space of its 2gB full capacity, it looks like, and work on Windows and DOS and Mac OS X
- it will have been formatted to have the disk space of its 2gB full capacity, it looks like, and work on Mac OS X and Windows and DOS
So, a happy solution for some holiday “snap” printing, and the ongoing less wasteful use of a USB 2gB memory stick on Windows or Mac OS X, on computers around the house. We show some of these ideas with our tutorial picture today.
To read more about getting the photos to the MacBook Pro laptop from the Android phone, please read, below, the techniques from Android Disk to MacBook Pro Disk Tutorial.
Previous relevant Android Disk to MacBook Pro Disk Tutorial is shown below.
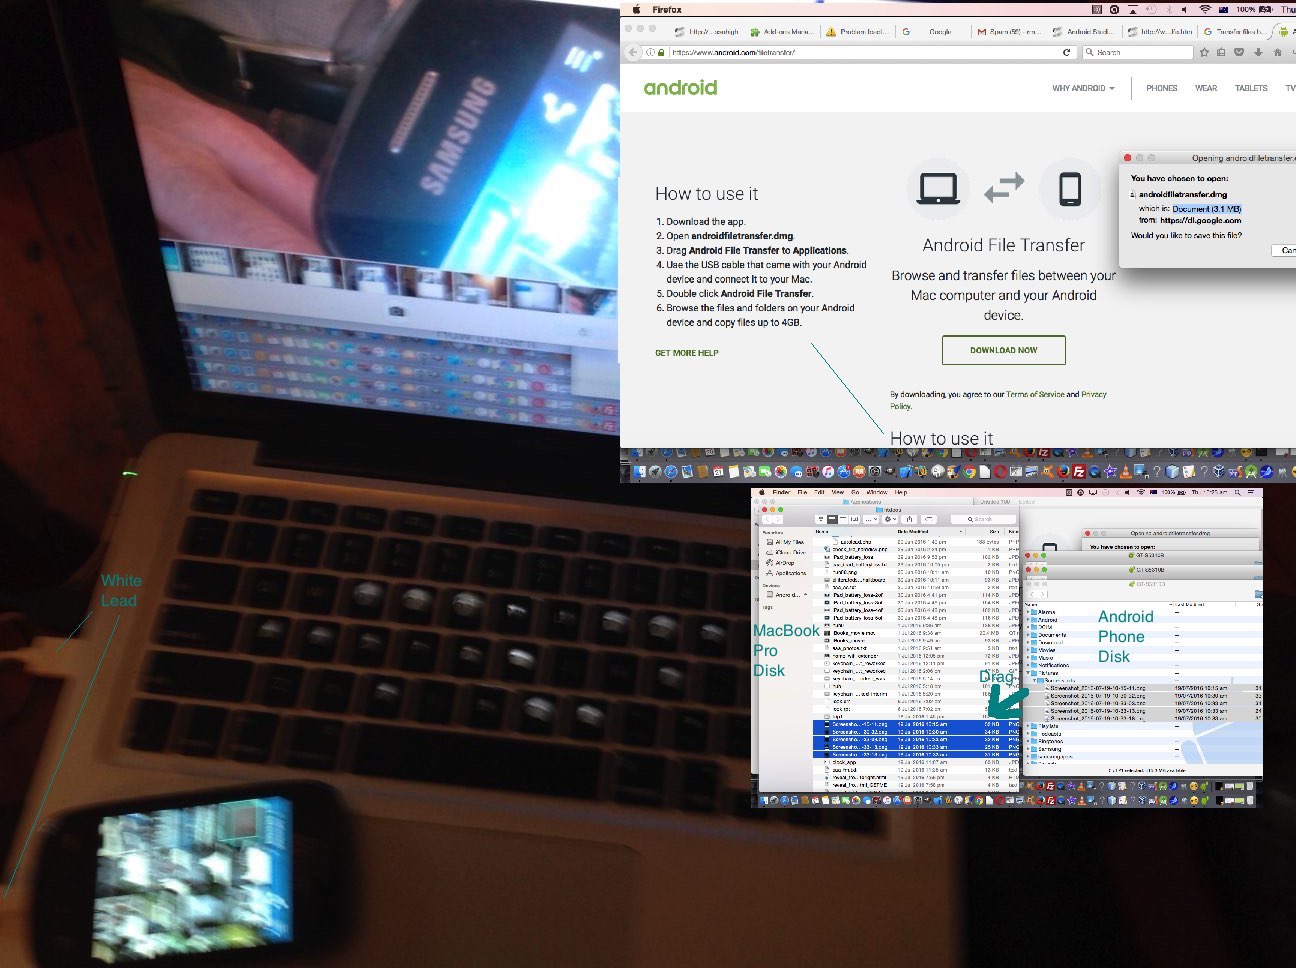
We love it here when we can tell you of something that works across the “big brands”, and what we mean by the two “big brands” today is Google (regarding their Android mobile phone operating system) and Apple (regarding their Mac OS X MacBook Pro laptop operating system). Today we transfer files from the Android mobile phone to our MacBook Pro laptop disk via …
- (ubiquitous) white lead … called a Micro USB Connector … the same one we used for Android Studio Real Physical Device Tutorial as shown below
- some great Mac OS X software we discovered at Android File Transfer
For Share ideas that involve your Android mobile phone and storing media on a local hard disk this could be a great alternative to other Share options for the MacBook Pro and some of the ideas we presented with Android Camera to Mac iPhoto Primer Tutorial.
Today’s tutorial picture shows you the setup for this functionality, and you’ll see the online advice for how you work the Mac OS X application for the Android File Transfer application.
Previous relevant Android Studio Real Physical Device Tutorial is shown below.
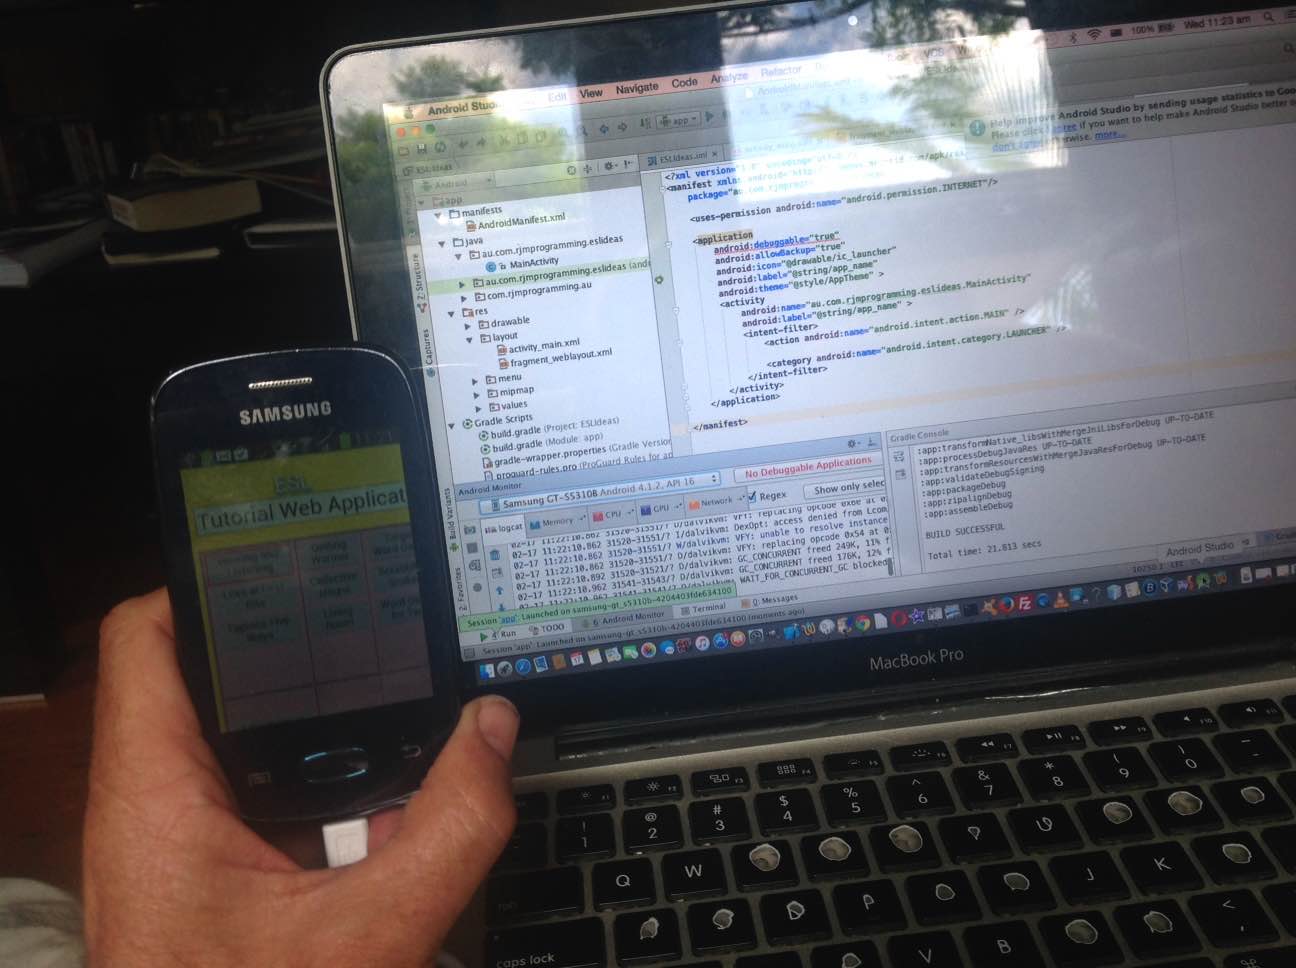
When creating Android apps with Android Studio IDE (or any other IDE, for that matter) it’s great to test the working of the app with various mobile phone and tablet emulators with AVD, and it’s even “greater” to extend that to testing on a real physical device.
Today, we’re going to work with …
- MacBook Pro testing that latest Android app using an Android Studio IDE project which we talked about with Android Studio on Mac OS X Primer Tutorial regarding “ESL Ideas”
- another (ubiquitous) white lead … called a Micro USB Connector … but not Muc, pleeeeease … decided against the puce one because it just didn’t go with the cushions … but we digress
- Samsung GT-S5310B Android 4.1.2 mobile phone … and, today of all days the “4.1.2” is a bit significant … because we want to talk about ant builds … but we digress
The (ubiquitous) white lead goes from the MacBook Pro’s USB port to the “underbelly” of the Samsung GT-S5310B.
One thing to do at the “computer” Android Studio end of the lead is to adjust AndroidManifest.xml to show android:debuggable="true" now.
Now if you’re on Windows I’d have more to say about the “computer” end of the lead, and if that is you, and you’ve never tested on a real device, you’ll want to read this great Google Android Studio page.
Come to think of it, everybody who’s never tested on a real device should read Google Android Studio page. See the advice about Android 4.2 … note that … ie. if the Settings menu’s submenu Developer Options is all grayed out tap on Build number (via Settings->About device) seven times … and “twice on the pipe, if the answer is noooooooooo” … but we digress.
However, we have a mobile phone with Android 4.1.2 … and so … this search got me to this great advice … and the consequent turning on of the Settings->Developer Options “switch” to on meant … Bob’s your uncle, Fanny’s your aunt … Android Studio responded like a … like a … well … a very hot studio.
A “Run App” will default to hooking up to this connected physical device (the Samsung GT-S5310B) and run the resultant mobile app on that device.
Previous relevant Android Studio on Mac OS X Primer Tutorial is shown below.
There are a lot of choices of IDE for creating mobile applications, and if you are a developer wanting to develop mobile apps for both Android and iOS platforms, you may be looking to try to set up an environment where all this can be achieved on the one piece of computer equipment.
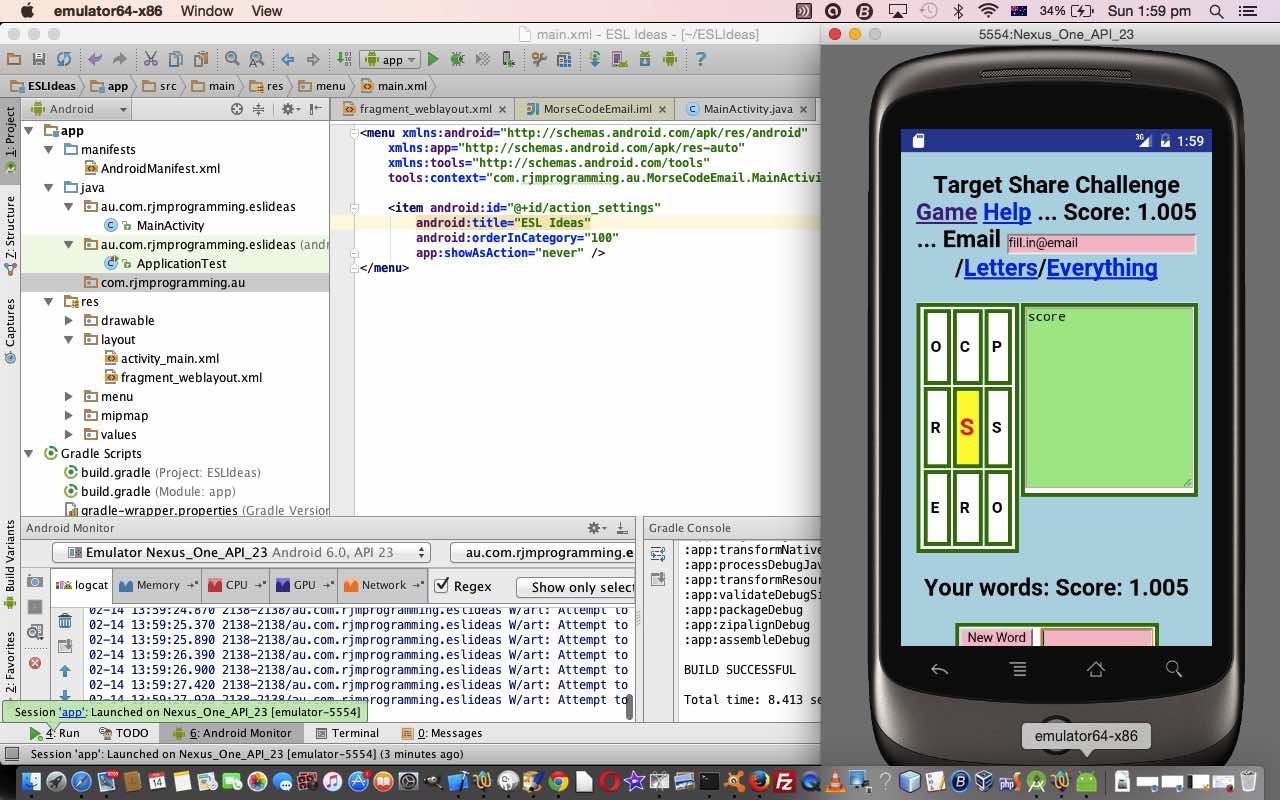
We prefer to think in terms of two IDEs handling the two mobile app types of iOS, with Swift and/or Objective-C as the source language, and Android, with Java as the source language. We don’t mind there being two separate IDEs involved, but we find it amazing enough that they can both sit on the one MacBook Pro laptop without resorting to any Operating System disk partitions. With the Android app, using Mac OS X (MacBook Pro) we asked Google if it could be done, and came up with the marvellous Android Studio IDE as a possibility … yay!
- iOS mobile apps get created via the Xcode IDE using Swift and/or Objective-C on a Mac OS X (MacBook Pro)
- Android apps get created via the Android Studio IDE using Java on a Mac OS X (MacBook Pro)
Today’s tutorial, as with the WordPress 4.1.1’s Android Studio on Mac OS X Primer Tutorial, hones in on that second idea from the install of Android Studio (to a MacBook Pro) through to the “middle game” emulation of an Android app via Android Studio and AVD onto an HTC Nexus One.
Please don’t think this is the only approach … and please research PhoneGap (PhoneGap iOS Mobile Xcode Primer Tutorial) and jQuery Mobile (jQuery Mobile Primer Tutorial) and Embarcadero (Delphi Pascal++ Embarcadero XE6 Primer Tutorial) also, perhaps for an approach that uses other ways of looking at the issue.
In the context of all this, we see the Android app “end game” as involving the creation of an .apk file that can be uploaded to Google Play for public access.
Similarly to our associated Android Studio Google Play Ready Primer Tutorial as shown below, today, the concepts in the Android Studio project regarding the “middle game”, comparing it to the Eclipse IDE (Eclipse Android App Google Play Ready Primer Tutorial), for which huge help came from this great link … thanks … are, again, for our “ESL Ideas” Android mobile app (which “channels” our project, recently, started with HTML/Javascript Themed Supervision Primer Tutorial) of today …
- Fragments – components of the Android UI … and setting of startup fragment of interest … fragment_weblayout.xml … fragments go some way to addressing that common issue for mobile developers that all the UI elements of a mobile application fit and would ideally be displayed with a tablet but it would be best to only conditionally display some when it comes to using a smaller format mobile device such as an Android mobile phone device
- Main Java in MainActivity.java … similar to Eclipse
- Layout in activity_main.xml … similar to Eclipse
- WebView … similar to Eclipse … allows an Internet web component in your Android mobile app
- Use of
myWebView.getSettings().setJavaScriptEnabled(true);to allow Javascript functionality for the WebView - AndroidManifest.xml … INTERNET permission … similar to Eclipse … to Build->”Generate Signed APK…” for Google Play publishing you need the extra …
android:debuggable="false"clause - Tools->Android->AVD Manager … emulator organization and emulator deployment help … remains the case that it is best to start the emulator all the way to the home page at the simulated device (right swipe unlocking any locks you get) … then run and attach your mobile app to this pre-established connection
You will be pleased to know that after the Android Studio install today, all is (still) well with Xcode on this Mac OS X (MacBook Pro) setup … we mostly like a happy ending … aaaaaaahhhhhhh!
Previous relevant Android Studio Google Play Ready Primer Tutorial is shown below.
Yesterday, with Android Studio Tic Tac Toe Game Tutorial as shown below, we reacquainted ourselves with Android Studio as an alternative IDE to Eclipse (and there are others too) to use the Android SDK and Java to develop mobile apps for an Android mobile device and in our aforesaid mentioned “start game”, “middle game” and “end game” view of mobile development we focussed on the “middle game”.
Today, we extend the “middle game” discussion of yesterday, with tutorial functionality touching on the “end game” with respect to Android Studio creating an Android mobile app on Google Play.
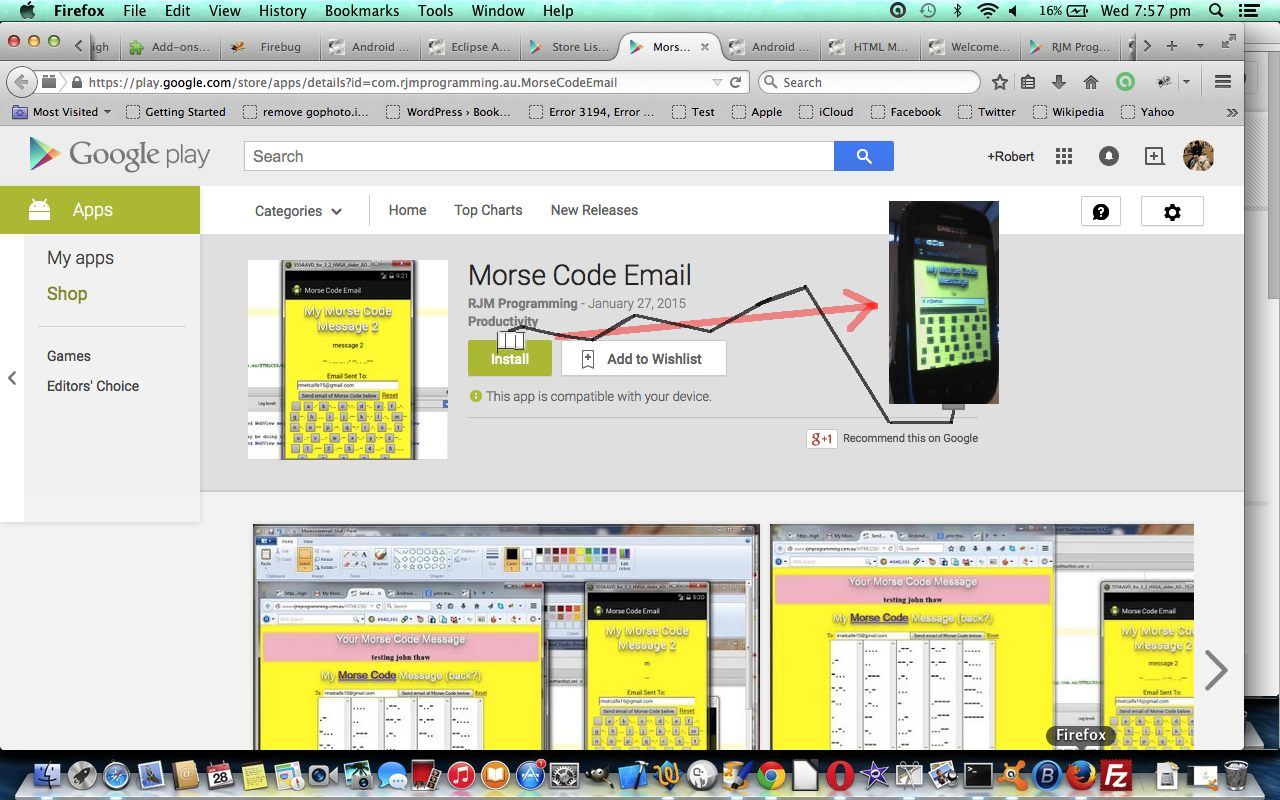
Wonder if you were around when we created the Morse Code emailer … HTML Morse Code Primer Tutorial? Well, today, we turn that into an Android mobile application using Android Studio, and publish it to Google Play for general “consumption” by the public.
So what are some of the concepts in the Android Studio project regarding the “middle game”, for which huge help came from this great link … thanks …
- Fragments – components of the Android UI … and setting of startup fragment of interest … fragments go some way to addressing that common issue for mobile developers that all the UI elements of a mobile application fit and would ideally be displayed with a tablet but it would be best to only conditionally display some when it comes to using a smaller format mobile device such as an Android mobile phone device
- Layout in activity_main.xml … similar to Eclipse
- WebView … similar to Eclipse … allows an Internet web component in your Android mobile app
- Use of
myWebView.getSettings().setJavaScriptEnabled(true);to allow Javascript functionality for the WebView - AndroidManifest.xml … INTERNET permission … similar to Eclipse … to Build->”Generate Signed APK…” for Google Play publishing you need the extra …
android:debuggable="false"clause - Tools->Android->AVD Manager … emulator organization and emulator deployment help … remains the case that it is best to start the emulator all the way to the home page at the simulated device (right swipe unlocking any locks you get) … then run and attach your mobile app to this pre-established connection
Source code wise, of interest to the “middle game”, is …
Before leaving the “middle game” thoughts, sometimes you need to adjust the code of a WebView’s innards (especially) if you want to do away with any “Back” or “Forward” button mobile application functionality, because any escape from the WebView’s control is that mobile application being effectively lost for that session. As such, the Morse Code programming HTML source code became morsecode.html (… and how we got there morsecode.html …) and the method of creating the email was made to use a PHP piece of supervised code as per morsecode.php (with a live run non-mobile web page link) to cater for Android mobile WebView compatibility … and thanks to this useful link.
And what of the “end game”? … Would direct you to the imagery of today’s tutorial … a lot of it covers the same ground as the “Eclipse” corresponding scenario tutorial called Eclipse Android App Google Play Ready Primer Tutorial.
Just to challenge you with a “middle, end, start order” … have a look at some information regarding Android Studio mobile development and the “start game” … Android Studio Primer Tutorial.
Hope this is food for thought for your Android mobile development plans! See the results of the work today at Google Play.
Previous relevant Android Studio Tic Tac Toe Game Tutorial is shown below.
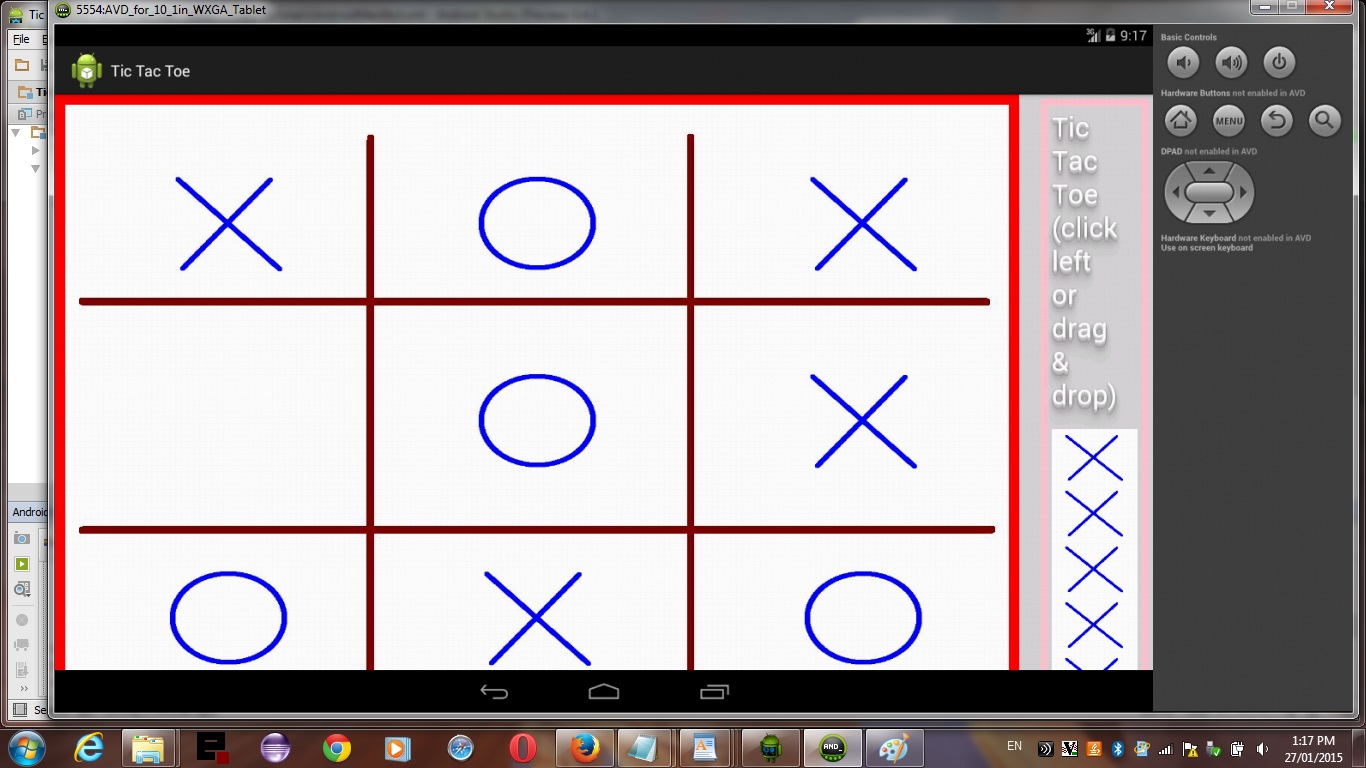
Wonder if you were around when we created Tic Tac Toe (or more like Noughts and Crosses, in Australia) using the HTML5 Canvas element and drag and drop methods (if you liked, or just plain box clicking, otherwise, which will be okay for mobile usage) … HTML/Javascript Canvas Tic Tac Toe Game Drag and Drop Tutorial as shown below? Well, today, we turn that into an Android mobile application using Android Studio.
Android Studio is an alternative IDE to Eclipse (and there are others too) to use the Android SDK and Java to develop mobile apps for an Android mobile device and in our aforesaid mentioned “start game”, “middle game” and “end game” view of mobile development we are just showing you the “middle game” today, but if you were to follow through … fore!!!!!!!! … and not shank … and not hook (ie. narrrrrrr … chortle, chortle) … then we may end up at Google Play with a mobile app … by the way, we talk about the “end game” at Eclipse Android App Google Play Ready Primer Tutorial (Android Studio has all this functionality and capability too).
So what are some of the concepts in the Android Studio project, for which huge help came from this great link … thanks …
- Fragments – components of the Android UI … and setting of startup fragment of interest … fragments go some way to addressing that common issue for mobile developers that all the UI elements of a mobile application fit and would ideally be displayed with a tablet but it would be best to only conditionally display some when it comes to using a smaller format mobile device such as an Android mobile phone device
- Layout in activity_main.xml … similar to Eclipse
- WebView … similar to Eclipse … allows an Internet web component in your Android mobile app
- Use of
myWebView.getSettings().setJavaScriptEnabled(true);to allow Javascript functionality for the WebView - AndroidManifest.xml … INTERNET permission … similar to Eclipse
- Tools->Android->AVD Manager … emulator organization and emulator deployment help … remains the case that it is best to start the emulator all the way to the home page at the simulated device (right swipe unlocking any locks you get) … then run and attach your mobile app to this pre-established connection
Source code wise, of interest, is …
So that’s a bit about the mobile world, and so concerning the innards of that WebView …
The Canvas HTML element tag can be used as the container to draw graphics on the fly usually via the use of Javascript functions for rendering and event management.
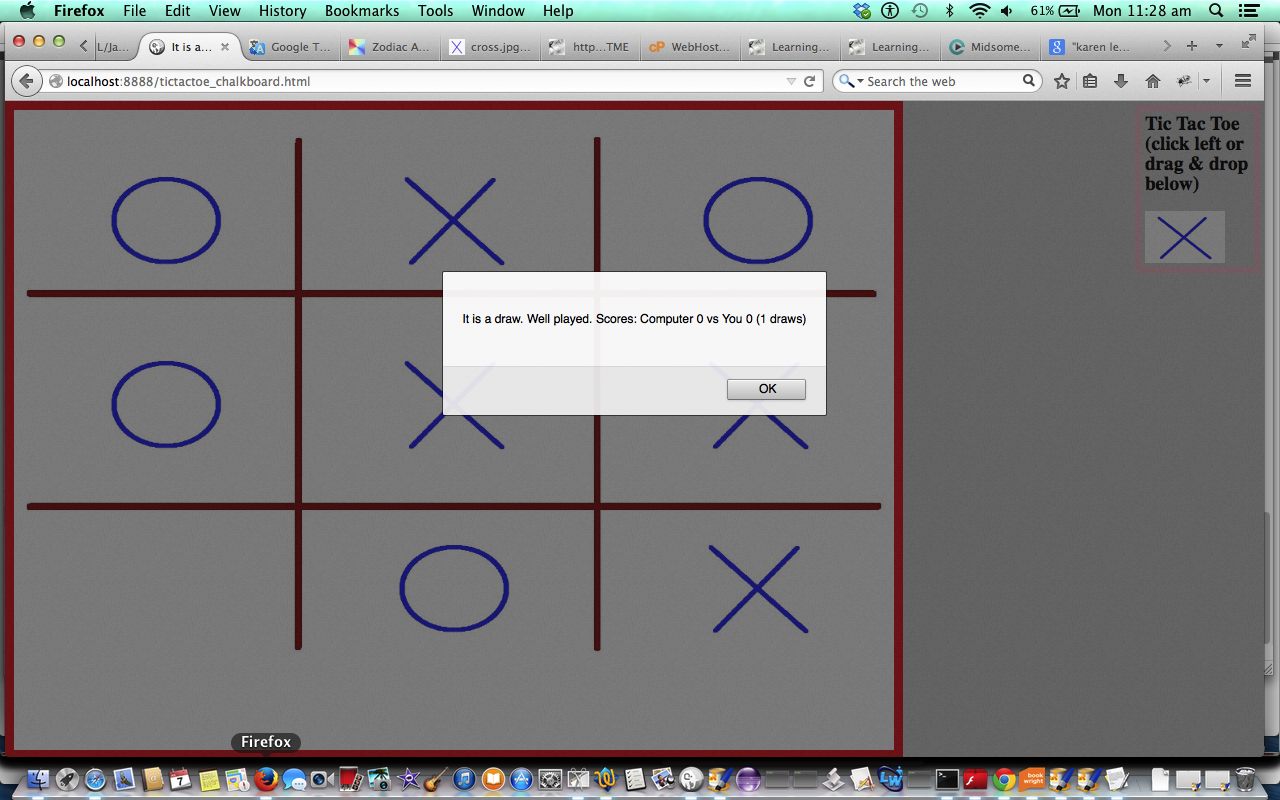
In today’s tutorial we show some image Drag and Drop functionality that you can use with the Canvas HTML5 element where we create a Tic Tac Toe game webpage. We thank w3schools for the great advice at this link.
The Drag and Drop does not work well on tablets, but for own Tic Tac Toe game today we allow either a drag and drop approach, or a touch/click approach.
You may want to read more at HTML Canvas Reference as a generic reference, or here, at the tutorial javascript – How do I add a simple onClick event handler to a canvas element? – Stack Overflow.
As you can imagine, this HTML canvas element, new to HTML5, can be very useful for some practical client-side web functionality.
Link to some downloadable HTML programming code … rename to tictactoe_chalkboard.html
You’ll notice heavy use of the Javascript Math.random() function.
We hope you enjoy this tutorial as a live run.
Should you find Tac Tac Toe (or even Noughts and Crosses) addictive you should see this … amazing!
Yes … you’ve reached the end … go first in each game and see if you can beat the computer!
Previous relevant HTML/Javascript Canvas Tic Tac Toe Game Drag and Drop Tutorial is shown below.
The Canvas HTML element tag can be used as the container to draw graphics on the fly usually via the use of Javascript functions for rendering and event management.
In today’s tutorial we show some image Drag and Drop functionality that you can use with the Canvas HTML5 element where we create a Tic Tac Toe game webpage. We thank w3schools for the great advice at this link.
The Drag and Drop does not work well on tablets, but for own Tic Tac Toe game today we allow either a drag and drop approach, or a touch/click approach.
You may want to read more at HTML Canvas Reference as a generic reference, or here, at the tutorial javascript – How do I add a simple onClick event handler to a canvas element? – Stack Overflow.
As you can imagine, this HTML canvas element, new to HTML5, can be very useful for some practical client-side web functionality.
Link to some downloadable HTML programming code … rename to tictactoe_chalkboard.html
You’ll notice heavy use of the Javascript Math.random() function.
We hope you enjoy this tutorial as a live run.
Should you find Tac Tac Toe (or even Noughts and Crosses) addictive you should see this … amazing!
Yes … you’ve reached the end … go first in each game and see if you can beat the computer!
If this was interesting you may be interested in this too.
If this was interesting you may be interested in this too.
If this was interesting you may be interested in this too.
If this was interesting you may be interested in this too.
If this was interesting you may be interested in this too.
If this was interesting you may be interested in this too.
If this was interesting you may be interested in this too.
If this was interesting you may be interested in this too.
If this was interesting you may be interested in this too.
If this was interesting you may be interested in this too.

