It’s MacBook Pro backup via Mac OS X’s Time Machine again, and the timing is into the afternoon. Although we are allowed to do other things while a Time Machine backup is occurring, today we’re going to call it quits, and let it run with the power connected for the 6 hours it says it is going to take. We’ll take a look the next morning. But what about the MacBook Pro going to sleep in the meantime? Perhaps the backup still works, or perhaps not. Better to try to keep the MacBook Pro awake, rather than its display and it falling asleep. Google?! Thanks for the heads up to this Apple webpage advice, thanks …
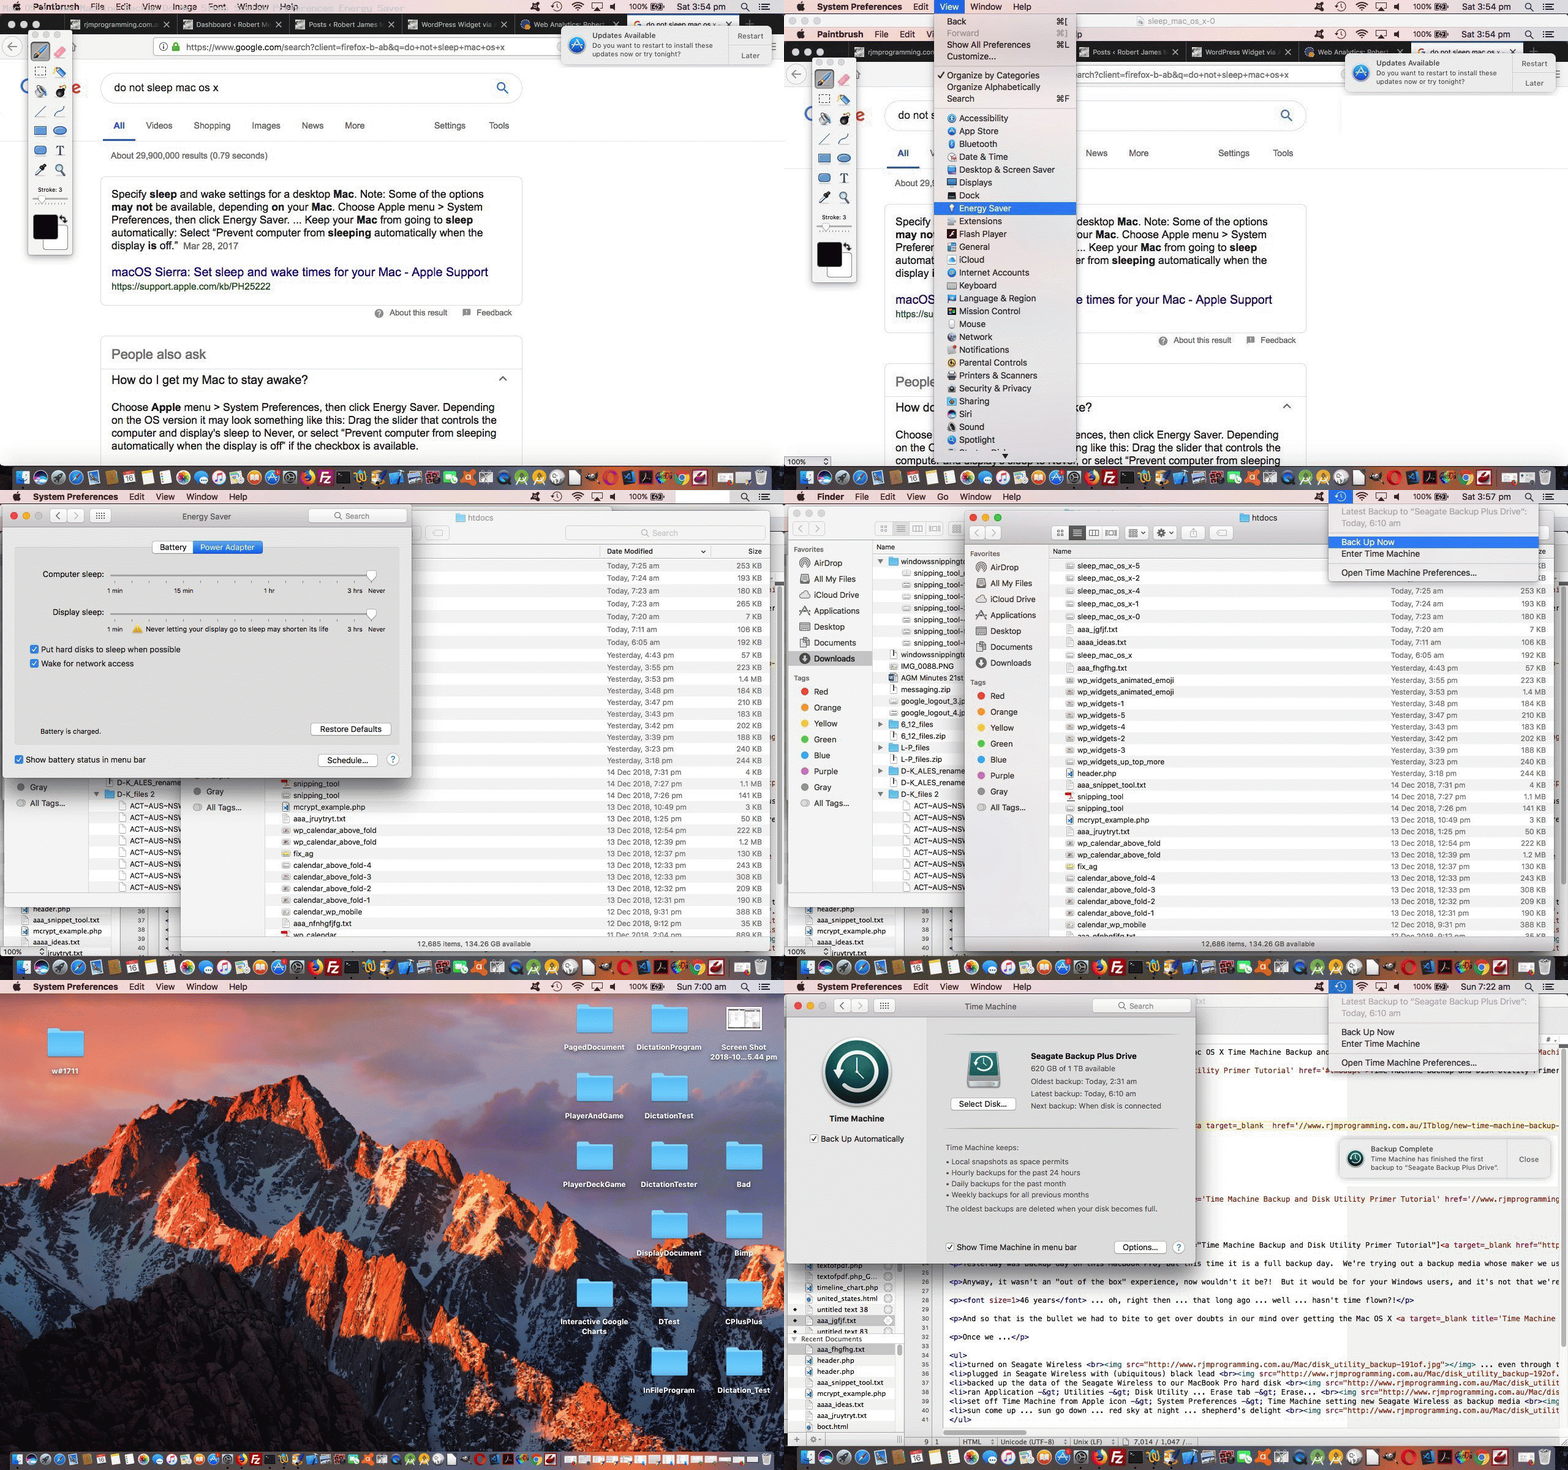
Choose Apple menu > System Preferences, then click Energy Saver
… was pertinent to us, and enough of a lead to give the macOS Sierra 10.12.6 advice …
- Choose Apple menu -> System Preferences
- Choose View menu -> Energy Saver
- Choose Power Adaptor tab
- Drag both Computer Sleep and Display Sleep to the far right “Never” setting (ie. never sleep)
Once you’ve done that, the rest of how the Mac OS X System Preferences Time Machine desktop application can work using a Seagate Backup external hard drive (but removable) as the backup media can be read below in among the thread of blog postings, the most recent being Restore of Time Machine Backup Primer Tutorial.
And yes, after some light entertainment, the next day the backup had been done ready to Eject the Seagate Backup external hard drive and to …
- Choose Apple menu -> System Preferences
- Choose View menu -> Energy Saver
- Choose Power Adaptor tab
- Drag both Computer Sleep and Display Sleep to the the setting one before 15 minutes
… to square the settings back to the way they were, which for the usual usage of the MacBook Pro, is fine.
Previous relevant Restore of Time Machine Backup Primer Tutorial is shown below.
You are more than likely like me, and respect the concept of “backup” of your work, like we talked about at Time Machine Backup and Disk Utility Primer Tutorial, but dread the day you’d ever have to “restore” that work.
Well, it happened to us, with a Mac Book Pro’s “hard disk” (but read more apt “solid state drive” name as per Solid State Drive Primer Tutorial) and we turned to a recent backup via the Mac OS X Time Machine application, using a Seagate Backup external hard drive.
In short, you have to be a bit patient with the “restore” phase to all this. It’s achievable, and we get happier with it by the “decaminute”, but with Mac OS X, desktop applications come in many shapes and forms and sources, and you’ll probably find that those emanating from the “net” should be individually copied from the Seagate Backup drive’s /Application folder to the MacBook Pro /Application folder application by application, using two Finder windows, one for the Seagate Backup source and another for the MacBook Pro destination.
Had a look around for Seagate Products to assist on “restore” but didn’t see any, though you should look for them yourself, if you are interested in this topic.
How does the Xcode IDE go with a restore? It’s okay with a …
- restore Applications folder Xcode via copy operation like above
- restore folder that Xcode stores its project files and resources in, in a similar way
For us, with our beloved MAMP we restored Applications folder MAMP folder tree via copy operation like above, then on restarting MAMP followed advice of Yosemite MAMP Issue Primer Tutorial, including a new Stop Press for it!
For us, with our TextWrangler we restored Applications folder TextWrangler, and then as far as the script for Blog Posting cloning, we needed to remake the Scripts directory as explained in WordPress Blog Posting AppleScript TextWrangler Helper Primer Tutorial.
As new applications you like are tried, remember to “Keep Them in Dock”.
You can watch a bit of a stream of consciousness PDF slideshow of how some of this panned out for us.
Previous relevant Time Machine Backup and Disk Utility Primer Tutorial is shown below.
Yesterday was backup day on this MacBook Pro, but this time it is a full backup day. We’re trying out a backup media whose maker we used before, Seagate, but a different product, namely Seagate Wireless, though we opted today for the external media via (ubiquitous) black lead … aren’t leads wonderful?! “Wake me up from this non-Wireless dream!”
Anyway, it wasn’t an “out of the box” experience, now wouldn’t it be?! But it would be for your Windows users, and it’s not that we’re complaining … far from it … but it did bring about the need to use a Mac OS X utility we generally try to avoid … Disk Utility. In our books, things have come “to a pretty pass” when you need Disk Utility, but then to calm the nerves … how long ago were we all going format a: (or even that old favourite format b: at the drop of a (Melbourne Cup) hat) … around about the same time they adjust interest rates … but we digress.
46 years … oh, right then … that long ago … well … hasn’t time flown?!
And so that is the bullet we had to bite to get over doubts in our mind over getting the Mac OS X Time Machine backup working with the Seagate Wireless and the MacBook Pro using Mac OS X … and we ventured in this direction not by reading the product instructions (who does that?! … this comment is unsponsored and completely out of order), but advice on the net, usually, from forums. But actually there is credence in my attitude … after all, after the product release, who uses these products and has problems or not … users … so thanks to all those contributors to forums and blogs … keep those cards and letters rolling in.
Once we …
- turned on Seagate Wireless
 … even through the box!
 - plugged in Seagate Wireless with (ubiquitous) black lead
 … you must have blinked
 - backed up the data of the Seagate Wireless to our MacBook Pro hard disk

- ran Application -> Utilities -> Disk Utility … Erase tab -> Erase…

- set off Time Machine from Apple icon -> System Preferences -> Time Machine setting new Seagate Wireless as backup media

- sun come up … sun go down … red sky at night … shepherd’s delight

… a completed backup does tend to ease the mind, and is a thing you could do, left alone, but powered, overnight. In this mode (of use), ironically, it takes a lot less time. Conversely, doing it while you work is possible, but the backup takes longer.
If this was interesting you may be interested in this too.
If this was interesting you may be interested in this too.
If this was interesting you may be interested in this too.


